My Go-To Sourdough Pizza Crust Recipe | Crisp Homemade Pizza Base
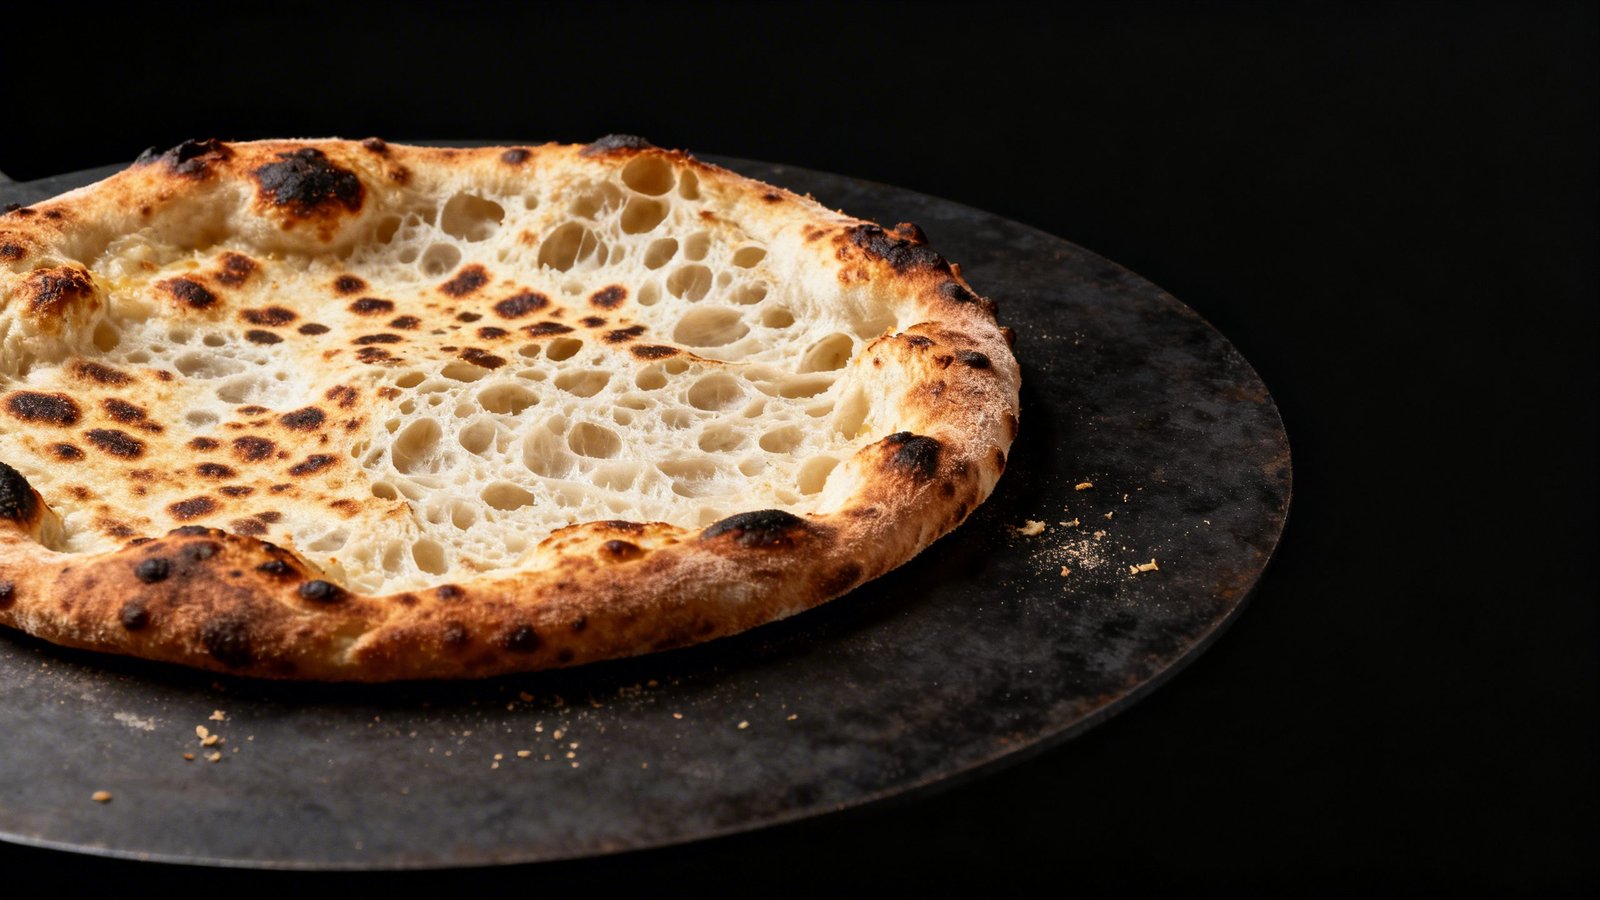
You know that perfect pizza crust you dream about—thin in the center, crisp at the edges, and full of flavor? That’s this sourdough pizza base. It brings that subtle tang you love, and when you bake it right, it shatters in the best way while still staying chewy where it counts. I make this dough weekly because it behaves, tastes amazing, and fits neatly into real life.
If you’re new to sourdough, don’t worry. I’ll walk you through an easy timeline, simple techniques, and practical tips so you can get consistent, pizzeria-level results at home. You’ll mix it the night before, shape when you’re ready, and pull beautifully blistered pizzas from your oven with almost zero stress.
Why This Sourdough Pizza Crust Works
- Long fermentation builds flavor: An overnight rest lets the dough develop that signature sourdough tang and aroma.
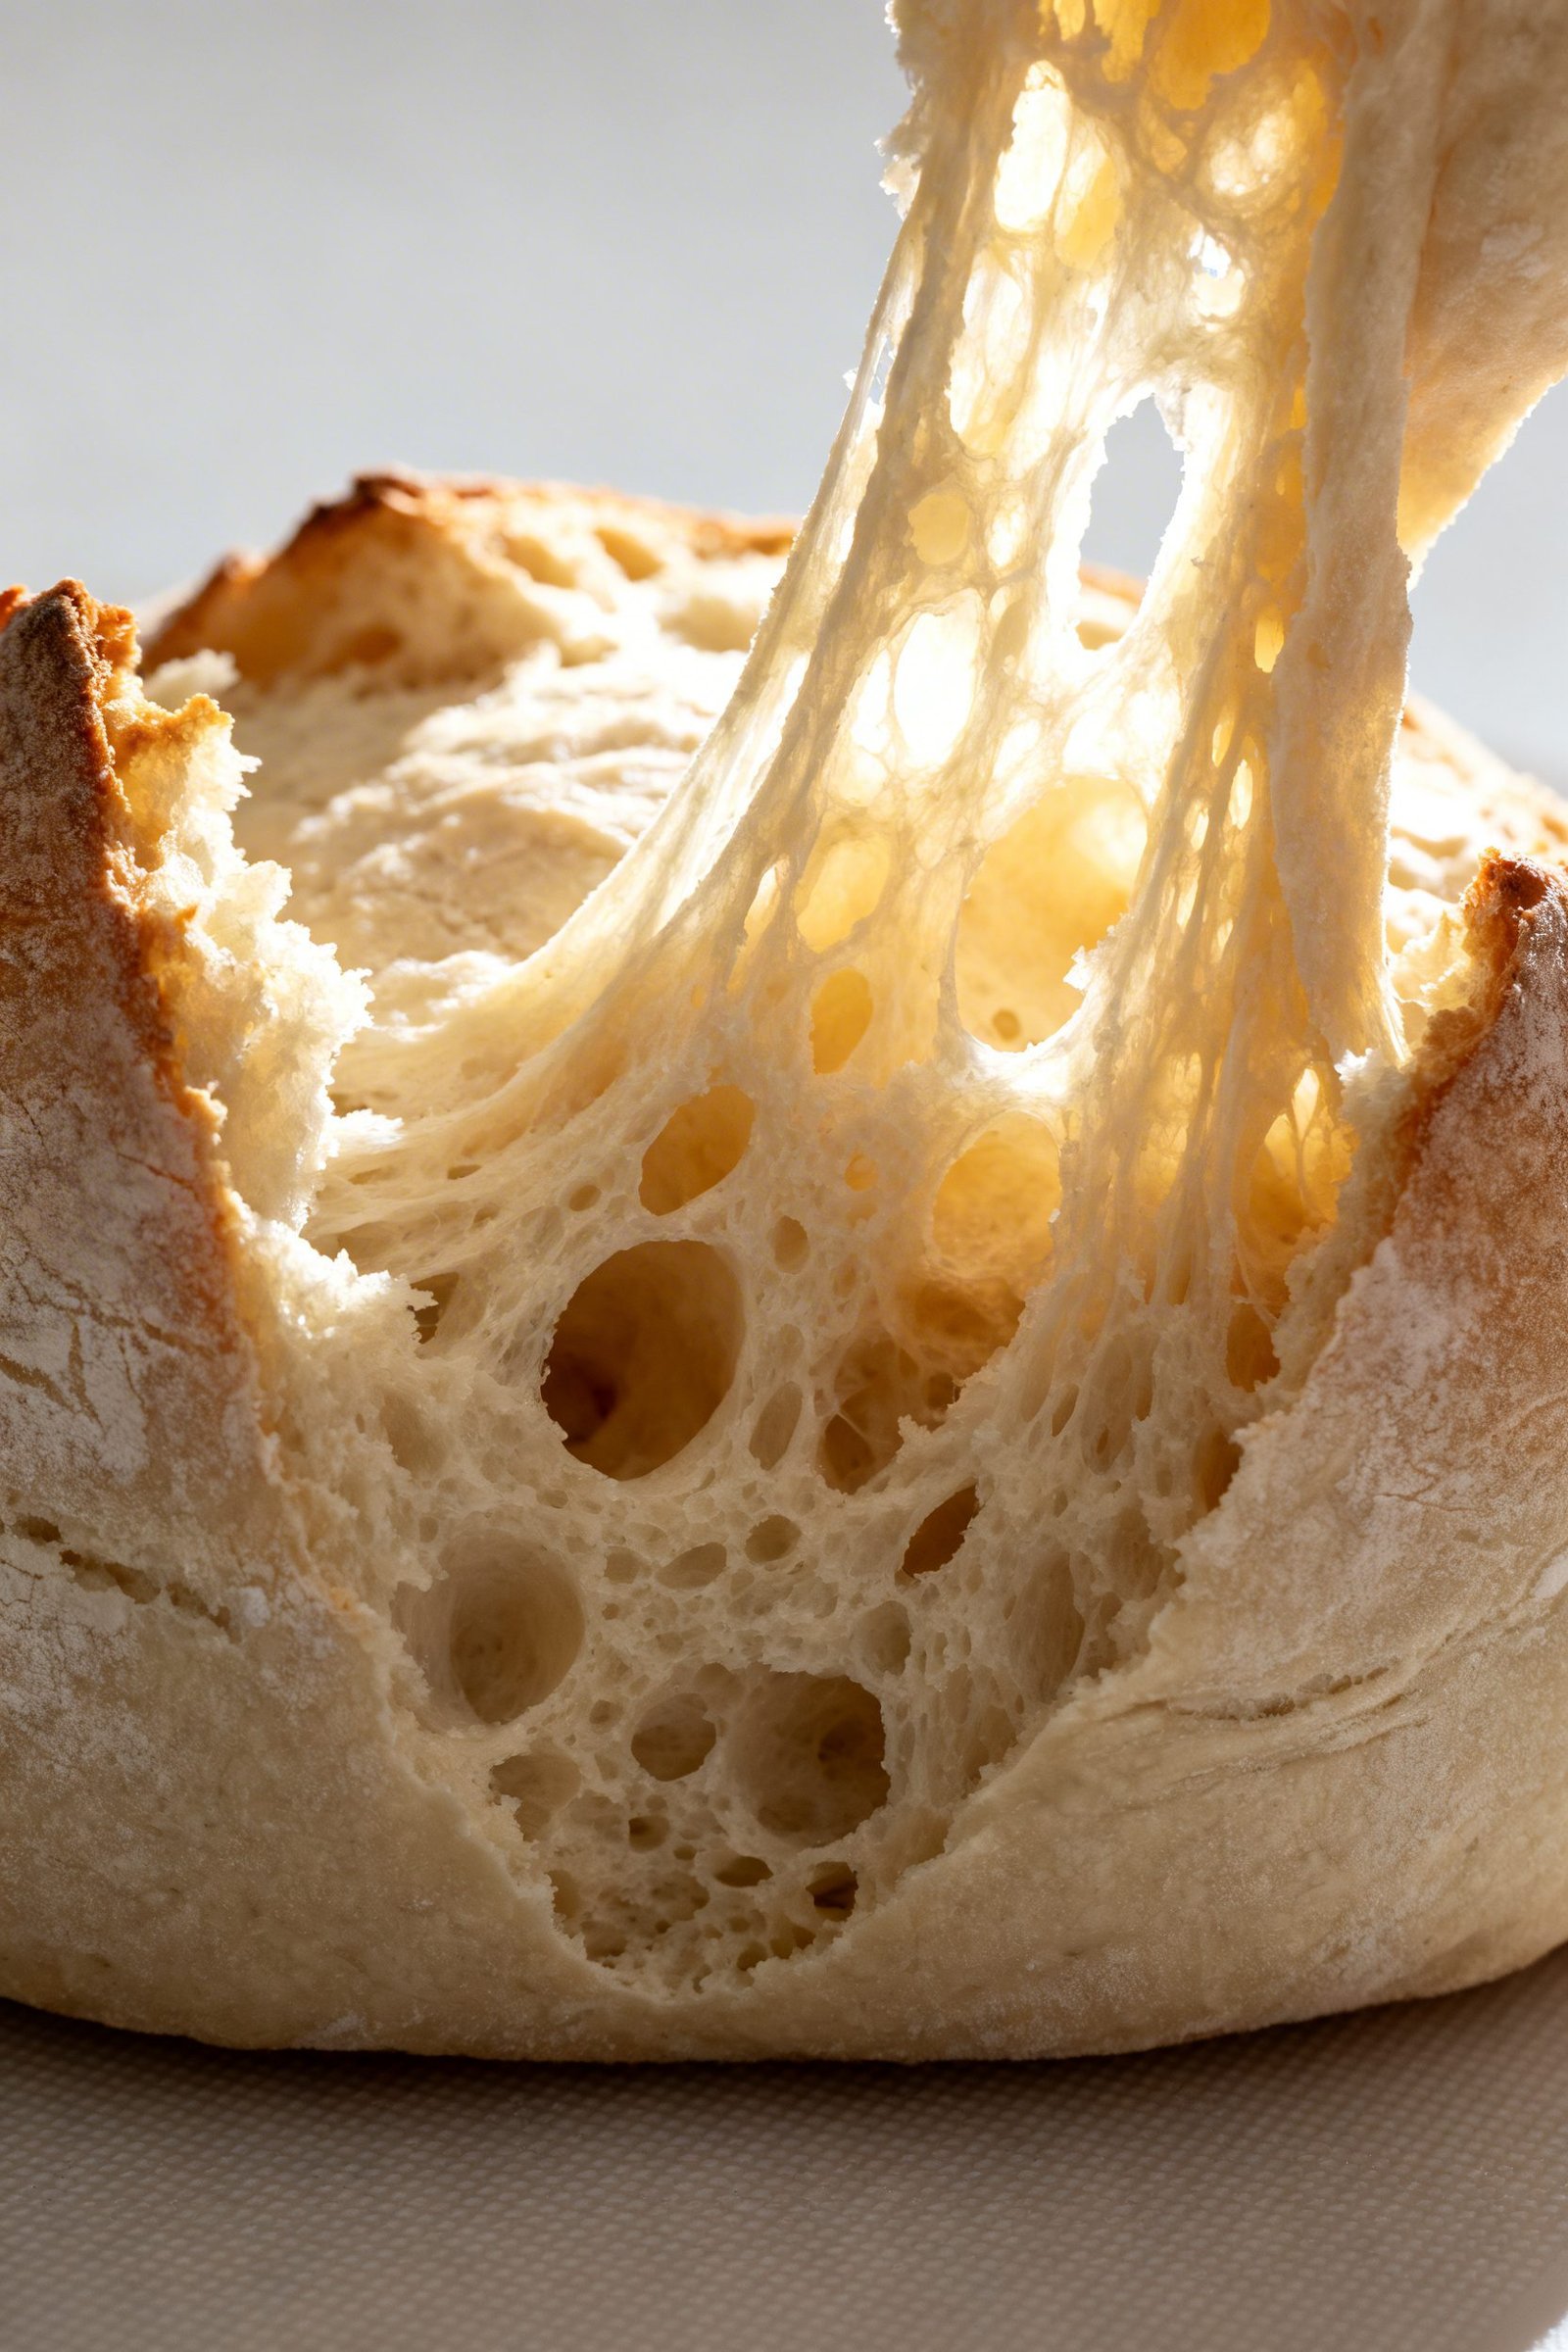
- High hydration gives crisp edges and light chew: Enough water means open crumb and oven spring while still keeping structure.
- Strong flour for strength: Bread flour (or a blend) handles stretching and helps you shape easily without tearing.
- Cold proof for flexibility: The fridge slows fermentation so you can bake when you want and still get great texture.
- Hot stone or steel for speed: A ripping-hot surface sets the crust fast for those blistered bottoms and crisp bite.
Ingredients
For the dough (2 large 12-inch pizzas or 3 smaller)
- 500 g bread flour (or 400 g bread flour + 100 g 00 flour)
- 325–340 g water, room temperature (65–68% hydration; start with 325 g, add more if needed)
- 120 g active, bubbly sourdough starter (100% hydration, fed 4–8 hours prior)
- 12 g fine sea salt
- 10 g olive oil (optional, for easier handling and a touch of tenderness)
For shaping and baking
- Extra flour or fine semolina for dusting
- Toppings of choice (sauce, cheese, veggies, cured meats, herbs)
How to Make This Sourdough Pizza Base
1) Mix and rest
- In a large bowl, whisk the flour and salt.
- Stir the starter into the water until mostly dissolved. Add olive oil if using.
- Combine wet and dry. Mix with a dough whisk or your hand until no dry spots remain. The dough will look shaggy—perfect.
- Cover and rest 20–30 minutes (autolyse). This rest jump-starts gluten development and makes the dough easier to handle.
2) Strengthen the dough
- Perform 3–4 sets of stretch-and-folds over 1.5–2 hours: every 30 minutes, wet your hand, lift one side of the dough, stretch up, and fold over. Rotate the bowl and repeat 3–4 times per set.
- By the final set, the dough should feel smoother, tighter, and elastic. If it still feels slack, add one extra fold set after another 30 minutes.
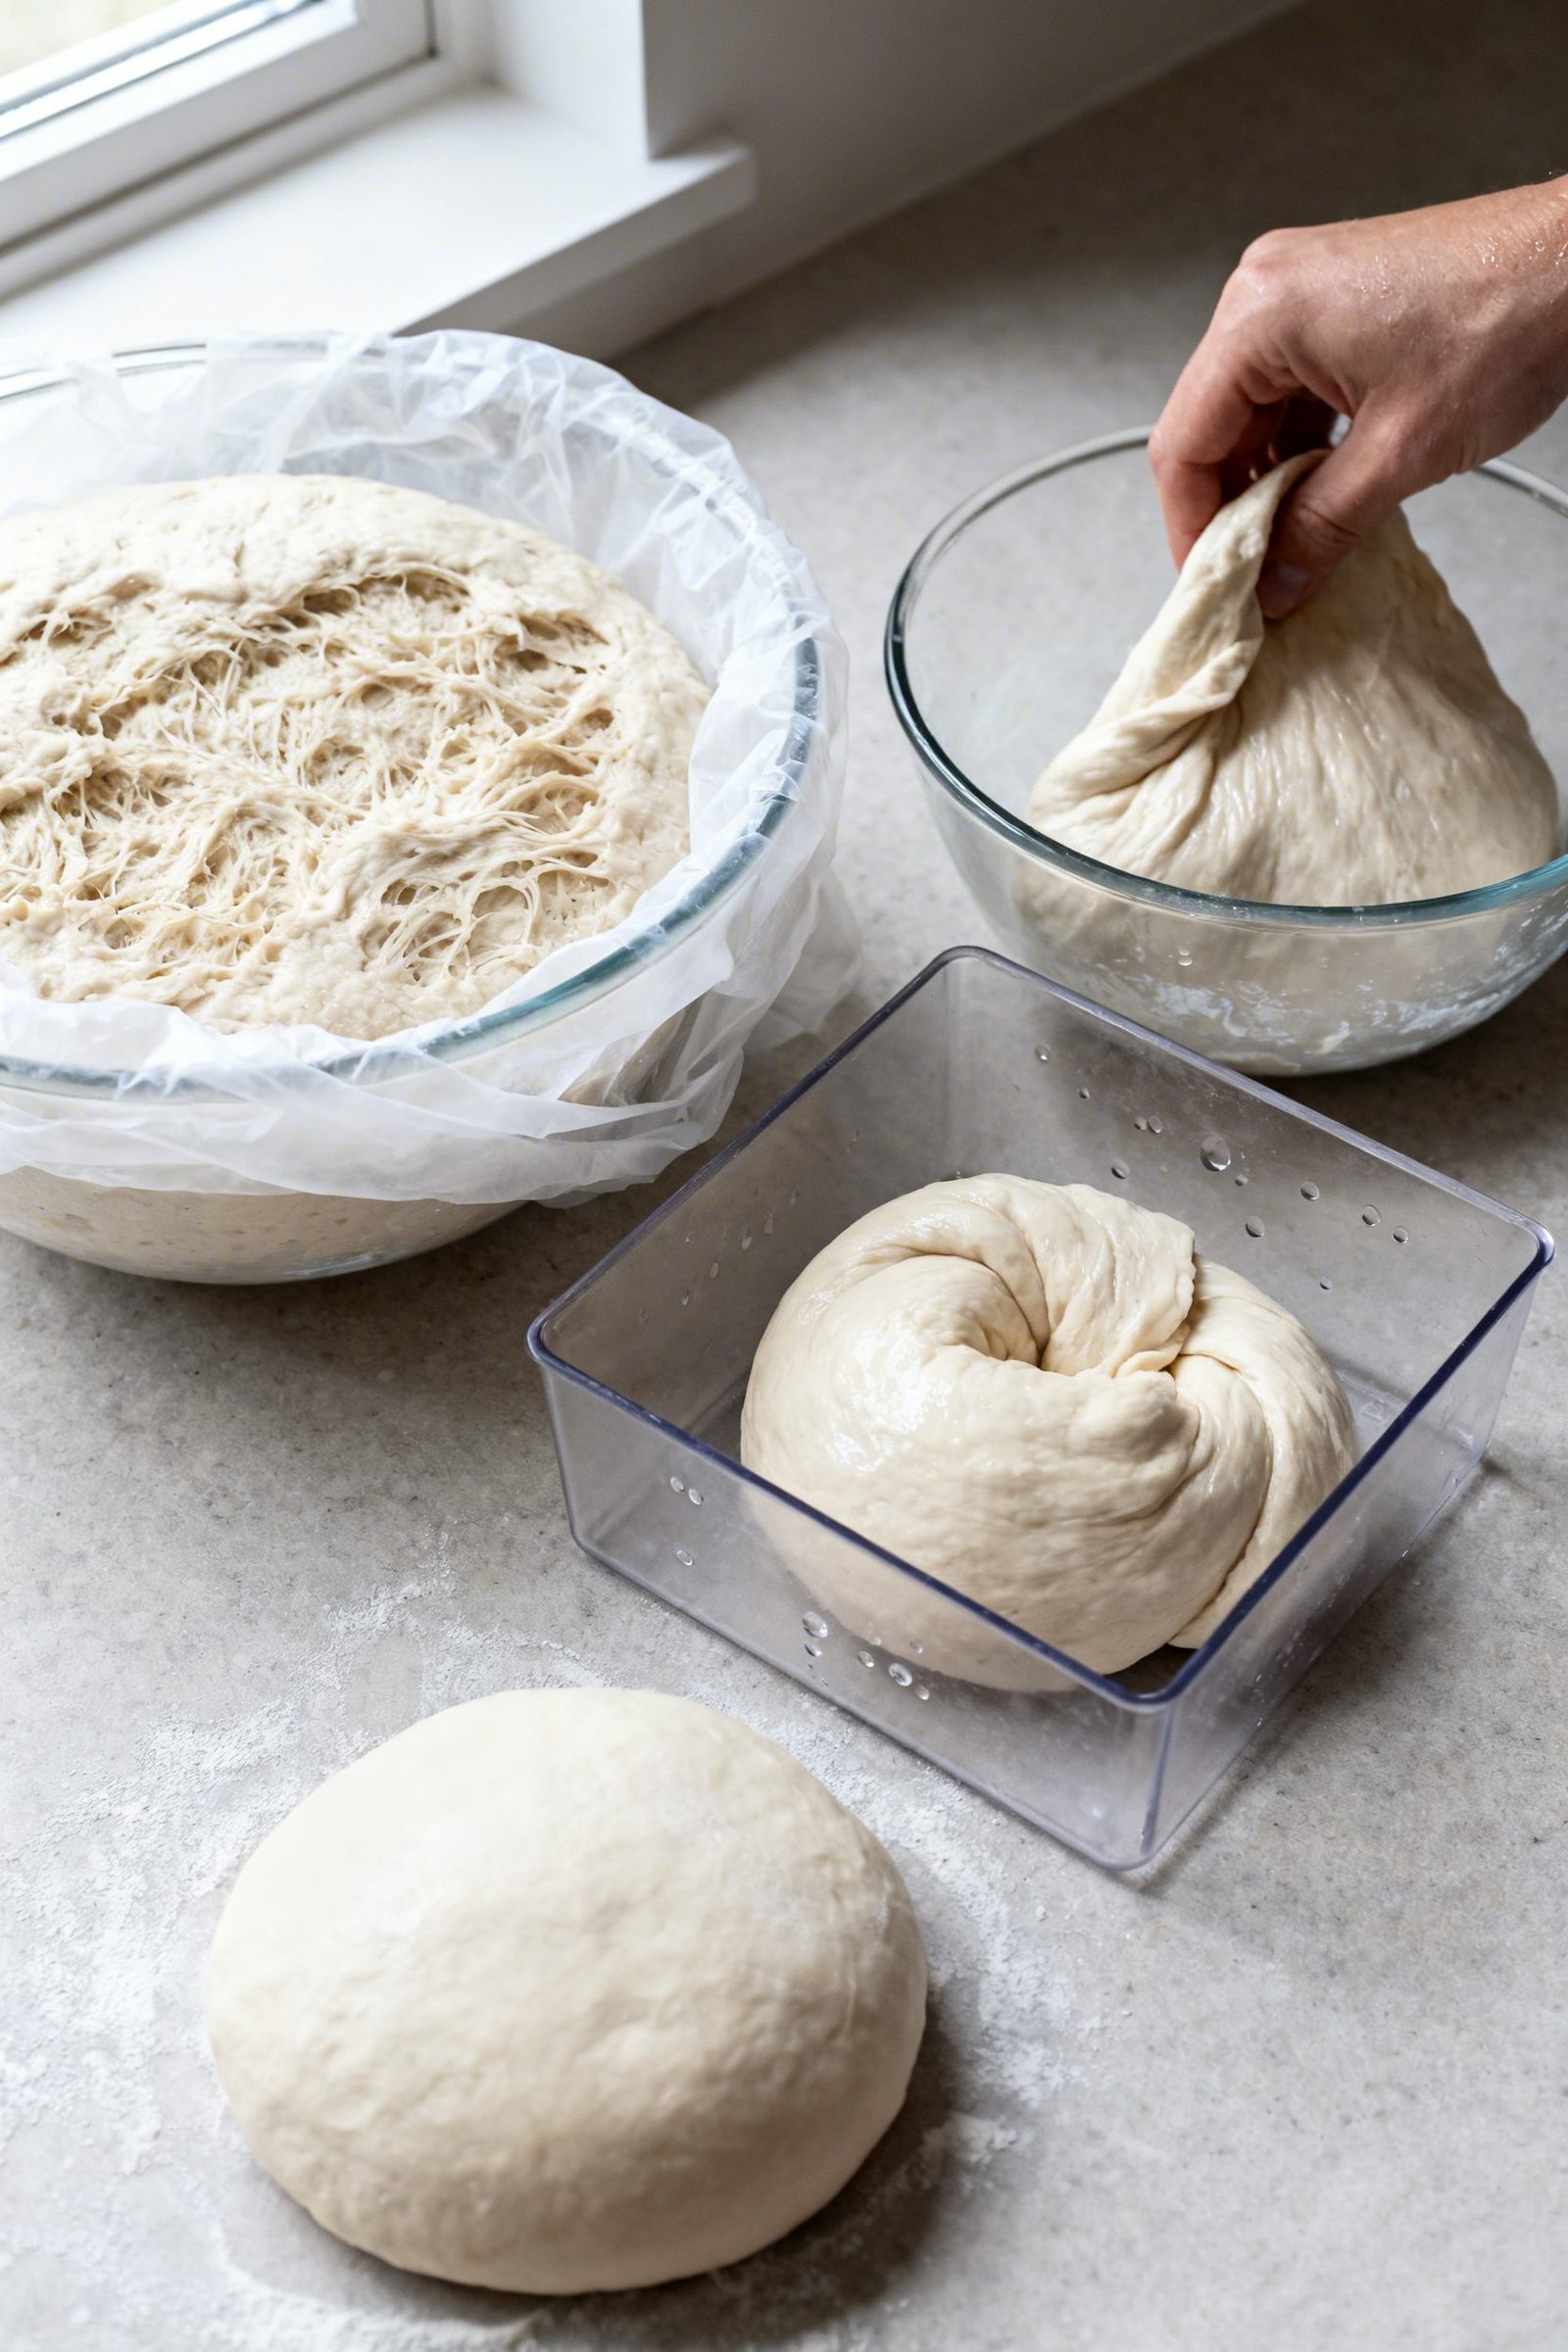
3) Bulk ferment
- Cover and let the dough rise at room temperature until it increases by ~50% and shows a domed top with small bubbles. This usually takes 3–5 hours depending on temperature.
- Look for signs, not the clock: a lighter feel, visible gas bubbles, and a slightly jiggly dough when you shake the bowl.
4) Cold proof for flavor and timing
- Turn the dough onto a lightly floured surface. Divide into 2 or 3 portions.
- Shape each into a tight ball: fold edges to the center, flip seam-side down, and tension the surface by gently dragging against the counter.
- Place each ball into a lightly oiled container or floured dough box. Cover and refrigerate 12–48 hours. Longer chill = deeper flavor and better browning.
5) Prep the oven
- Place a pizza stone or steel on the top rack (about 6–8 inches from the broiler). Preheat to 500–550°F (260–290°C) for at least 45–60 minutes. A fully heated surface makes the crust crisp.
- If you have a broiler, plan to finish the last minute under broil for extra leopard spots.
6) Shape the dough
- Remove dough from the fridge 45–60 minutes before baking so it relaxes.
- Dust your work surface and hands with flour or use a mix of flour and semolina.
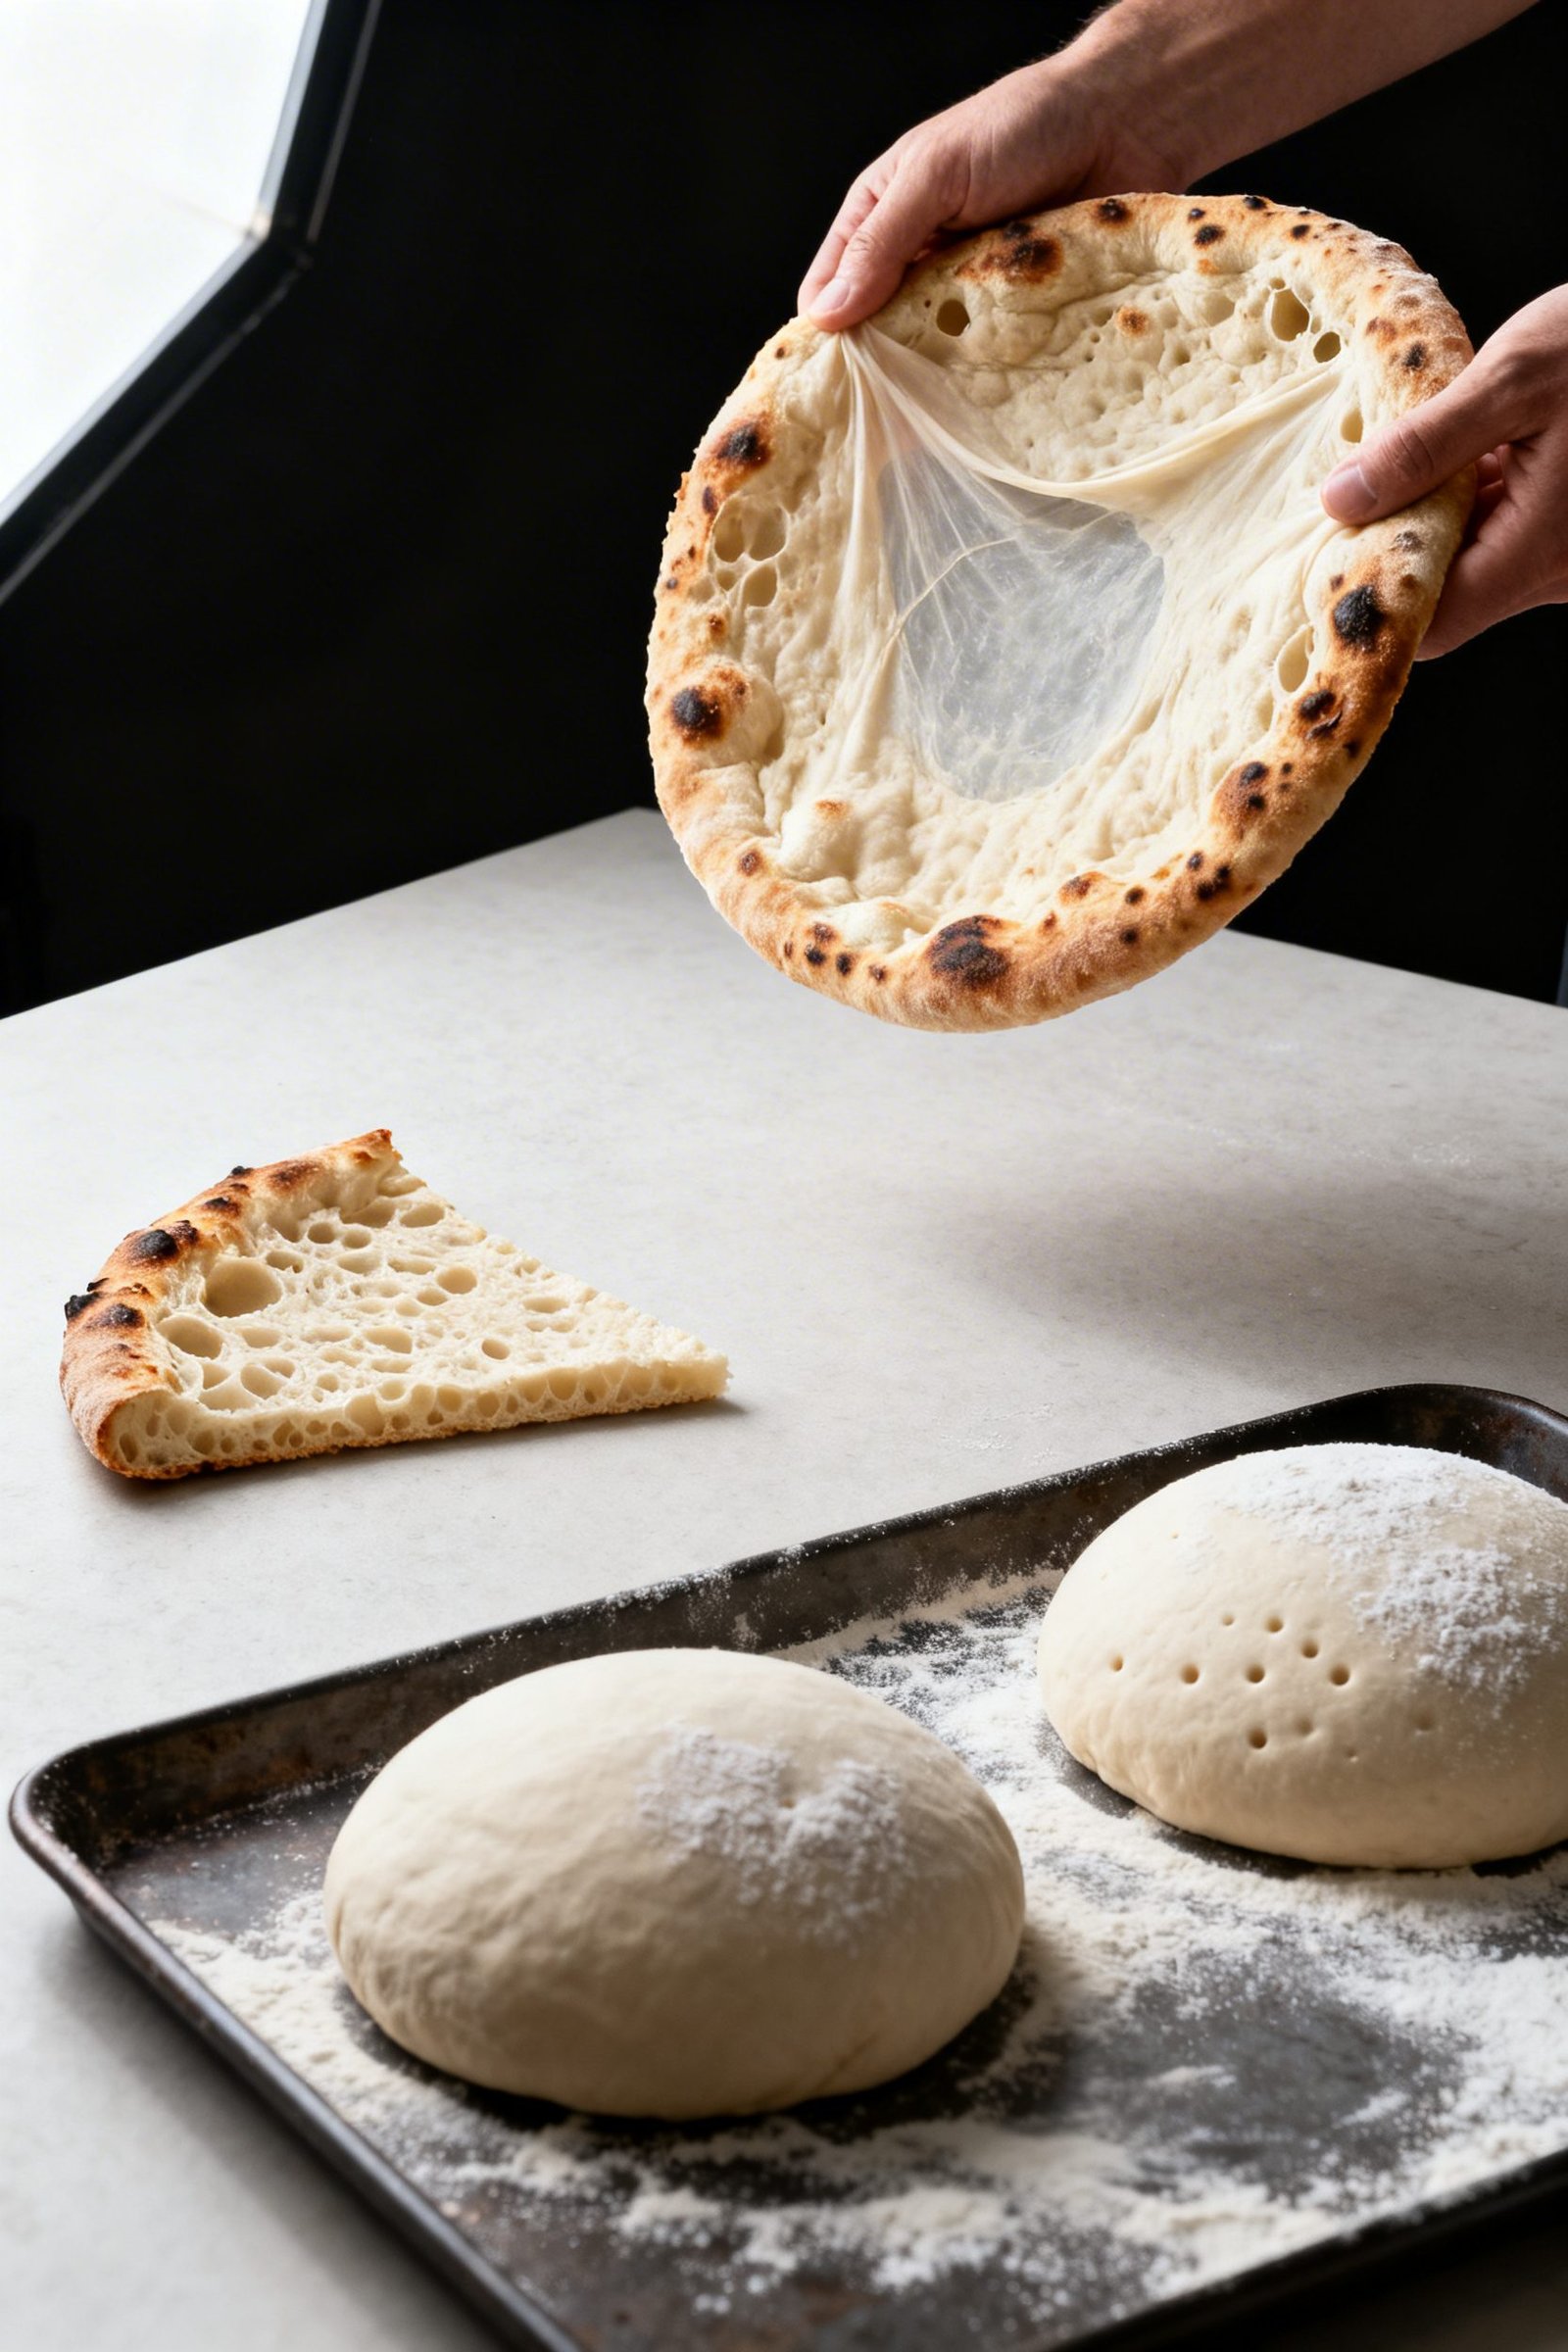
- Gently press the dough ball into a disc with your fingertips, leaving a 1-inch rim. Do not use a rolling pin—you’ll press out the gas.
- Lift the dough and stretch over the backs of your hands, rotating as you go, until about 12 inches wide. If it resists, rest it for 5 minutes, then continue.
7) Top and bake
- Transfer the stretched dough to a floured peel or an inverted baking sheet dusted generously to prevent sticking.
- Add thin layers of sauce and toppings. Less is more for maximum crispness.
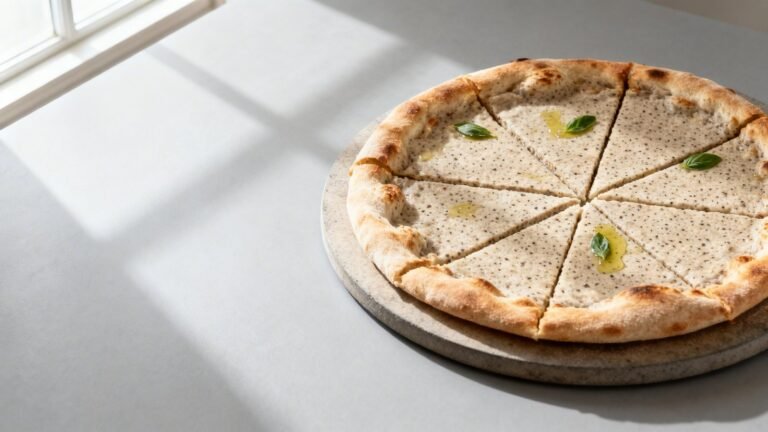
- Launch onto the hot stone/steel. Bake 6–8 minutes at 500–550°F. For extra char, switch to broil for the final 45–90 seconds, watching closely.
- Slide onto a cooling rack for 1–2 minutes to vent steam and lock in crispness, then slice.
How to Store Your Sourdough Pizza Dough and Crust
- In the fridge: Keep dough balls covered up to 48 hours. If they overproof, gently degas, reshape into balls, and rest 30 minutes before stretching.
- In the freezer (raw dough): Lightly oil dough balls, wrap tightly, and freeze up to 3 months. Thaw overnight in the fridge, then bring to room temp 60–90 minutes before shaping.
- Par-baked crusts: Stretch, bake plain 3–4 minutes until set but pale. Cool completely, wrap, and freeze up to 2 months. Top and finish straight from frozen.
- Leftover baked pizza: Store slices in an airtight container up to 3 days. Reheat on a hot skillet or 450°F oven for 5–7 minutes to regain crispness.
Why You’ll Love This Sourdough Pizza Base
- Flavor you can’t fake: Natural fermentation adds complexity you won’t get with quick yeast.
- Reliable texture: Crisp on the bottom, airy on top, with a tender chew in the rim.
- Flexible schedule: Mix at night, bake the next day—or the day after—without stress.
- Better browning: Organic acids and sugars from the starter help you get that golden, blistered crust.
- Endlessly customizable: From classic margherita to white pies and veggie-loaded versions, this base supports it all.
Mistakes to Avoid
- Underheating the baking surface: If the stone or steel isn’t screaming hot, you’ll get pale, soggy bottoms.
- Overloading toppings: Too much sauce or cheese weighs the crust down and traps steam.
- Rolling pin temptation: It crushes air pockets that make the rim light and open.
- Shaping cold dough: Tight, cold dough snaps back. Let it relax first for easy stretching.
- Wet peel, sticky launch: Dust generously with flour or semolina and work quickly to avoid sticking.
- Ignoring dough cues: Go by feel and volume increase, not only the timer.
Fun Twists to Try
- Flour blend: Swap 20–30% of the bread flour with 00 flour for extra tenderness and easy stretching.
- Whole grain boost: Add 10–15% finely milled whole wheat or spelt for nutty depth. Increase water by 10–15 g.
- Garlic-herb dough: Mix in 1–2 teaspoons dried Italian herbs and 1 grated garlic clove for a fragrant base.
- Olive oil richness: Bump olive oil to 20 g for a slightly more tender, focaccia-leaning edge.
- Thin-crust mode: Stretch to 13–14 inches and keep toppings extra light for ultra-crisp results.
- Cast-iron method: Preheat a cast-iron skillet, press the dough in, top, and bake; finish under the broiler for char.
FAQ
My starter isn’t super active. Can I still make this?
Yes, with a boost. Use 100 g starter and add 1–2 g instant yeast to the mix. You’ll keep sourdough flavor while ensuring a strong rise.
How do I know when the dough has fermented enough?
Look for a 40–60% rise, a soft, airy feel, and visible bubbles. Poke the dough—if the dent springs back slowly and not fully, you’re ready to divide.
What hydration should I use?
Start around 65–68%. If your flour is strong and you’re comfortable handling wetter doughs, push to 70–72% for an even lighter crumb.
Do I need sugar or honey?
No. Sourdough fermentation creates natural sugars. If you want faster browning in a cooler oven, add 1 teaspoon sugar or malt powder.
Stone or steel?
A steel transfers heat faster for intense bottom char and speed. A thick stone gives gentler heat and steady bakes. Both work—preheat thoroughly.
Can I make this same-day?
Yes. Use a very active starter, keep the dough warm (75–78°F), and skip the cold proof. You’ll lose some complexity but still get a great crust.
How do I stop sticking when launching?
Dust the peel, build the pizza quickly, and shimmy the peel to ensure movement before launching. A thin layer of semolina acts like ball bearings.
Why is my crust pale?
Not hot enough, not long enough, or too much moisture from toppings. Preheat longer, finish under the broiler, and keep toppings light.
Wrap-Up
This sourdough pizza crust brings big flavor, a crisp base, and a beautifully airy rim—without complicated steps. Mix at night, chill, shape with confidence, and bake hot. Once you nail your rhythm, pizza night starts to feel effortless, and every slice tastes like your favorite neighborhood spot—only better because you made it at home.
Sourdough Pizza Crust
A crisp, airy, and flavorful sourdough pizza base with an easy overnight schedule and hot bake for blistered crust.
Ingredients
- 500 g bread flour (or 400 g bread flour + 100 g 00 flour)
- 325–340 g water, room temperature (65–68% hydration; start with 325 g, add more if needed)
- 120 g active, bubbly sourdough starter (100% hydration, fed 4–8 hours prior)
- 12 g fine sea salt
- 10 g olive oil (optional, for easier handling and a touch of tenderness)
- Extra flour or fine semolina for dusting
- Toppings of choice (sauce, cheese, veggies, cured meats, herbs)
Instructions
- Mix flour and salt in a large bowl.
- Dissolve starter in water; add olive oil if using.
- Combine wet and dry until no dry spots remain; dough will be shaggy.
- Cover and rest 20–30 minutes (autolyse).
- Perform 3–4 sets of stretch-and-folds every 30 minutes over 1.5–2 hours; add an extra set if dough feels slack.
- Bulk ferment at room temperature until ~50% increase, domed top, and small bubbles (about 3–5 hours).
- Turn dough onto a lightly floured surface, divide into 2 or 3 portions, and shape into tight balls.
- Place in lightly oiled or floured containers, cover, and refrigerate 12–48 hours.
- Preheat a pizza stone or steel on the top rack at 500–550°F (260–290°C) for 45–60 minutes; plan to finish under broiler if desired.
- Remove dough from fridge 45–60 minutes before baking.
- Dust work surface and hands; gently press dough into a disc leaving a 1-inch rim; stretch over backs of hands to ~12 inches.
- Transfer to a floured peel; add thin layers of sauce and toppings.
- Bake 6–8 minutes at 500–550°F; optionally broil for the final 45–90 seconds, watching closely.
- Cool on a rack 1–2 minutes, then slice.