Rustic Artisan Bread Recipe | Easy Homemade Yeast Bread for Beginners
Nothing smells better than a warm loaf of homemade bread. This rustic artisan bread gives you that crackly crust and tender, open crumb you crave, and you can make it with simple pantry staples. If you’re new to yeast, don’t stress—I’ll walk you through each step so your first loaf feels like a win.
You’ll mix a shaggy dough, let time do most of the work, and bake it hot for maximum crust. No special mixer needed. Just a bowl, a spoon, and a hot oven. Ready to bake your best beginner bread?
Why This Easy Artisan Bread Works
Simple ingredients and a relaxed method create big flavor with minimal effort. Here’s why this recipe delivers:
- High hydration creates that chewy, open crumb with little kneading.
- Longer rise time builds deep, wheaty flavor and better texture.
- Hot oven with steam forms a crisp, blistered crust at home.
- Beginner-friendly technique uses gentle folds instead of intensive kneading.
- Flexible timing lets the dough rest in the fridge if your day gets busy.
Ingredients
- 3 1/4 cups (410 g) bread flour – gives structure and chew. Use all-purpose if needed.
- 1 1/4 cups (295 g) warm water, 95–105°F – warm to the touch, not hot.
- 1 1/4 tsp instant yeast – also called rapid rise; active dry works with a 5-minute bloom.
- 1 1/2 tsp fine sea salt – balances flavor and strengthens gluten.
- 1 tsp honey or sugar (optional) – boosts browning and helps fermentation.
- 1–2 tsp olive oil (optional) – for a slightly softer crust and easier handling.
- Flour for dusting – to shape without sticking.
How to Make Easy Homemade Artisan Bread
1) Mix the Dough
- In a large bowl, whisk flour, salt, and yeast. If using honey or sugar, stir it into the warm water.
- Pour water into the dry ingredients. Stir with a wooden spoon until a shaggy, sticky dough forms. Add the olive oil if you like.
- Check hydration: The dough should feel tacky and soft. If it looks dry, add 1–2 teaspoons water. If it pools into batter, dust in 1–2 teaspoons flour.
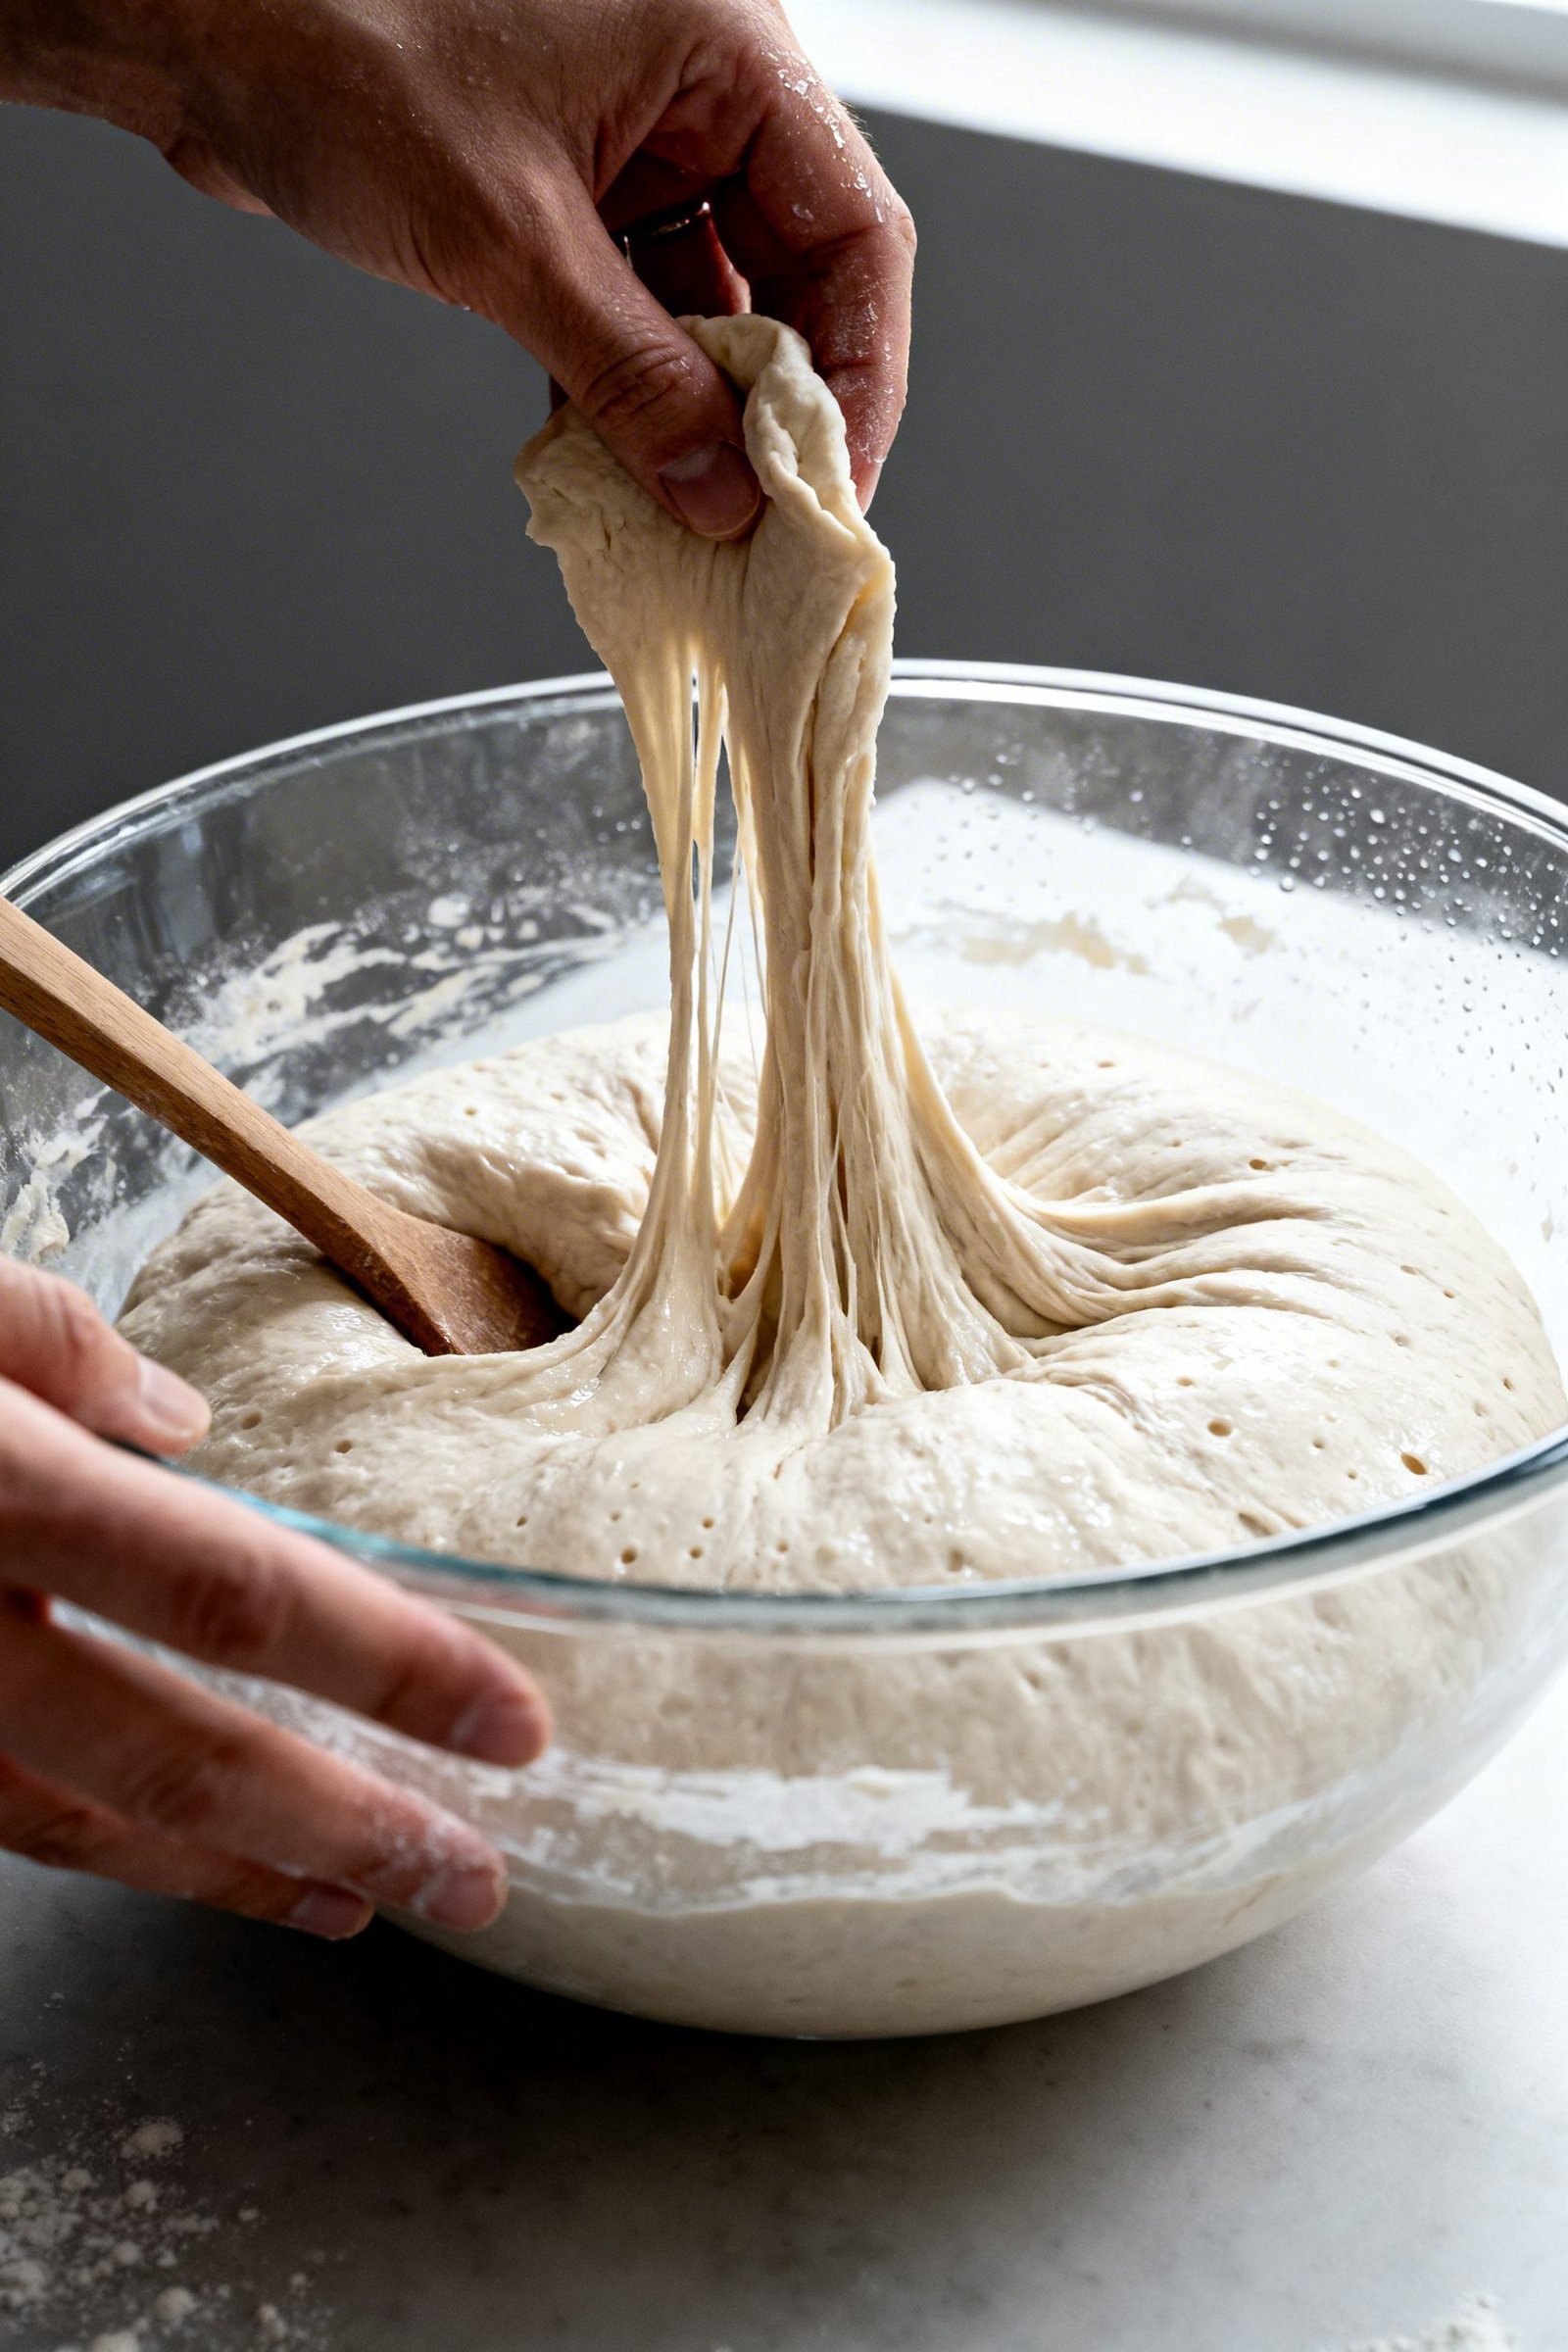
2) Rest and Fold
- Cover the bowl with a damp towel or plastic wrap. Let it rest for 30 minutes.
- With wet fingers, grab one edge of the dough, stretch it up, and fold it over the center. Turn the bowl a quarter turn and repeat 4–6 times. This builds gluten without kneading.
- Repeat the 30-minute rest and folding step 2 more times (total 3 rounds). The dough will smooth out and hold shape better each time.
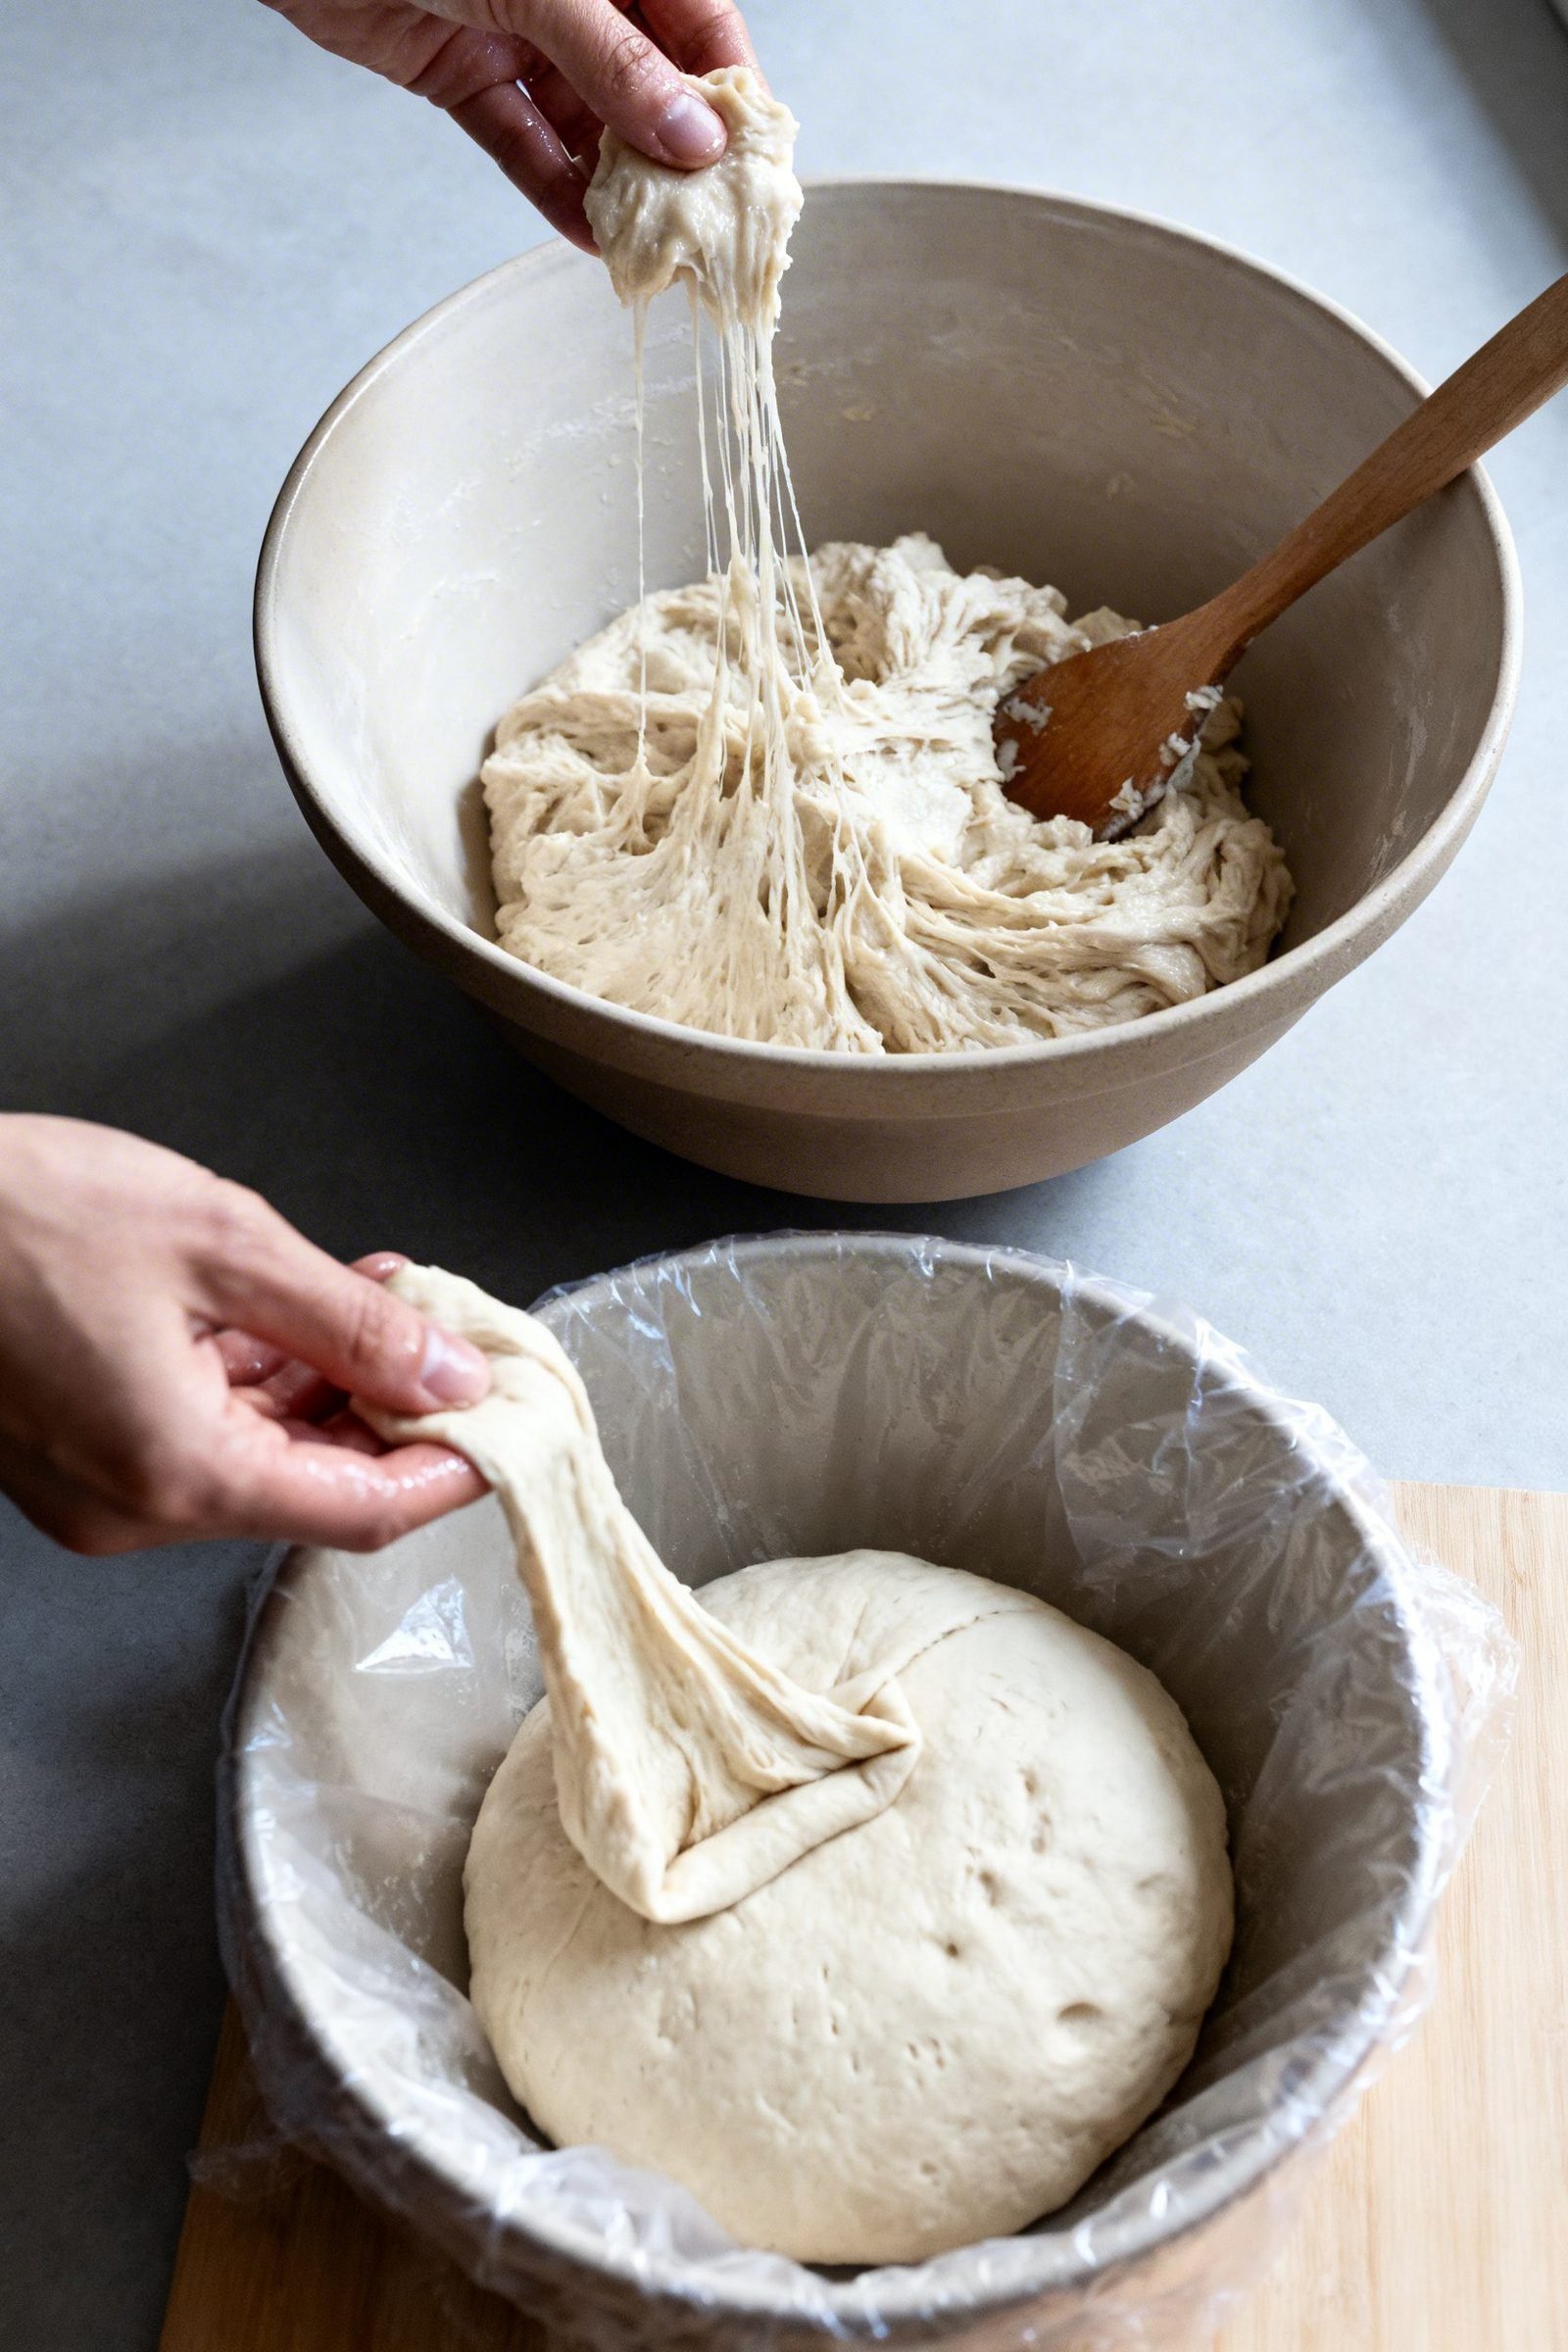
3) First Rise (Bulk Fermentation)
- Cover tightly and let the dough rise at room temperature until puffy and roughly doubled, 60–90 minutes depending on your kitchen warmth.
- Cold option: After a 30–60 minute start at room temp, refrigerate 8–18 hours. This boosts flavor and makes shaping easier.
4) Shape the Loaf
- Lightly flour the counter. Gently ease the dough out, keeping as much air as possible.
- Pat into a loose rectangle. Fold the top third down and the bottom third up like a letter. Turn 90 degrees and tuck edges under to form a tight round (boule).
- Place seam-side down on a piece of parchment. Dust the top with flour. Cover loosely and let it rest 30–45 minutes, until slightly puffy.
5) Preheat for Crust
- Set a Dutch oven (with lid) on the center rack. Preheat the oven to 450°F (232°C) for at least 30 minutes to get thoroughly hot.
- No Dutch oven? Preheat a baking stone or sheet and place a metal pan on the lower rack to create steam later.
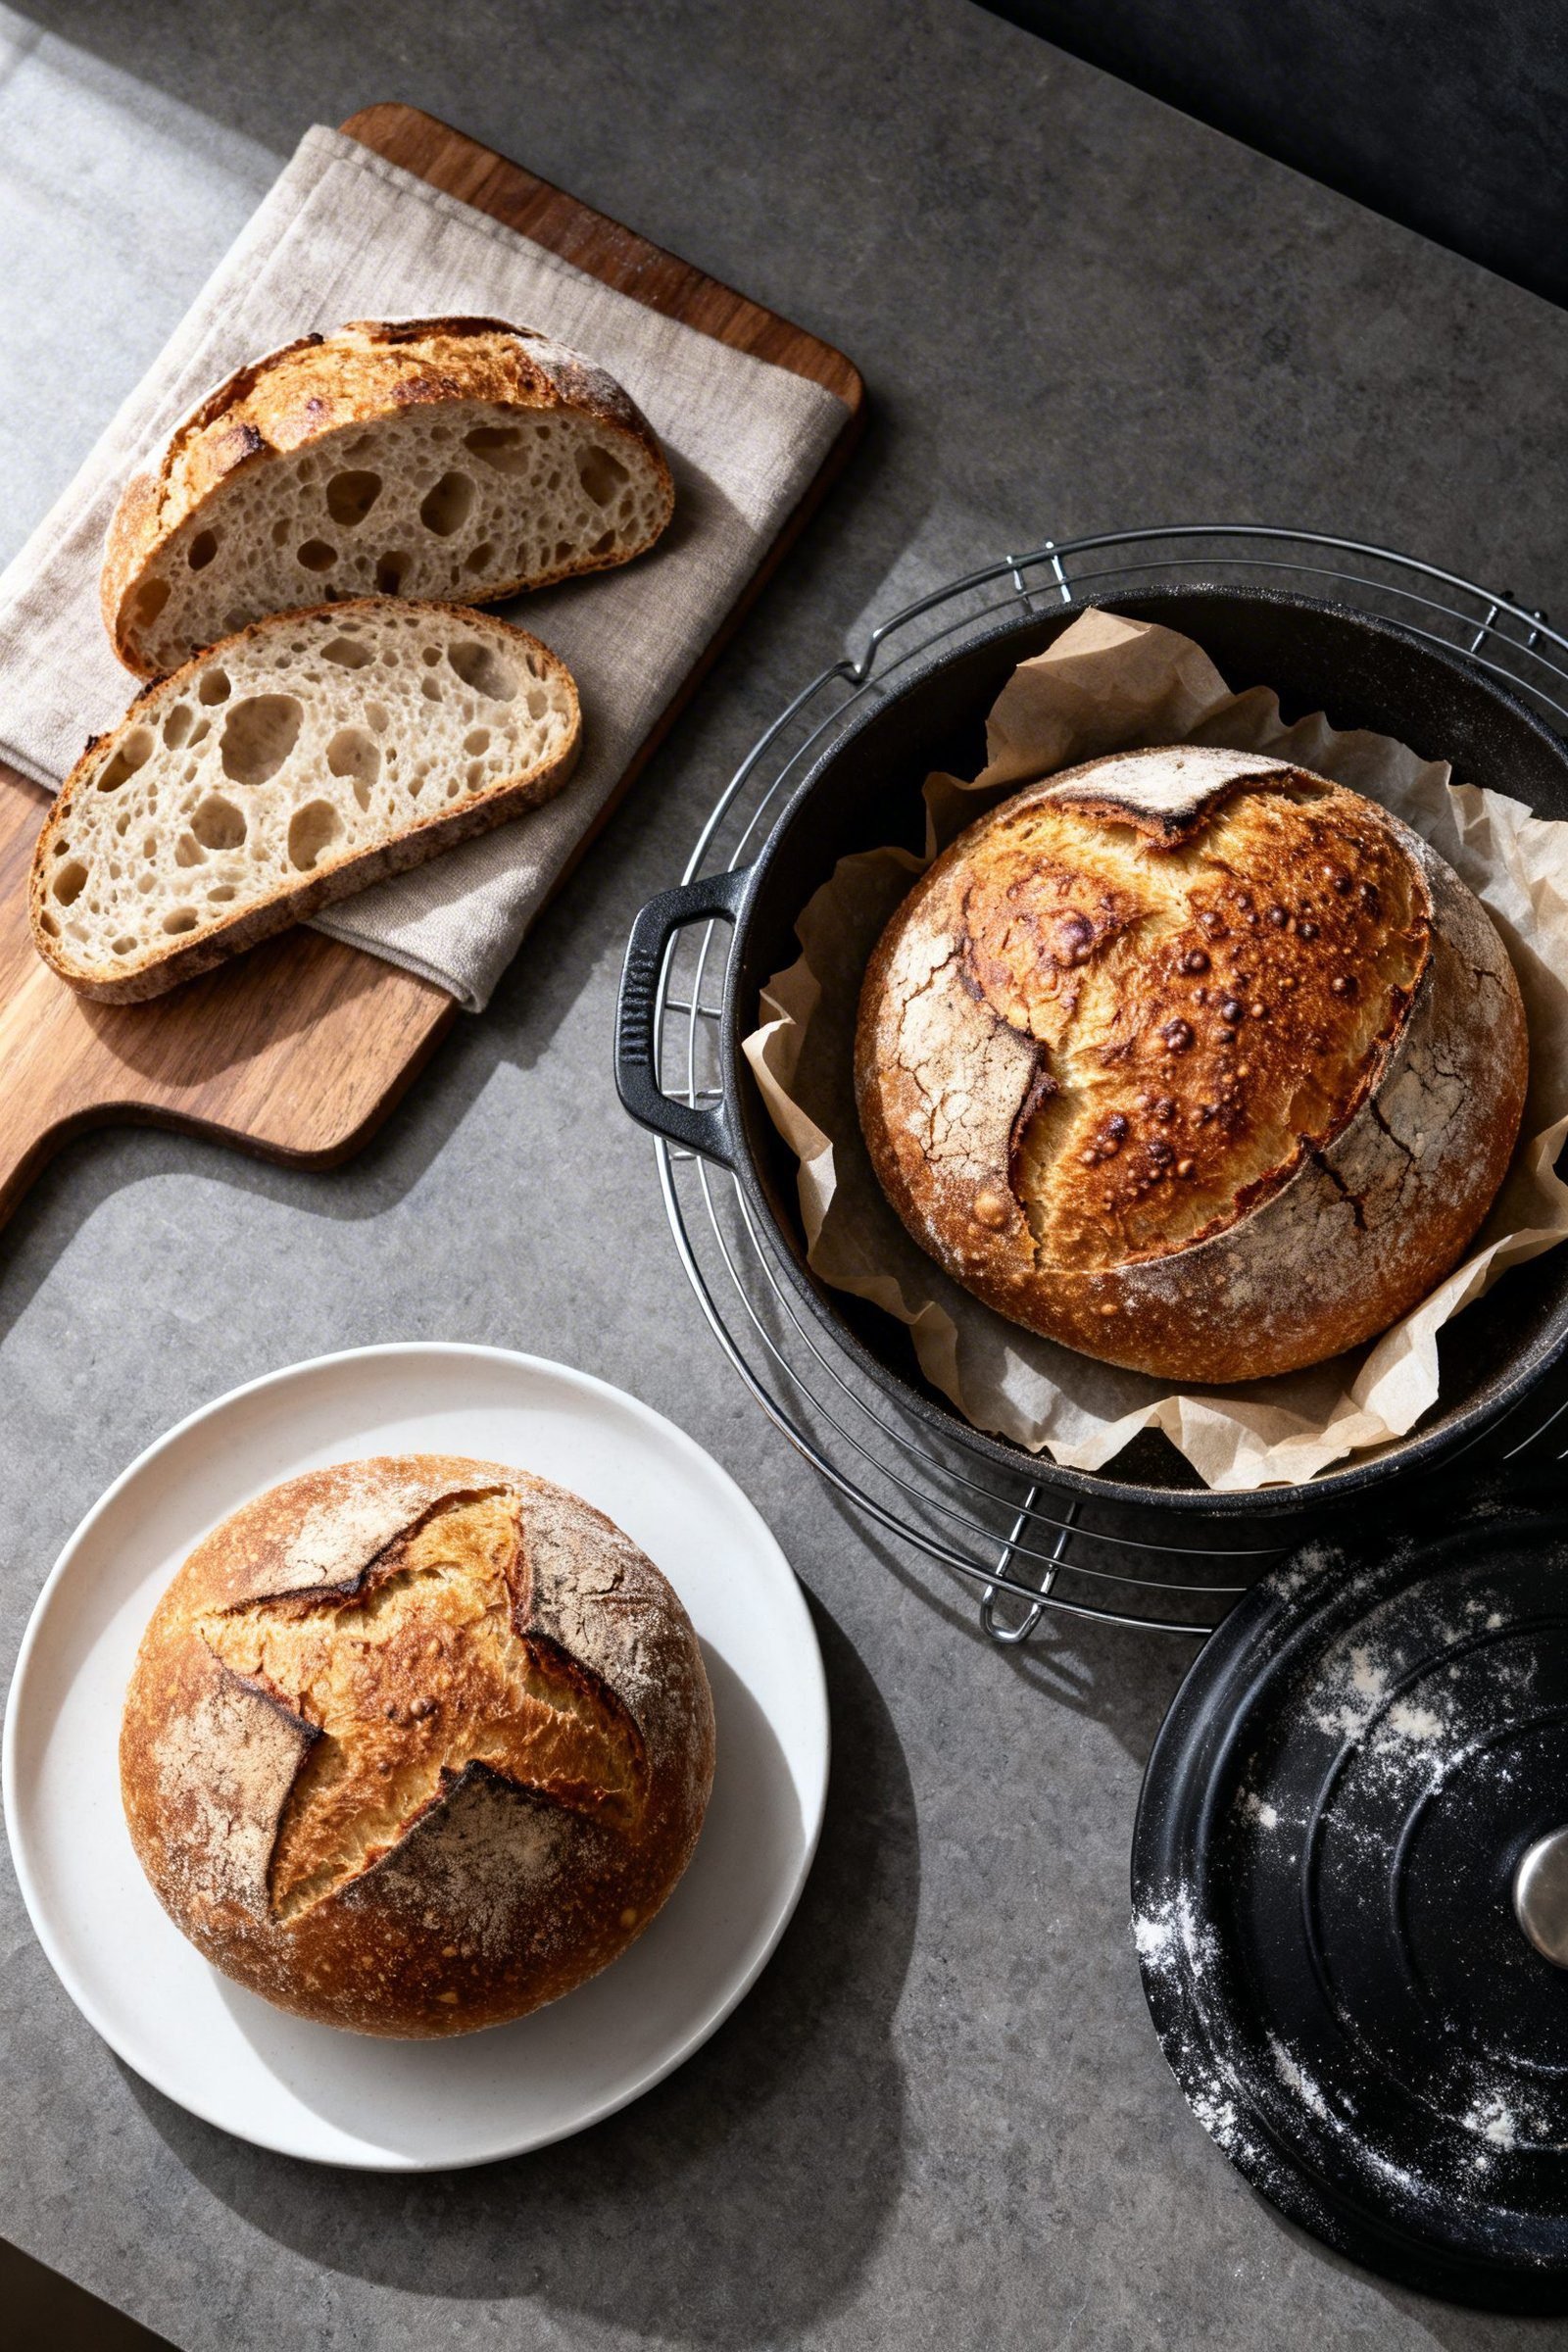
6) Score and Bake
- Using a sharp knife or lame, score a 1/2-inch deep slash across the top. This controls the expansion and gives that rustic look.
- Carefully lift the dough on the parchment into the hot Dutch oven. Cover with the lid.
- Bake covered for 25 minutes. Remove the lid and bake another 15–20 minutes until deep golden-brown with crackly edges.
- Check doneness: Internal temp should hit 205–210°F. The loaf should feel light and sound hollow when tapped.
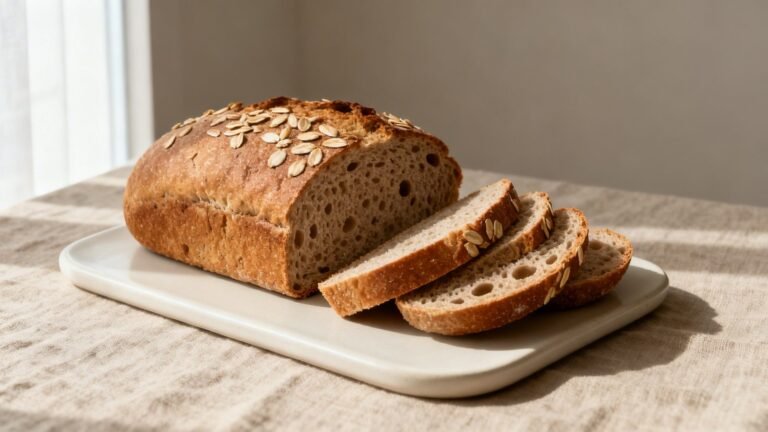
7) Cool and Slice
- Transfer the loaf to a rack. Let it cool at least 1 hour. The crumb finishes setting during this time.
- Slice with a serrated bread knife. Serve with salted butter, olive oil, or soup.
How to Store Your Homemade Bread
- Room temperature: Keep the loaf cut-side down on a board or in a bread box for 2–3 days. Avoid plastic if you want the crust to stay crisp.
- Short-term wrap: Use a paper bag or a clean tea towel to protect from drafts while keeping the crust from going rubbery.
- Freeze: Slice, then freeze in a zip-top bag with the air pressed out. Toast straight from frozen or rewarm in a 350°F oven for 8–10 minutes.
- Revive crust: Sprinkle or mist the loaf lightly with water and bake at 375°F for 8–12 minutes to re-crisp.
Benefits of Baking This Rustic Bread
- Confidence-building: You learn core bread skills—hydration, folds, shaping, and scoring.
- Budget-friendly: Flour, water, yeast, and salt beat store prices for artisan loaves.
- Custom flavor: Control salt, sweetness, and add-ins to match your taste.
- Better texture: That bakery-style crust and airy crumb feel special without fancy gear.
- Make-ahead friendly: The cold ferment fits busy schedules and improves flavor.
What to Avoid for Best Results
- Overheating the water: Water hotter than 110°F can damage yeast.
- Adding too much flour: Slight stickiness is good. Heavy flouring leads to a dense loaf.
- Skipping the preheat: A blazing-hot pot or stone creates oven spring and crust.
- Cutting too soon: Slicing hot bread compresses the crumb and makes it gummy.
- Neglecting salt: Salt shapes flavor and strengthens the dough’s structure.
Variations You Can Try
- Whole wheat blend: Swap 25–40% of the bread flour with whole wheat. Add 1–2 teaspoons extra water if the dough feels stiff.
- Seeded crust: Roll the shaped dough in sesame, poppy, or sunflower seeds before the final rise.
- Herb and garlic: Mix in 1–2 teaspoons dried herbs and 1 teaspoon garlic powder for a savory loaf.
- Olive and rosemary: Fold in 1/2 cup chopped olives and 1 tablespoon chopped rosemary during the first fold.
- Cheesy pull-apart: Sprinkle 1/2–3/4 cup shredded sharp cheddar during shaping; seal well.
- Overnight baguettes: Shape into two batards, proof on a floured towel, and bake on a stone with steam.
FAQ
Can I use all-purpose flour?
Yes. Use the same amount by weight. If measuring by cups, start with 3 1/4 cups and hold back a tablespoon or two of water, then adjust as needed. Expect a slightly softer crumb.
What if I only have active dry yeast?
Bloom 1 1/4 teaspoons active dry in the warm water with the honey/sugar for 5–10 minutes until foamy, then mix as directed.
Why didn’t my bread rise?
Common culprits: old yeast, water too hot or too cold, cool kitchen, or dough too dry. Check yeast freshness, use warm water around 100°F, and give it more time if your room runs cool.
Do I need a Dutch oven?
No. Bake on a preheated stone or sheet. Pour 1 cup hot water into a preheated metal pan on the lower rack to create steam, then reduce to 425°F after 15 minutes if browning too fast.
How do I get bigger holes in the crumb?
Keep the dough slightly wetter, handle it gently during shaping, and ensure a thorough preheat. Strong scoring and a hot pot help the loaf spring.
Can I double the recipe?
Yes. Mix in a larger bowl and divide into two loaves after bulk fermentation. Bake one at a time for best crust.
Conclusion
You can bake bakery-worthy artisan bread in your own oven with a handful of ingredients and a little patience. Warm water, good salt, and time do the heavy lifting while you practice simple folds and a confident score. Once you taste that shattery crust and tender crumb, you’ll keep this recipe on repeat—and you’ll tweak it with herbs, seeds, or whole grains to make it yours.
Rustic Artisan Bread
Beginner-friendly artisan loaf with a crisp crust and open crumb using simple ingredients and gentle folds.

Ingredients
- 3 ¼ cups (410 g) bread flour (or all-purpose)
- 1 ¼ cups (295 g) warm water, 95–105°F
- 1 ¼ tsp instant yeast (or active dry, bloomed 5–10 minutes)
- 1 ½ tsp fine sea salt
- 1 tsp honey or sugar (optional)
- 1–2 tsp olive oil (optional)
- Flour for dusting
Instructions
- Whisk flour, salt, and instant yeast in a large bowl. If using honey or sugar, stir it into the warm water.
- Pour the water into dry ingredients and stir until a shaggy, sticky dough forms; add olive oil if using. Adjust with 1–2 tsp water or flour as needed for a tacky dough.
- Cover and rest 30 minutes. With wet fingers, perform 4–6 stretch-and-folds around the bowl.
- Repeat the 30-minute rest and fold twice more (total 3 rounds).
- Cover tightly and let rise at room temperature until puffy and roughly doubled, 60–90 minutes. Option: after 30–60 minutes at room temp, refrigerate 8–18 hours.
- Lightly flour the counter and gently turn out the dough. Pat into a rectangle, fold like a letter, rotate, and shape into a tight round (boule).
- Place seam-side down on parchment, dust with flour, cover loosely, and rest 30–45 minutes until slightly puffy.
- Place a Dutch oven with lid in the oven and preheat to 450°F (232°C) for at least 30 minutes.
- Score a ½-inch deep slash on top. Lift dough on parchment into the hot Dutch oven, cover with lid.
- Bake covered for 25 minutes. Remove lid and bake 15–20 minutes more until deep golden-brown and 205–210°F internal temperature.
- Cool on a rack at least 1 hour before slicing.