Quick Rocky Road Candy Recipe | Rich Chocolate Marshmallow Treats
When you crave a fast, no-bake chocolate treat with big payoff, make rocky road candy. You’ll get creamy chocolate, fluffy marshmallows, and crunchy nuts in every bite—no fancy skills required. It mixes up in one bowl, sets quickly, and disappears even faster.
I rely on this recipe when I need a last-minute dessert, holiday gift, or movie-night sweet. You can customize it a dozen ways, but the classic combo hits every craving: silky chocolate, sweet vanilla marshmallows, and salty roasted nuts. Let’s make a batch together.
Why This Rocky Road Candy Is Foolproof
This recipe keeps things simple and delicious, even if you’ve never made candy before.
- No thermometer needed: You just melt chocolate gently and stir in mix-ins. That’s it.
- Fast to make: Prep takes about 10 minutes; chilling does the rest.
- Perfect texture balance: Soft marshmallow, crunchy nuts, and smooth chocolate in every square.
- Flexible ingredients: Use semisweet, dark, or milk chocolate. Swap nuts. Add cookies or fruit.
- Great make-ahead treat: It stores well, ships well, and holds shape at room temp.
Ingredients
- Chocolate chips (3 cups/18 oz): Semisweet gives classic balance. Use half dark for deeper flavor.
- Unsalted butter (2 tablespoons): Adds gloss and a softer bite.
- Fine sea salt (1/4 teaspoon): Rounds out sweetness.
- Vanilla extract (1 teaspoon): Boosts chocolate aroma and depth.
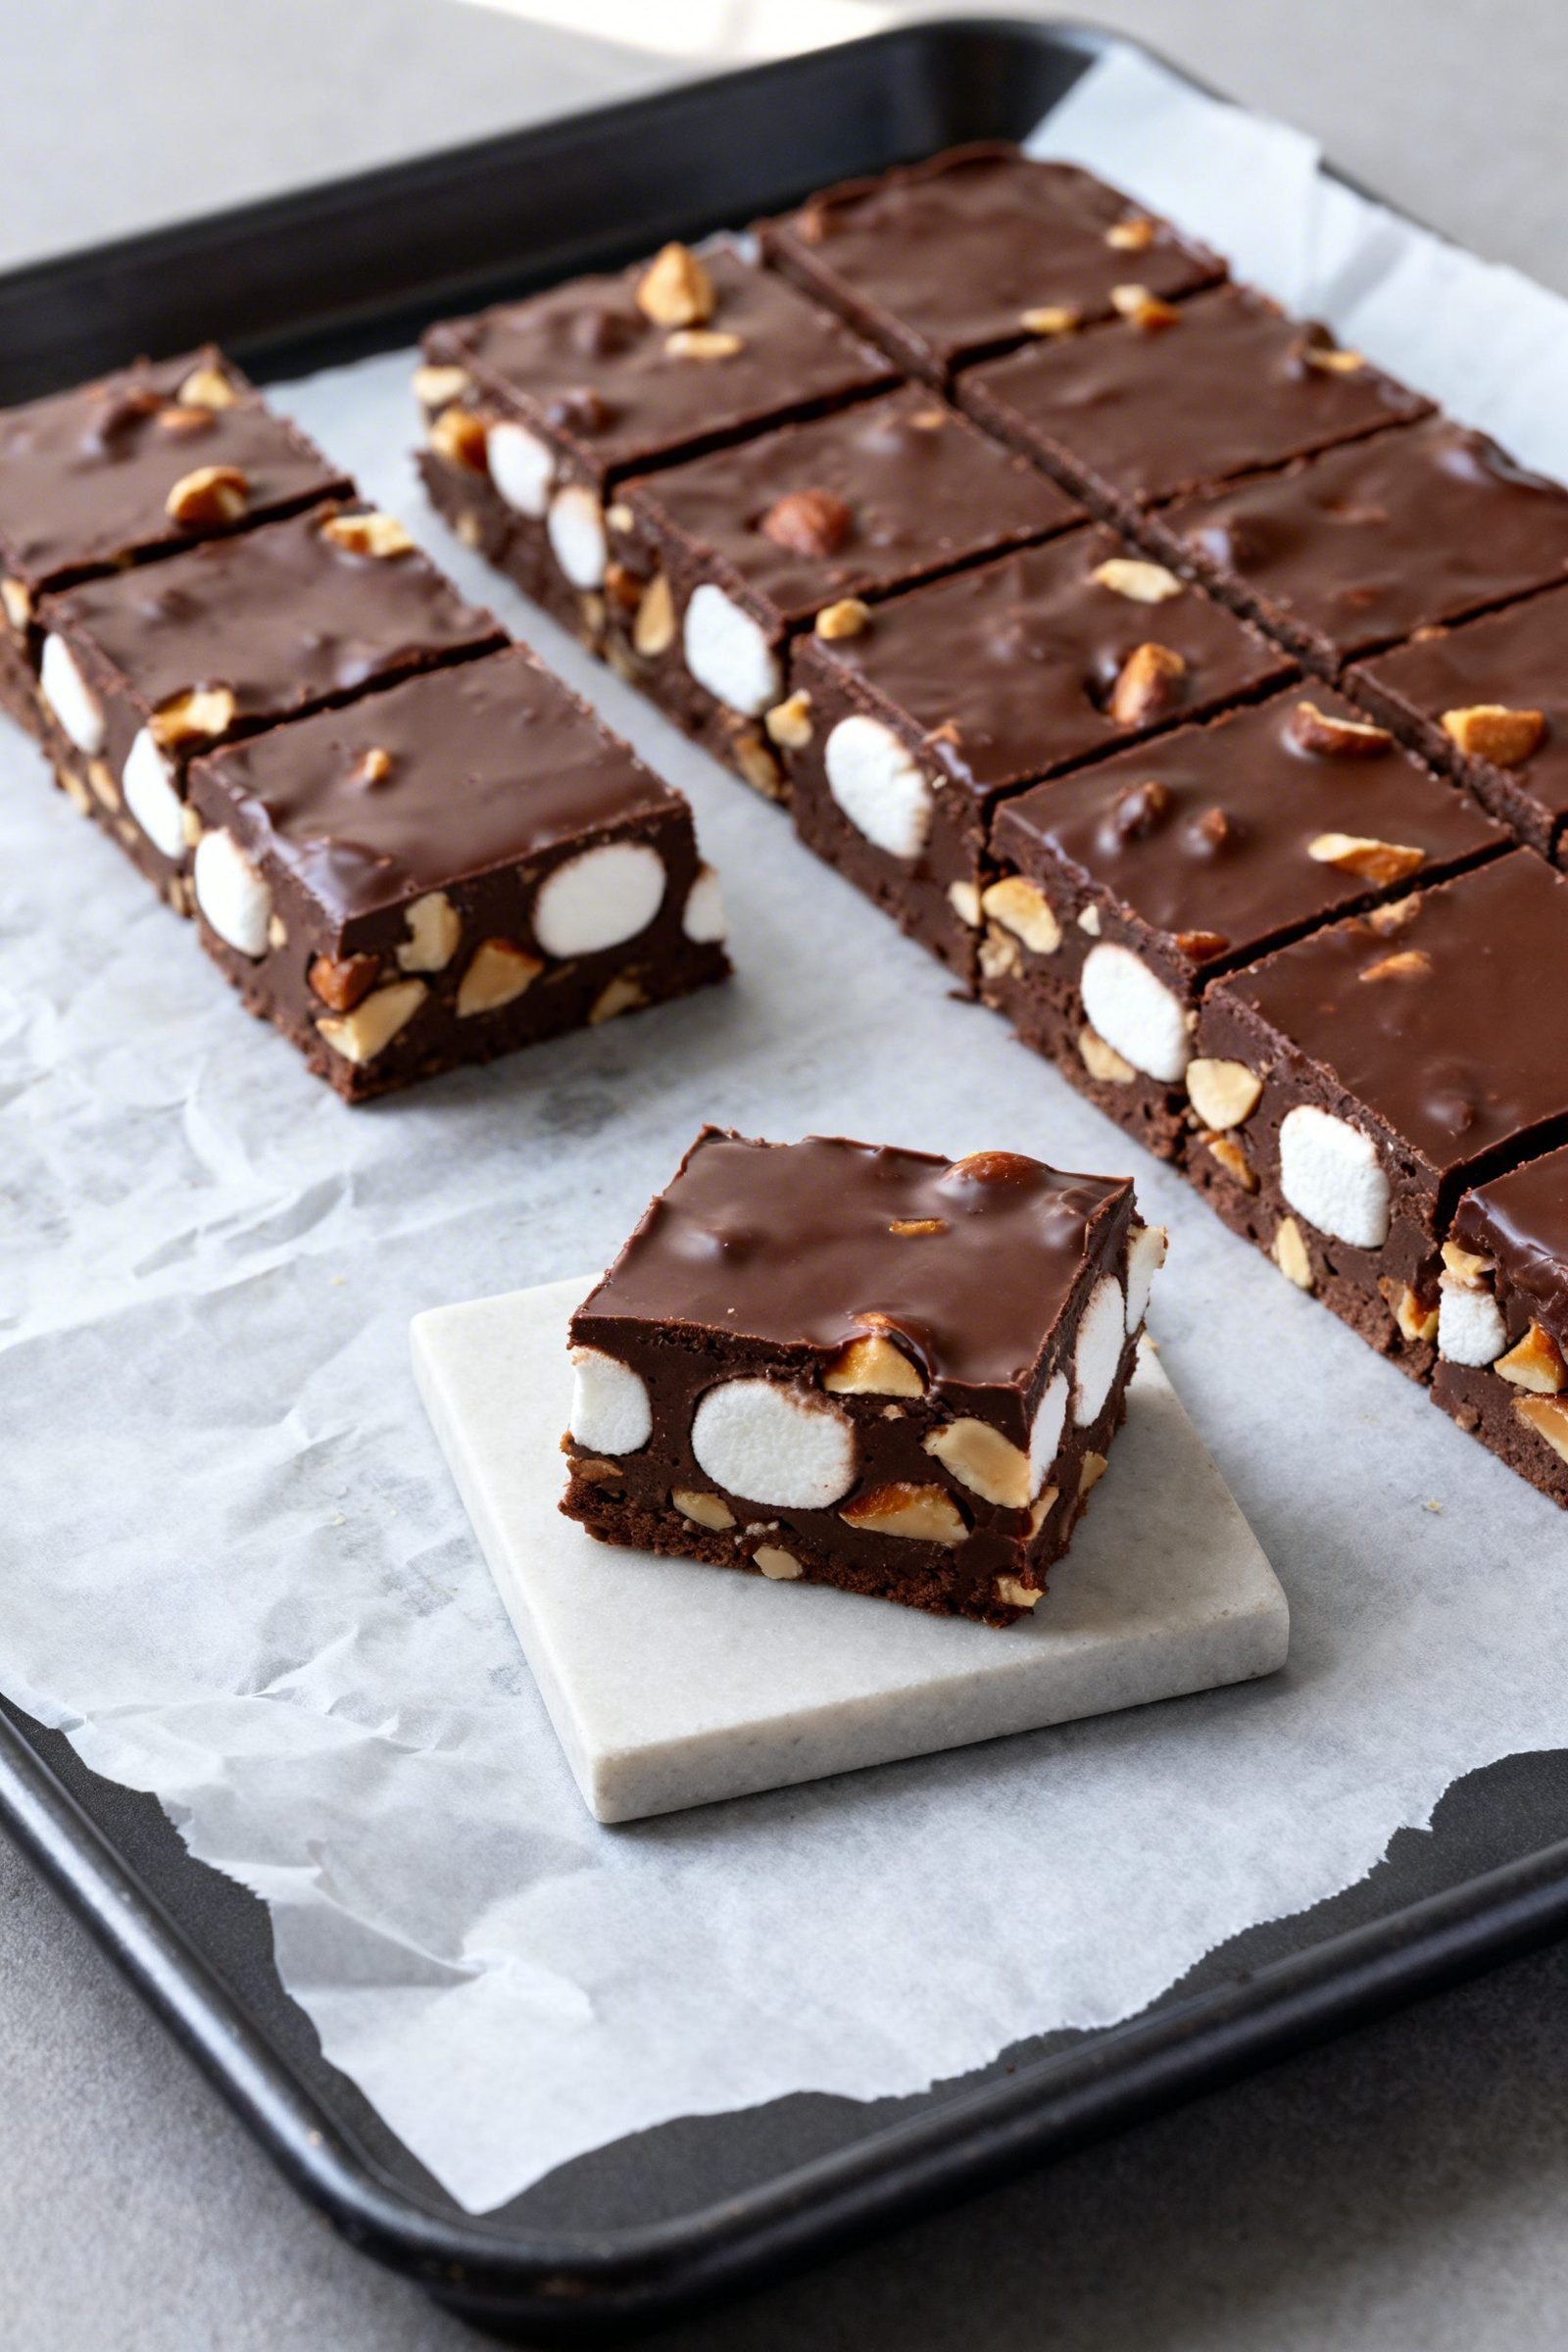
- Mini marshmallows (4 cups): Minis mix evenly and keep their shape.
- Roasted nuts (1 1/2 cups), chopped: Peanuts, almonds, or walnuts. Choose salted for sweet-salty contrast.
- Optional add-ins (up to 1 cup total): Shredded coconut, crushed pretzels, dried cherries, toffee bits.
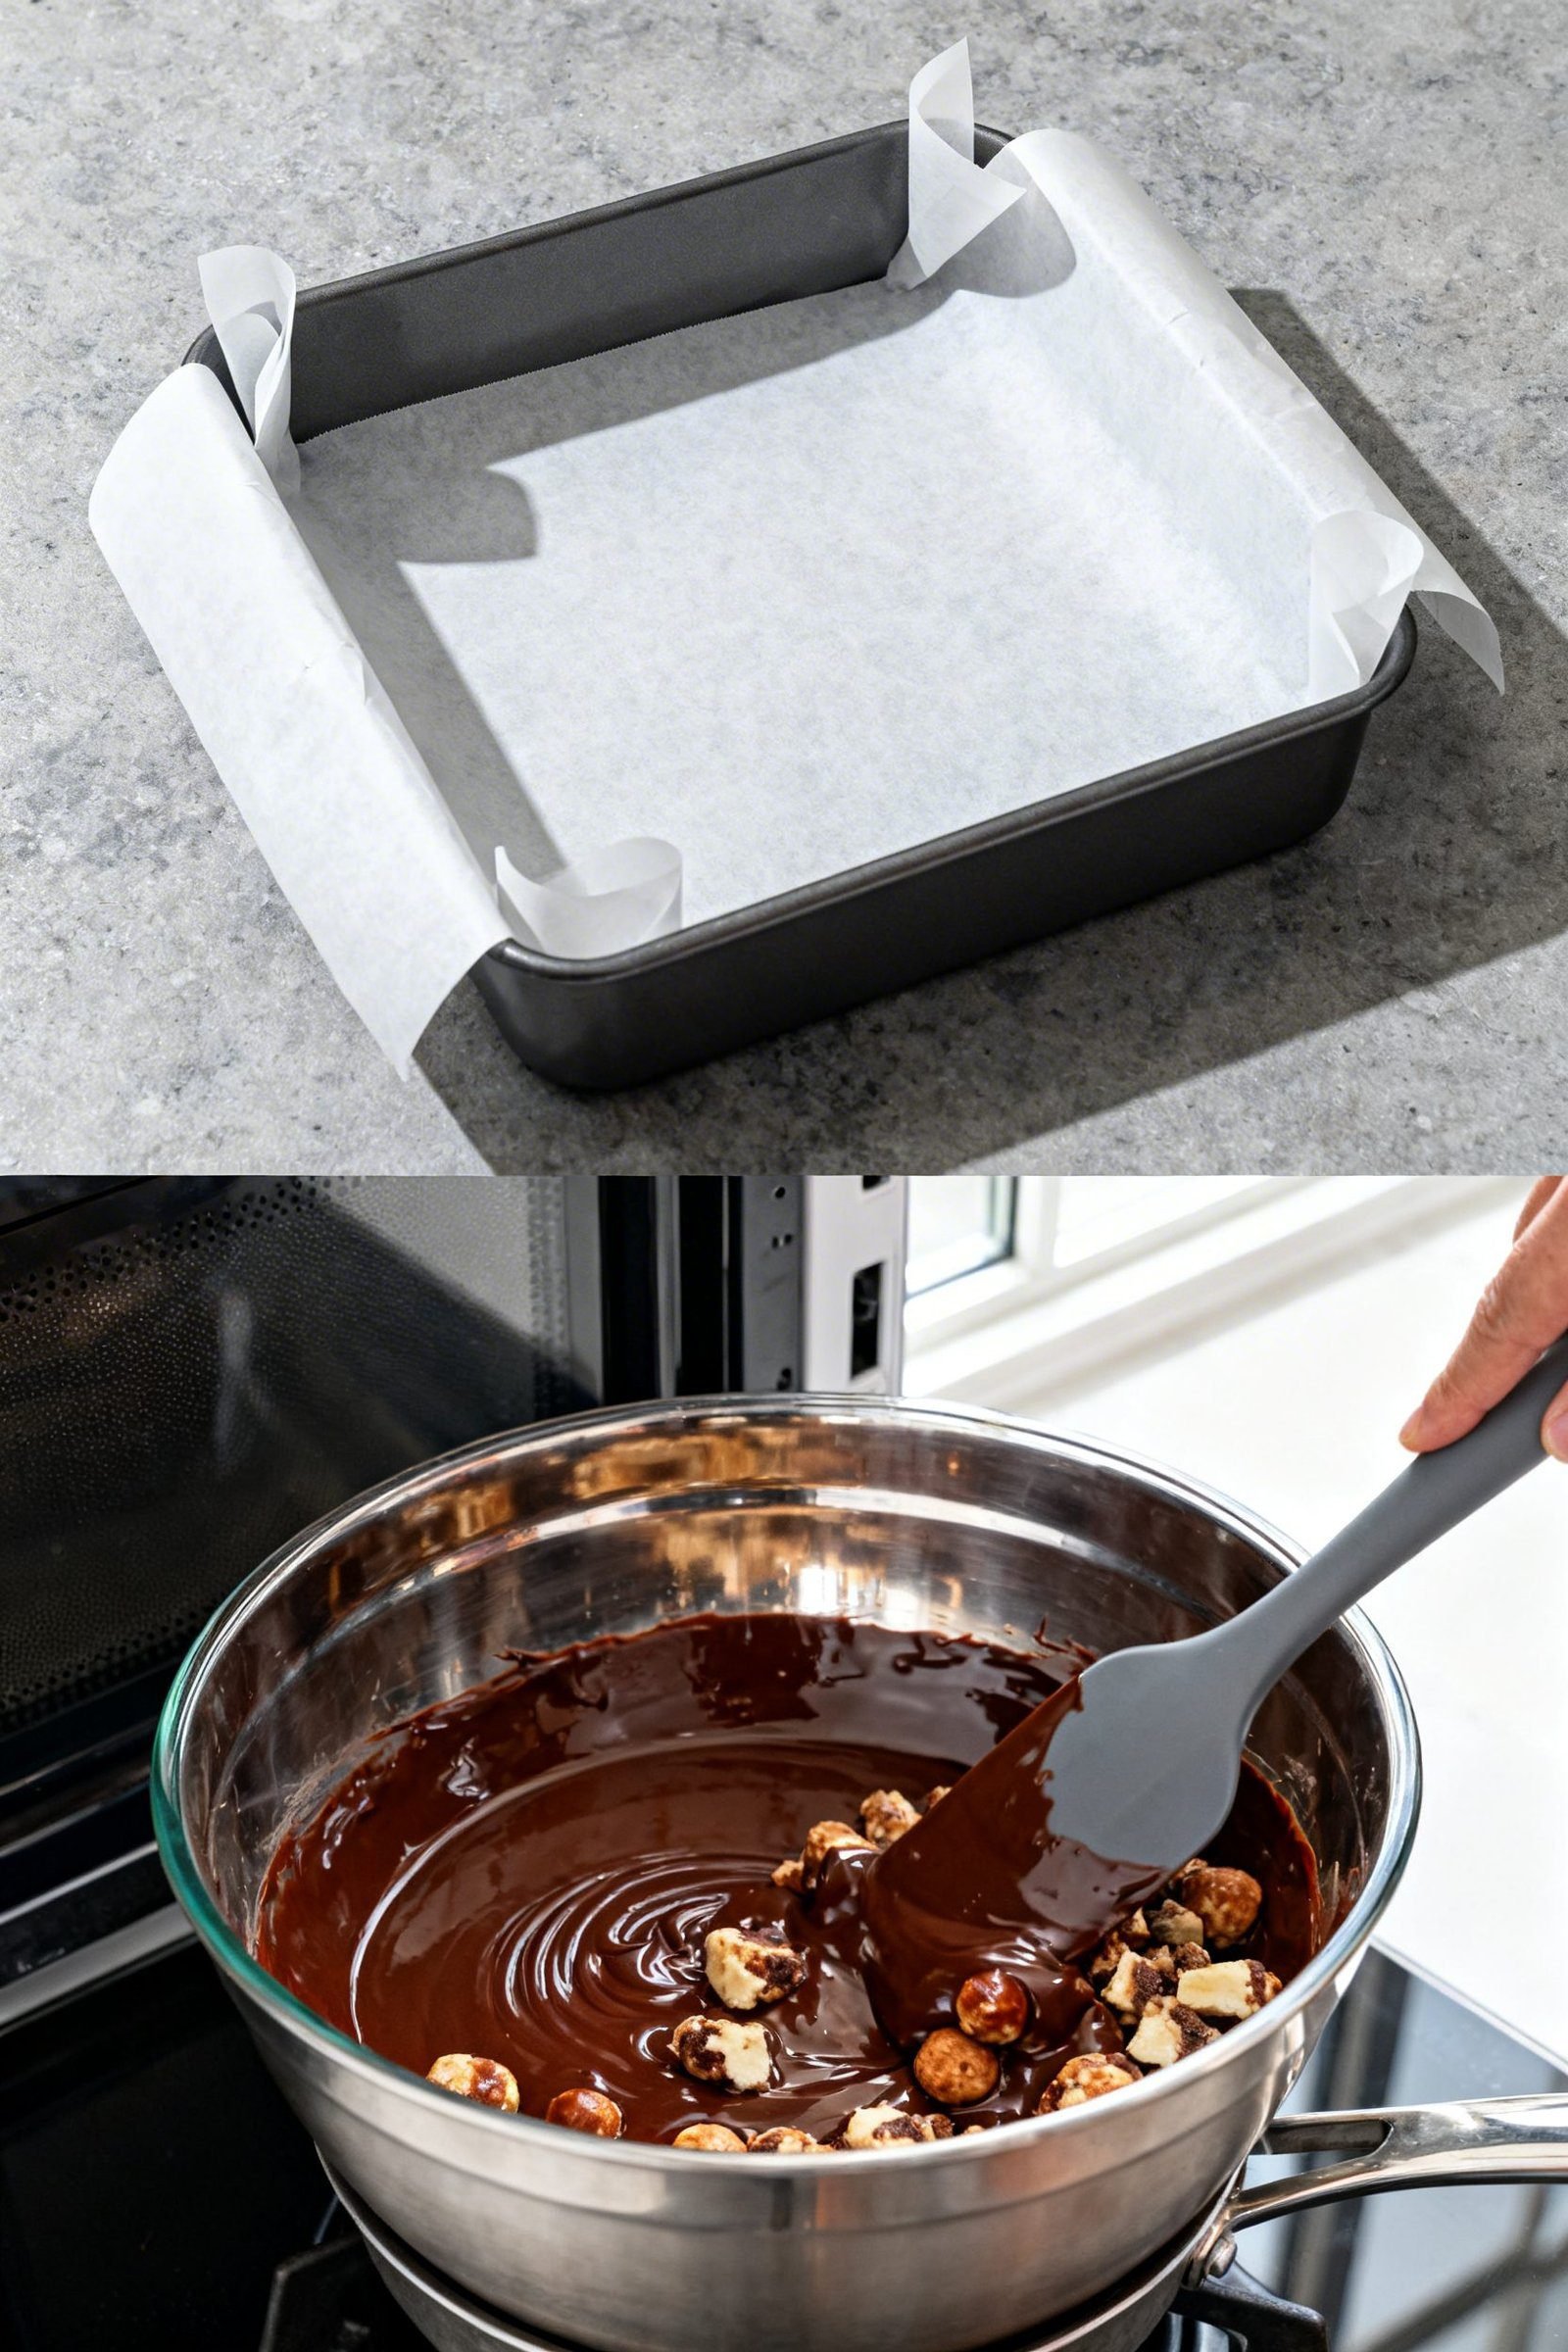
Pan prep: Line an 8×8- or 9×9-inch pan with parchment, leaving overhang for easy lifting.
How to Make Quick Rocky Road Candy
- Prep the pan: Line your square pan with parchment. Lightly grease the sides if your parchment doesn’t cover them.
- Melt the chocolate: Add chocolate chips and butter to a heatproof bowl. Microwave in 20–30 second bursts, stirring after each, until smooth. Or set the bowl over a pot of barely simmering water and stir until melted.
- Season and cool slightly: Stir in salt and vanilla. Let the chocolate sit 2–3 minutes so it cools a bit. Warm is fine; piping hot will melt the marshmallows.
- Fold in the mix-ins: Add marshmallows and chopped nuts. If using extras like coconut or dried fruit, fold them in now. Stir gently to coat without crushing.
- Press into the pan: Scrape the mixture into the lined pan. Press lightly with a spatula to level the top. Don’t compact it too firmly—you want pockets of marshmallow.
- Chill to set: Refrigerate for 45–60 minutes, or until firm enough to slice cleanly. For softer bites, let it set at cool room temperature for 2–3 hours.
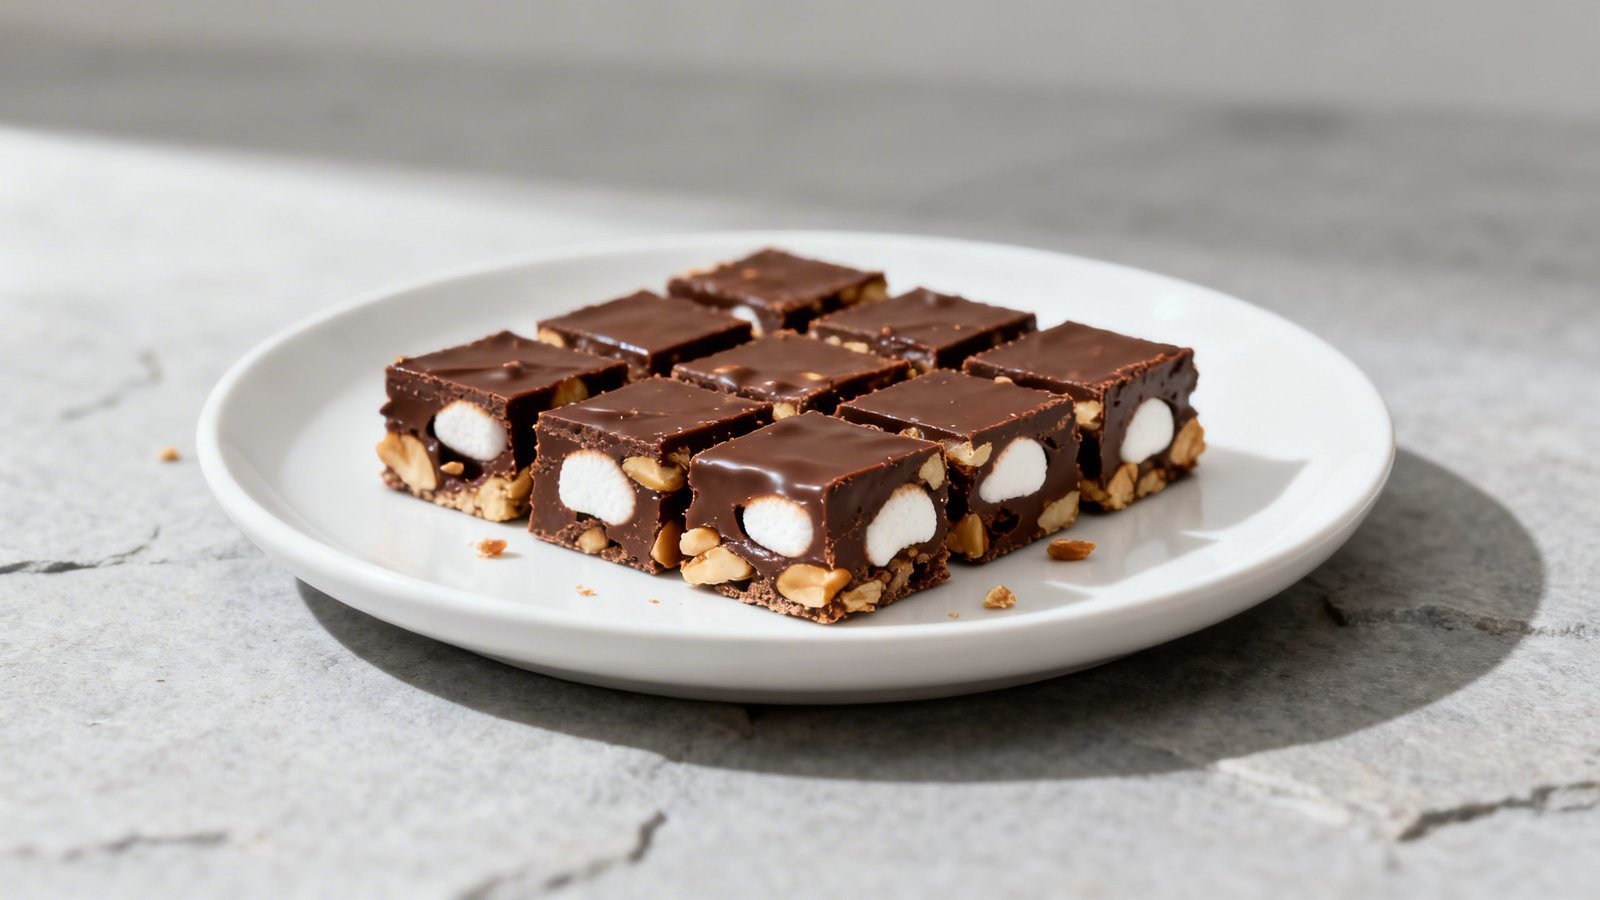
- Slice and serve: Lift out by the parchment. Use a sharp knife to cut 1- to 1.5-inch squares. Wipe the blade between cuts for neat edges.
Yield: About 36 bite-size squares from a 9-inch pan.

How to Store Rocky Road Candy
- Room temperature: Store in an airtight container up to 5 days in a cool, dry spot.
- Refrigerator: Keeps 2 weeks. Let pieces sit 5–10 minutes before serving for best texture.
- Freezer: Wrap tightly and freeze up to 2 months. Thaw in the fridge overnight, then bring to room temp to avoid condensation.
- Packing for gifts: Layer pieces with parchment so they don’t stick, and keep out of direct sun or heat.
Why You’ll Love Making and Eating This Treat
- Big flavor with little effort: Melting and mixing is all it takes.
- Kid-friendly project: Safe, quick, and fun to stir and press into the pan.
- Budget-friendly: Uses pantry items and stretches into many servings.
- Custom every time: Change the chocolate and mix-ins to suit your mood.
- Perfect for sharing: Great for bake sales, potlucks, and edible gifts.
What to Avoid for Perfect Results
- Overheating the chocolate: Scorched chocolate turns grainy. Use low heat and stir often.
- Adding wet mix-ins: Moisture can seize chocolate. Pat dried fruit dry and avoid juicy add-ins.
- Stirring in super-hot chocolate: Hot chocolate melts the marshmallows into streaks. Let it cool a couple of minutes first.
- Skipping salt: A pinch of salt sharpens the chocolate and balances sweetness.
- Packing the mixture too tightly: Compressing crushes marshmallows and makes dense, hard pieces.
Easy Flavor Twists to Try
- Dark and Toasty: Use 70% dark chocolate and toasted almonds, finish with flaky sea salt.
- Peanut Butter Swirl: Melt 1/3 cup peanut butter with the chocolate and use roasted peanuts.
- Mocha Crunch: Stir in 1 teaspoon espresso powder and add crushed chocolate-covered espresso beans.
- Cherry Almond: Add chopped dried cherries and slivered almonds, plus a touch of almond extract.
- Coconut Bliss: Fold in sweetened shredded coconut and macadamias; use half milk chocolate for a softer profile.
- Cookie Crush: Add 1 cup crushed chocolate wafer cookies or graham crackers for texture.
- Salted Pretzel: Swap half the nuts for crushed pretzels and finish with a sprinkle of flaky salt.
FAQ
Can I use large marshmallows?
Yes. Cut them into mini pieces with kitchen scissors lightly greased with oil to prevent sticking.
Which chocolate melts best?
Chocolate chips work, but bars melt silkier. If you can, use baking bars chopped into pieces for the smoothest texture.
Do I need corn syrup?
No. Butter and gentle melting keep the chocolate glossy and sliceable without corn syrup.
How do I make it nut-free?
Skip nuts and add crunchy alternatives like pretzels, seeds, or crushed cookies. Use nut-free chocolate if allergies require it.
Why did my chocolate seize?
Water or steam likely got in, or you overheated it. Start over if it turns thick and grainy, and melt low and slow next time.
Can I double the recipe?
Absolutely. Use a 9×13-inch pan and add a few extra minutes of chilling time.
How do I cut clean squares?
Use a sharp chef’s knife. Warm it under hot water, dry it, slice, and wipe between cuts.
Conclusion
Rocky road candy brings maximum joy with minimum work—melt, mix, chill, slice. Keep the basics the same, tweak the mix-ins to fit your crowd, and you’ll have a tray of rich chocolate marshmallow treats ready whenever the craving hits. Make a batch today, and stash a few squares for yourself before they vanish.
Quick Rocky Road Candy
A fast, no-bake chocolate treat with marshmallows and crunchy nuts that mixes in one bowl and sets quickly.
Ingredients
- Chocolate chips, semisweet or mixed (3 cups/18 oz)
- Unsalted butter (2 tablespoons)
- Fine sea salt (¼ teaspoon)
- Vanilla extract (1 teaspoon)
- Mini marshmallows (4 cups)
- Roasted nuts, chopped (1 ½ cups; peanuts, almonds, or walnuts; salted preferred)
- Optional add-ins, up to 1 cup total (shredded coconut, crushed pretzels, dried cherries, toffee bits)
- Parchment paper for an 8×8- or 9×9-inch pan
Instructions
- Line an 8×8- or 9×9-inch pan with parchment, leaving overhang; lightly grease any exposed sides.
- Melt chocolate chips with butter in a heatproof bowl using 20–30 second microwave bursts, stirring after each, or over a double boiler until smooth.
- Stir in the salt and vanilla, then let the chocolate cool 2–3 minutes so it’s warm, not hot.
- Fold in mini marshmallows and chopped roasted nuts; add any optional mix-ins and gently stir to coat.
- Scrape mixture into the lined pan and press lightly to level without compacting.
- Refrigerate 45–60 minutes until firm enough to slice, or let set at cool room temperature 2–3 hours.
- Lift out by the parchment and cut into 1- to 1.5-inch squares, wiping the knife between cuts.