
How to Make Graham Cracker Crust | Easy No Bake Pie Base Recipe
Meet your new baking best friend: a no-bake graham cracker crust that comes together in minutes and tastes like buttery, toasty cookie magic. This easy base fits any creamy pie filling you love—key lime, cheesecake, chocolate silk, banana cream—if you can dream it, this crust will hold it.
I’ll show you exactly how to get the perfect texture: crisp enough to slice cleanly, tender enough to eat with a fork, and never crumbly. You’ll learn which crumbs work best, how much butter you truly need, and the little pressure trick that keeps the crust from slumping. Let’s make your pies taste bakery-level with almost zero effort.
Why This No-Bake Graham Cracker Crust Works
- Right crumb-to-butter ratio: Enough fat to bind and slice cleanly, not so much that it turns greasy.
- Fine, even crumbs: Uniform texture packs tightly and prevents crumbling.
- Salt + sugar balance: A pinch of salt sharpens flavor; a little sugar adds structure and caramel notes.
- Chill to set: A short fridge rest firms the butter and locks everything in place for clean cuts.
- Flexible method: Works as a fully no-bake crust or get extra crunch with a quick 8–10 minute bake.
Ingredients
- Graham cracker crumbs (1 1/2 cups, about 12 whole crackers): Use plain or honey grahams. Crush very fine.
- Unsalted butter, melted (6 tablespoons): Binds crumbs and adds rich flavor.
- Granulated sugar (3 tablespoons): Sweetens and helps crisp the crust.
- Fine sea salt (1/8 teaspoon): Balances sweetness and boosts flavor.
- Optional: ground cinnamon (1/4 teaspoon): Adds warmth that pairs with most creamy fillings.
Pan options:
- 9-inch pie plate (standard depth)
- 9-inch springform pan (for no-bake cheesecake)
- Eight 4-inch tart pans (for minis)
How to Make a No-Bake Graham Cracker Crust
1) Make fine crumbs
- Food processor: Pulse crackers to very fine, sandy crumbs—no big flakes.
- Bag + rolling pin: Seal crackers in a zip-top bag, crush thoroughly, and sift out any large bits.
Goal texture: Sand-like, not dusty powder and not chunky.
2) Mix the crust
- Whisk crumbs, sugar, salt, and cinnamon (if using) in a bowl.
- Pour in melted butter and stir until all crumbs look evenly moistened and start to clump when squeezed.
Check it: Pinch some mixture—it should hold together without feeling wet. If it crumbles, add 1 teaspoon more melted butter at a time.
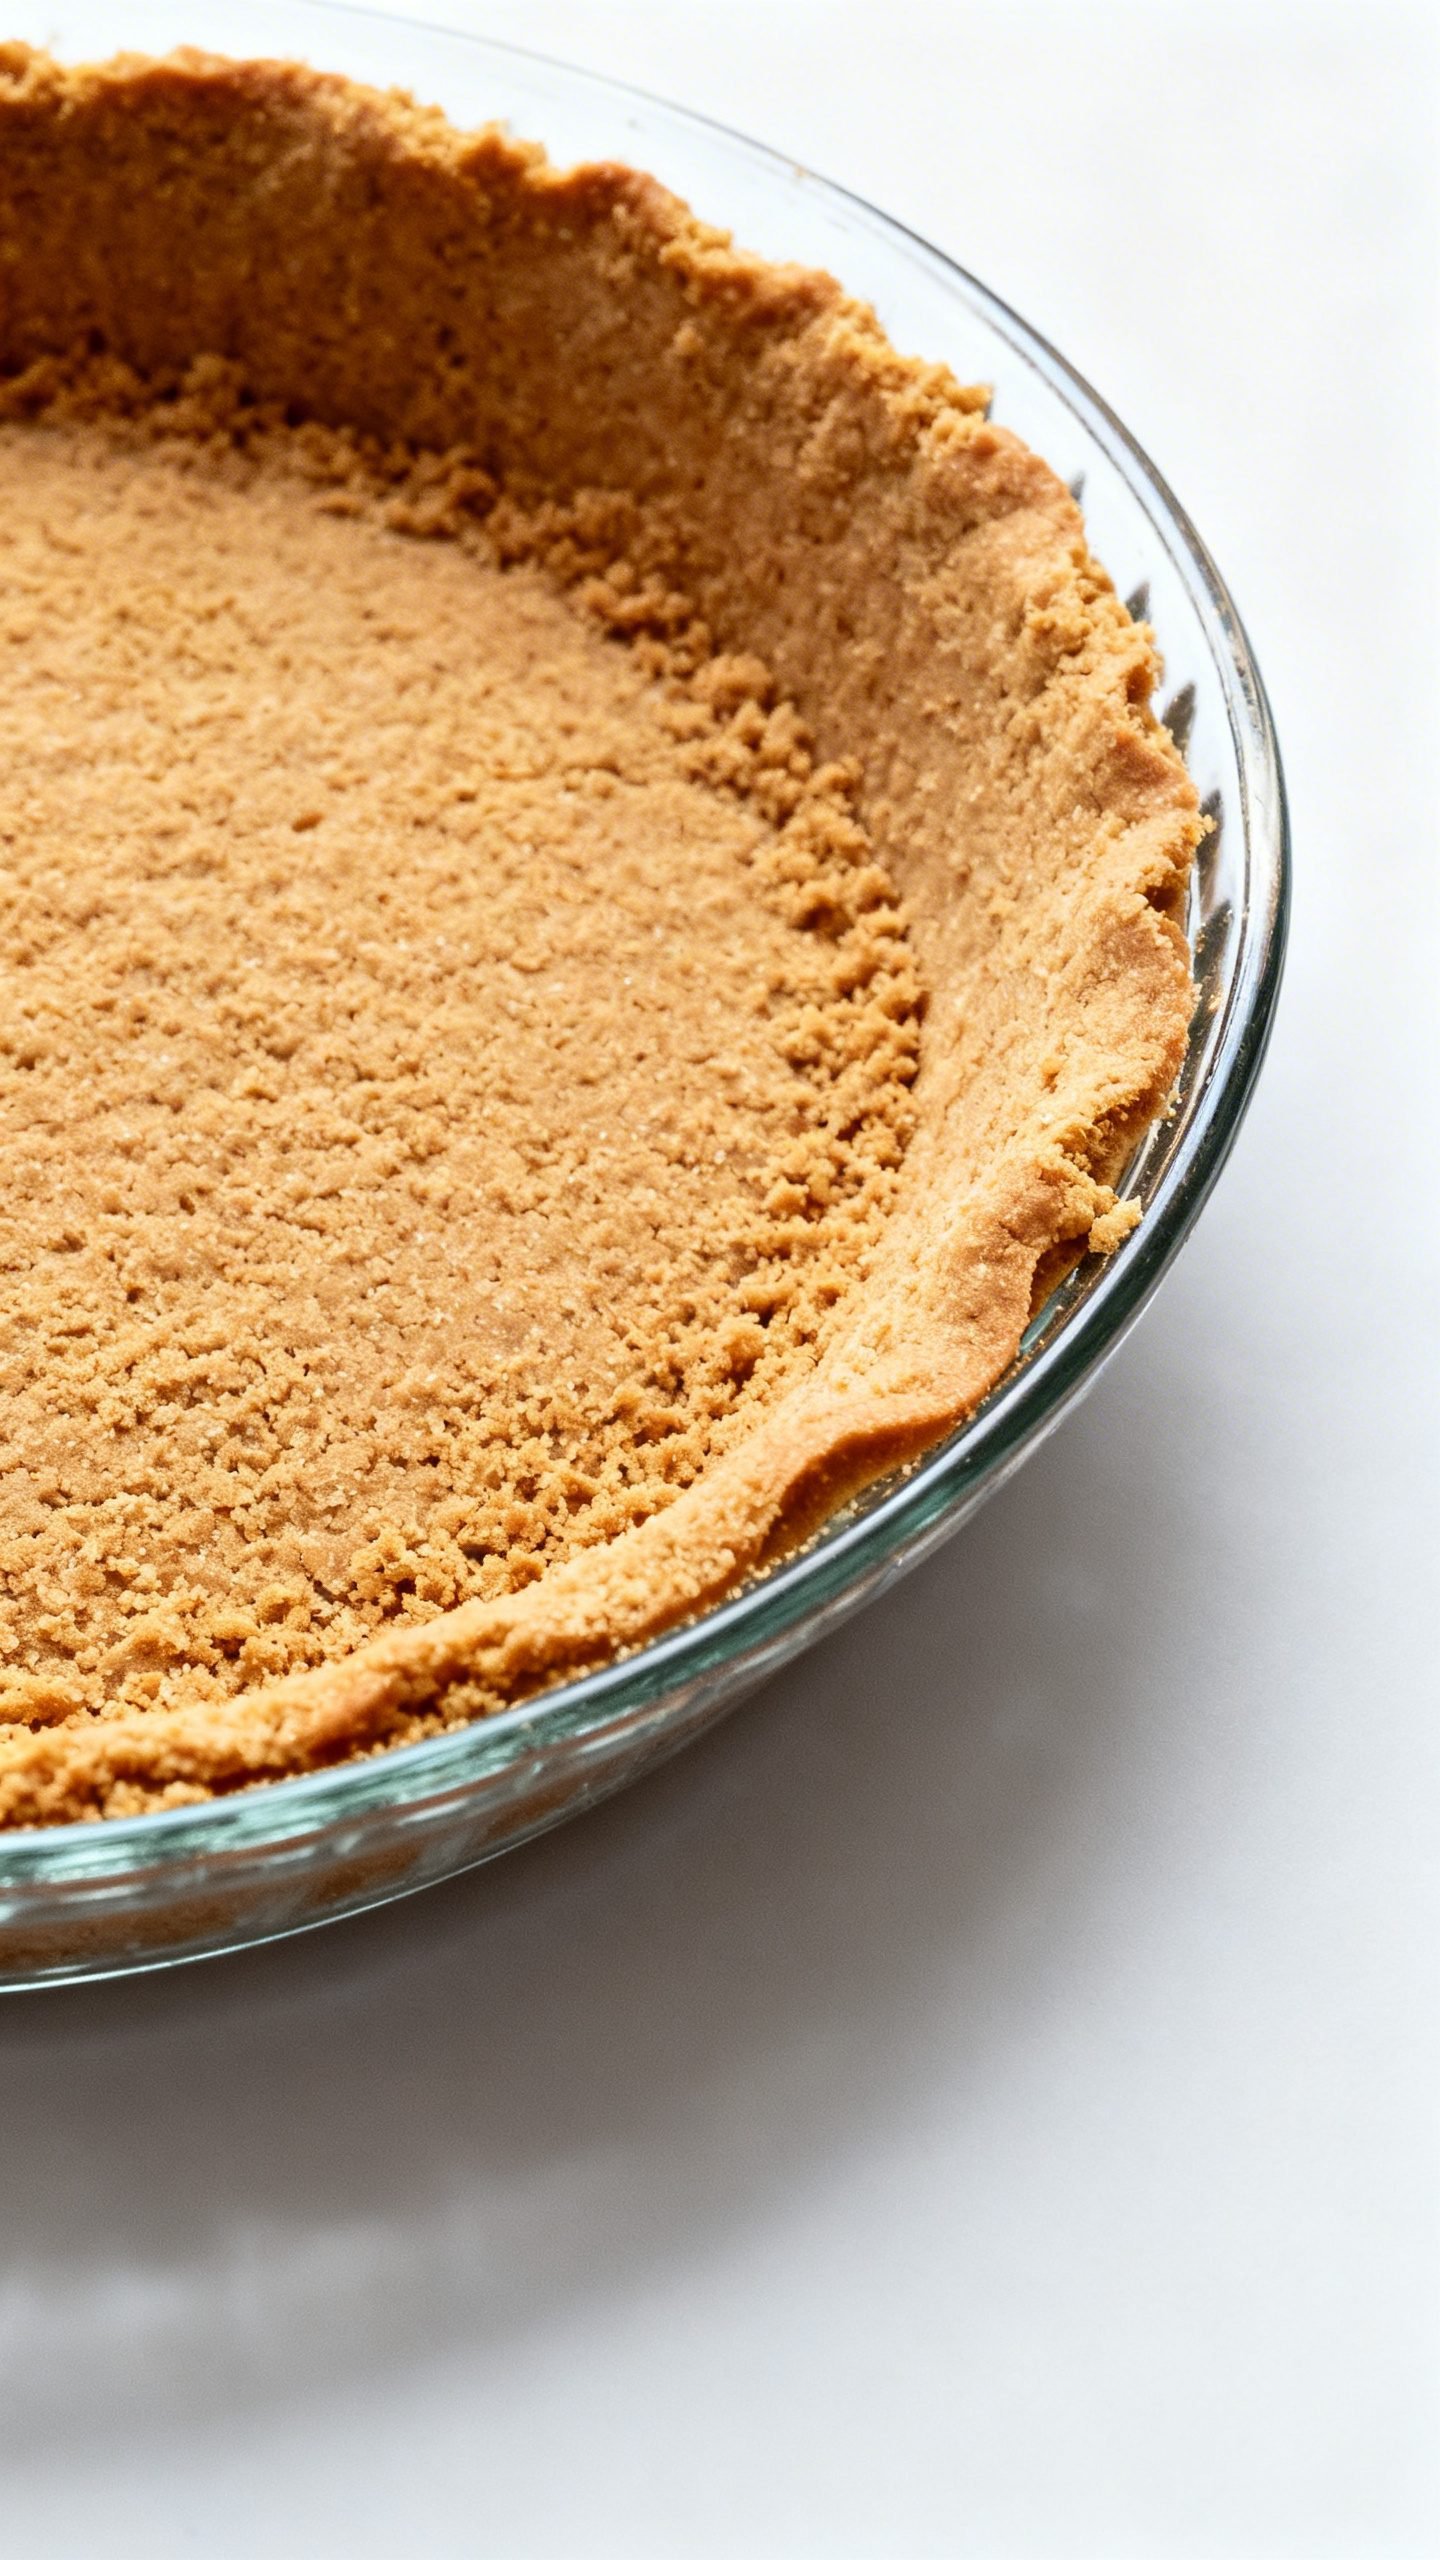
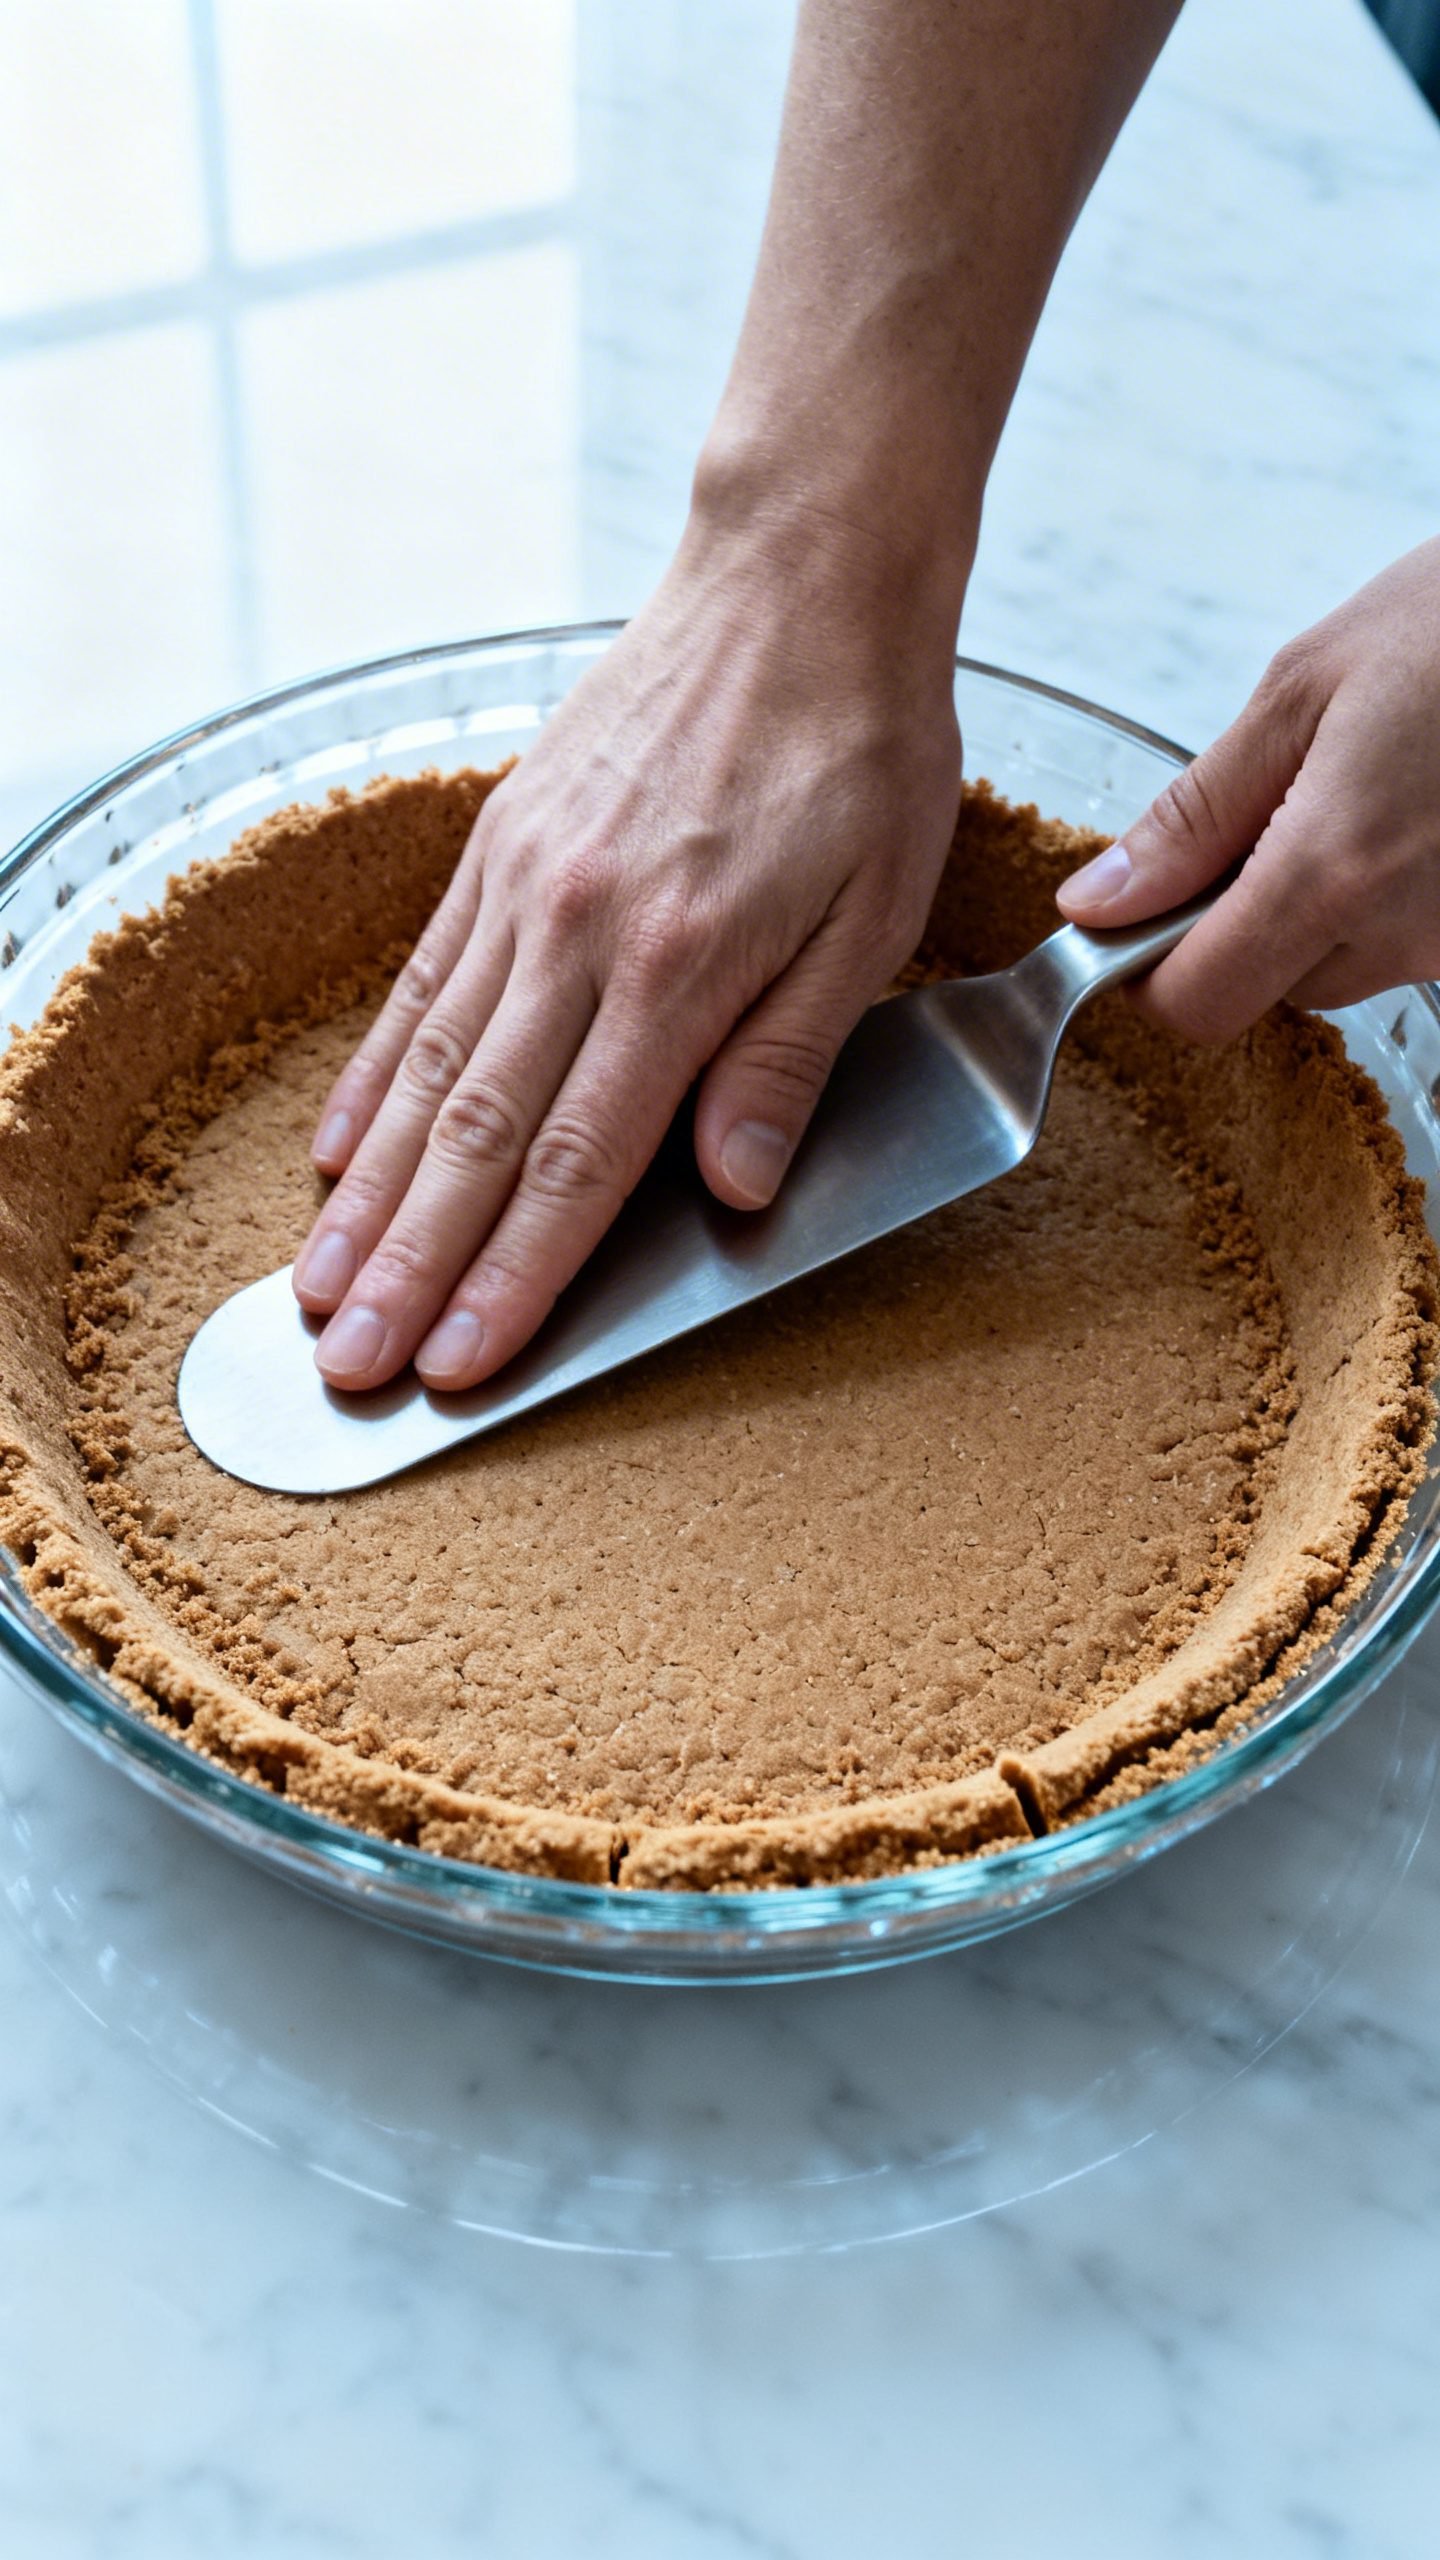
3) Press it evenly
- Pour mixture into your pan. Spread into an even layer.
- Use the bottom of a flat measuring cup or glass to press the base firmly, then press up the sides.
- Aim for 1/4-inch thickness on the bottom and slightly thinner up the walls.
Pro tip: Anchor the edge first. Press where the sides meet the base to avoid a thick ridge that crumbles later.
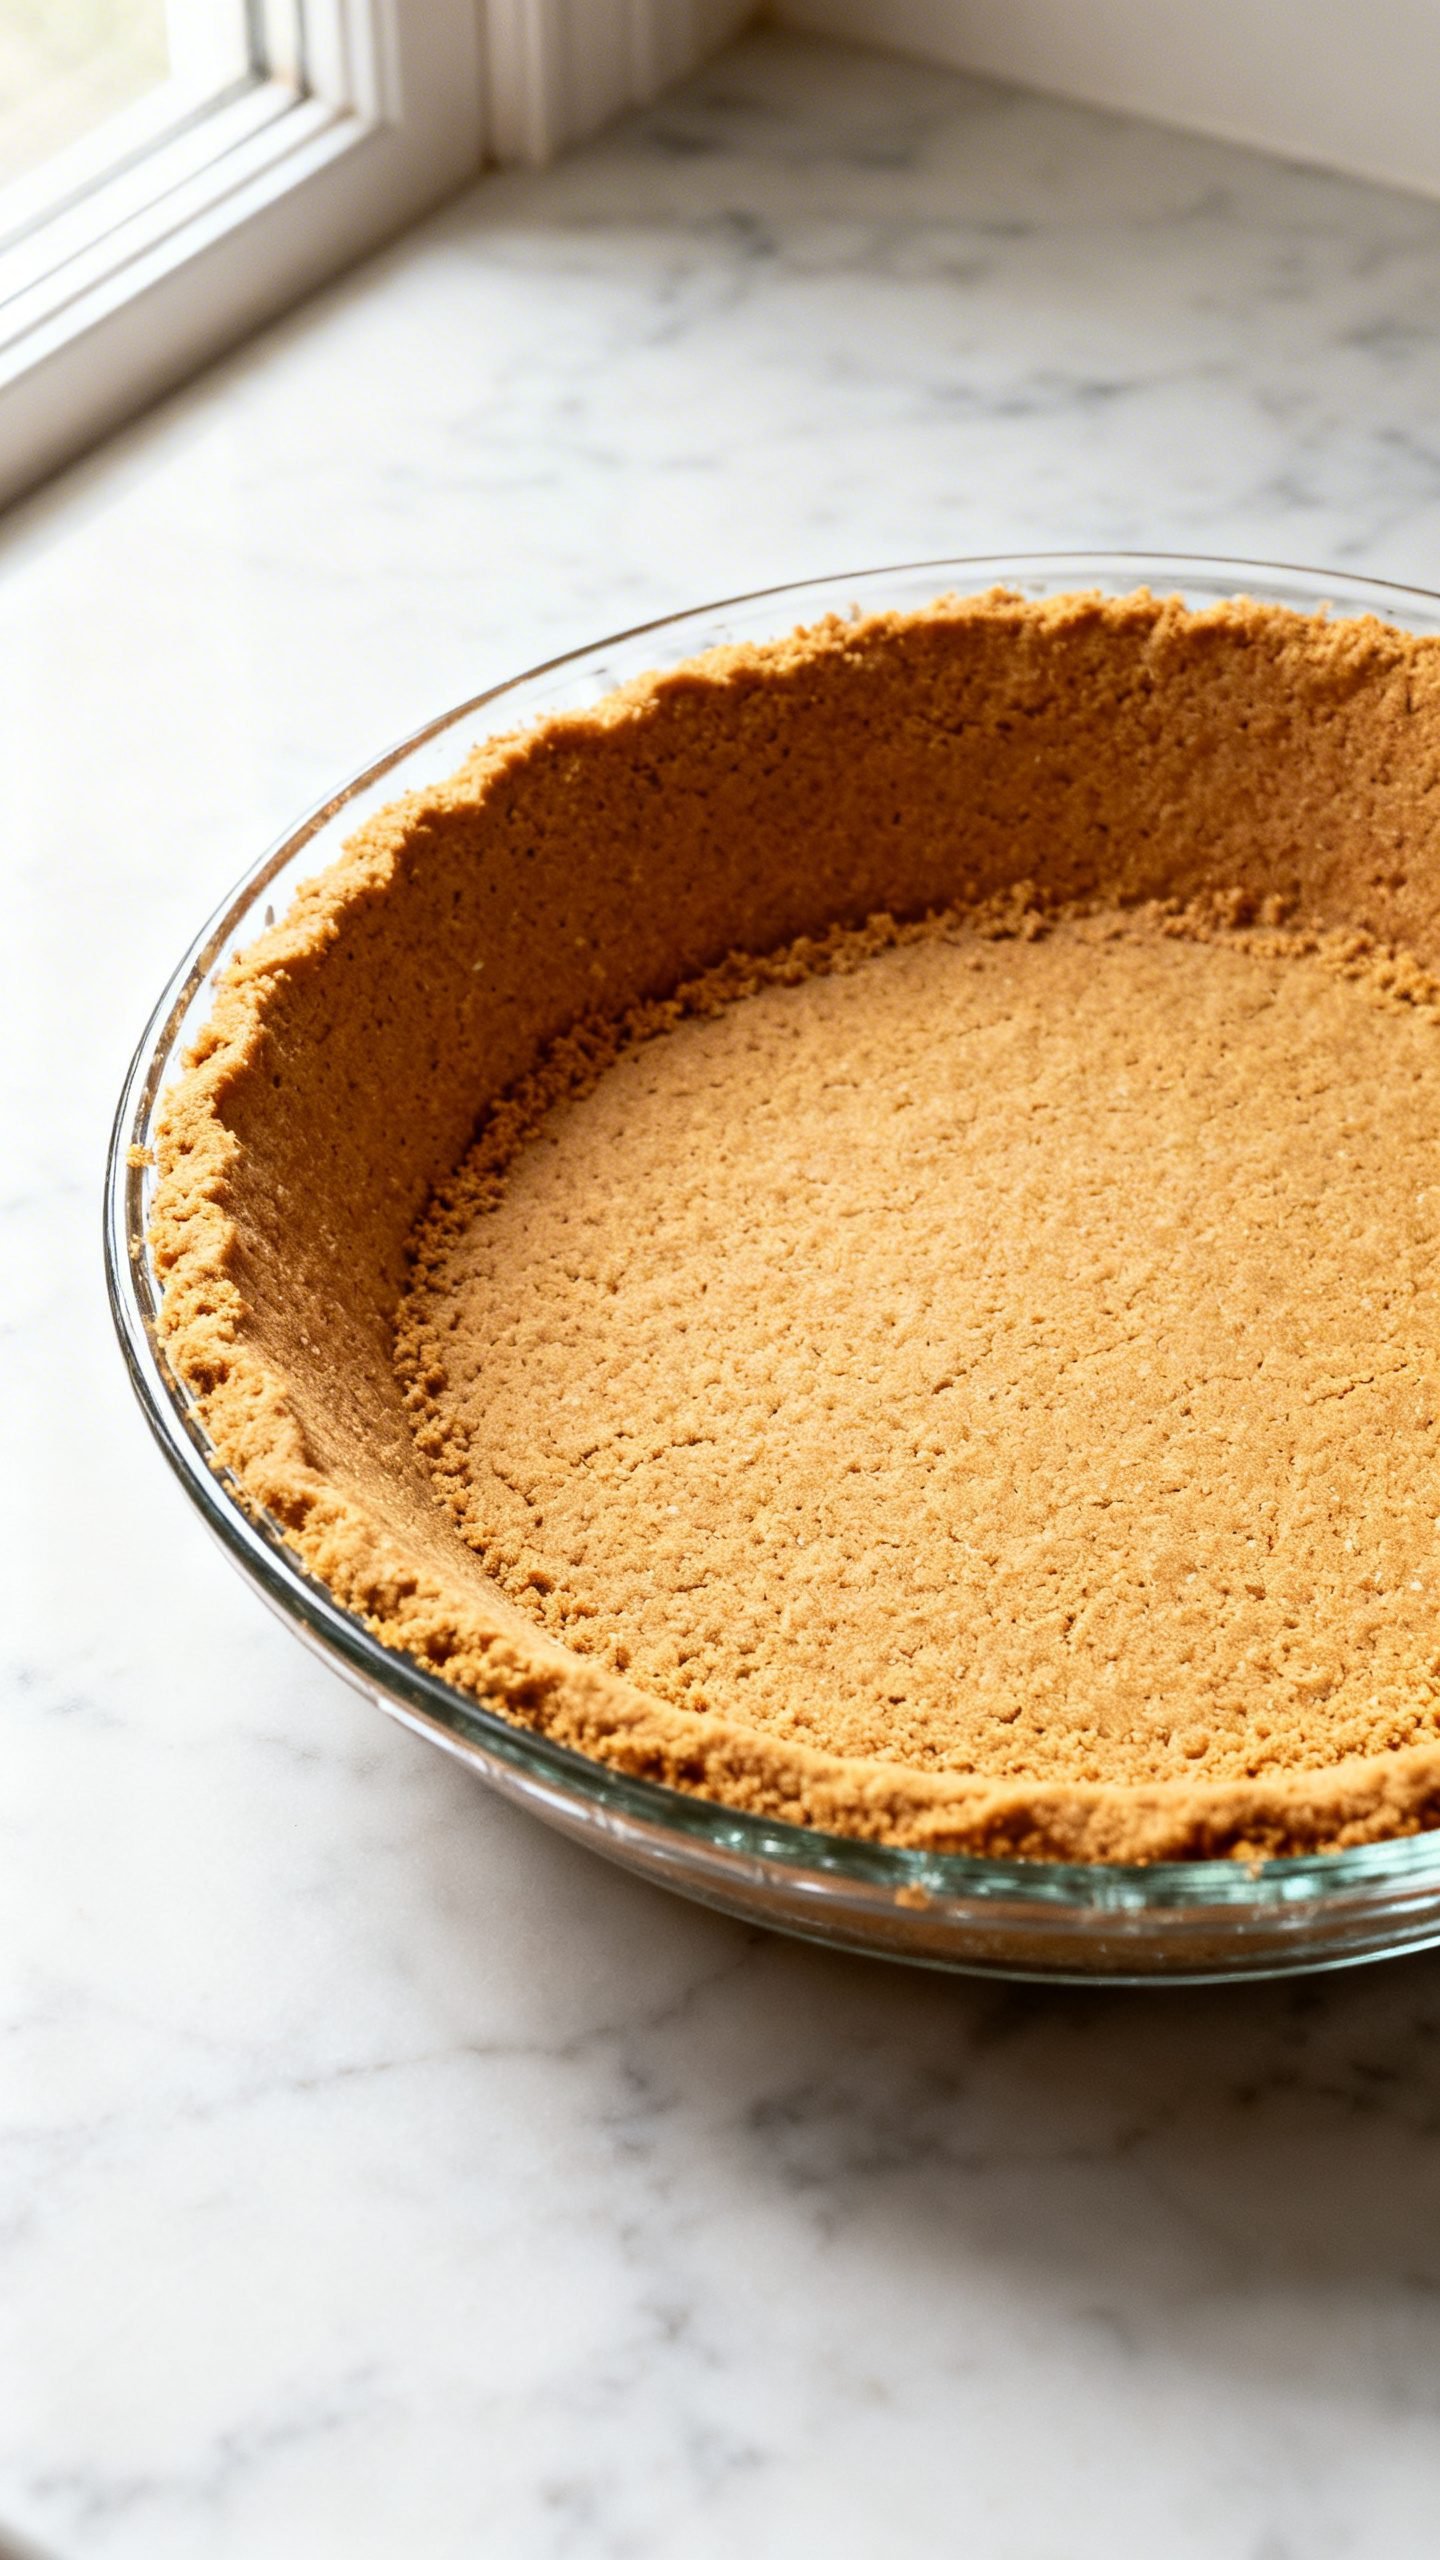
4) Chill or bake to set
- No-bake option: Chill 30–45 minutes until firm, then fill.
- Crispier option: Bake at 350°F (177°C) for 8–10 minutes until fragrant and slightly darker. Cool completely before filling.
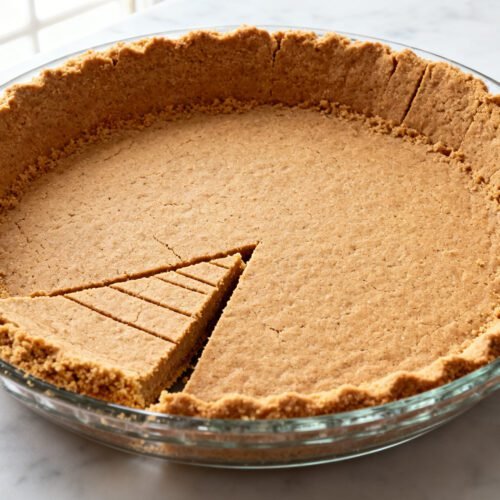
When is it ready? The crust should feel solid when tapped and release clean slices when cut.
How to Store Your Graham Cracker Crust
- Unfilled, chilled crust: Cover tightly and refrigerate up to 3 days.
- Unfilled, baked crust: Cool fully, wrap well, and refrigerate up to 5 days or freeze up to 2 months.
- Filled pies: Follow the filling’s storage instructions. Most cream pies keep 2–4 days in the fridge.
- Freezing tips: For longer storage, wrap the pan in plastic, then foil. Thaw in the fridge before filling.
Benefits of Making Your Own Graham Cracker Crust
- Better flavor: Real butter beats pre-made crusts every time.
- Custom texture: Control crumb size and thickness for easier slicing.
- Adaptable: Works with citrus, chocolate, nutty, or fruity fillings.
- Fast and reliable: 10 minutes of hands-on time, no special skills needed.
- Budget-friendly: Pantry staples make a bakery-quality base for less.
What Not to Do
- Don’t leave big crumb chunks: They break the structure and cause crumbling.
- Don’t skimp on pressing: Light pressure leads to a loose, messy crust. Pack it firmly.
- Don’t over-butter: Too much butter turns greasy and can slump up the sides.
- Don’t skip chilling: Butter needs time to set before you add filling.
- Don’t pour hot fillings: Heat melts the butter and weakens the crust. Cool fillings to room temp first.
Variations You Can Try
- Brown butter crust: Brown the butter until nutty, cool slightly, then mix in. Incredible with pumpkin or banana.
- Chocolate crust: Add 1 1/2 tablespoons cocoa powder and 1 extra tablespoon sugar. Great with peanut butter or mint fillings.
- Nutty twist: Replace 1/4 cup crumbs with finely ground toasted pecans, almonds, or hazelnuts.
- Gluten-free: Use gluten-free graham crackers and the same method.
- Spiced version: Add cinnamon and a pinch of ginger for chai or fall-inspired pies.
- Coconut crunch: Stir in 2 tablespoons finely shredded unsweetened coconut, then bake for a toasty note.
- Extra sturdy: For heavy fillings, add 1 tablespoon sugar and bake 10–12 minutes for maximum structure.
FAQ
How many graham crackers make 1 1/2 cups of crumbs?
About 12 full sheets (rectangle crackers). Measure after crushing for accuracy.
Can I reduce the sugar?
Yes. Use 1–2 tablespoons. The crust stays together, but flavor and crispness drop slightly.
Why did my crust crumble?
- Crumbs too coarse: Crush finer.
- Not enough butter: Add 1–2 teaspoons melted butter and press again.
- Skipped chill time: Chill at least 30 minutes before filling.
How do I prevent sogginess?
- Bake the crust 8–10 minutes to set it extra firm.
- Cool completely before adding filling.
- Use thicker, high-fat fillings rather than thin, watery ones.
Can I use a different cookie?
Absolutely. Vanilla wafers, digestive biscuits, Biscoff, or chocolate wafers all work. Adjust butter slightly if crumbs seem dry or oily.
How do I line the pan?
You don’t need to, but a light mist of nonstick spray helps slice removal in pie plates. For springform pans, you can line the bottom with parchment.
Is this safe for no-bake fillings?
Yes. Chill the crust fully before adding custards, cream cheese fillings, or mousse.
Conclusion
You only need a few pantry staples and 10 minutes to master a graham cracker crust that slices clean, tastes buttery, and never falls apart. Keep the crumbs fine, the butter balanced, and the pressure firm, and you’ll turn every cream pie into a showstopper. Make one today, chill it while you prep the filling, and enjoy that first perfect slice.
How to Make Graham Cracker Crust | Easy No Bake Pie Base Recipe
Ingredients
Ingredients
- 1 1/2 cups graham cracker crumbs (about 12 whole crackers)
- 6 tablespoons unsalted butter, melted
- 3 tablespoons granulated sugar
- 1/8 teaspoon fine sea salt
- 1/4 teaspoon ground cinnamon (optional)
Instructions
Instructions
- Crush graham crackers into very fine, sandy crumbs using a food processor or a bag and rolling pin, removing any large bits.
- Whisk the crumbs, sugar, salt, and cinnamon (if using) in a bowl.
- Pour in the melted butter and stir until all crumbs are evenly moistened and hold together when pinched; if too dry, add melted butter 1 teaspoon at a time.
- Pour the mixture into a 9-inch pie plate, 9-inch springform pan, or mini tart pans and spread evenly.
- Press the crumbs firmly into the bottom and up the sides using a flat-bottomed measuring cup or glass, aiming for about 1/4-inch thickness on the base and slightly thinner on the sides, anchoring the edge where the sides meet the base.
- Refrigerate the crust for 30–45 minutes until firm before filling, or bake at 350°F (177°C) for 8–10 minutes until fragrant and slightly darker, then cool completely before filling.


