How to Flood Cookies with Royal Icing | Perfect Sugar Cookie Tutorial
You can decorate bakery-level sugar cookies at home with smooth, glossy royal icing. I’ll show you how to outline, flood, and add details without stress. You’ll learn the right icing consistency, timing tips, and easy fixes for common mistakes.
This tutorial walks you through everything: from mixing icing and coloring it, to piping crisp borders and flooding with a flawless finish. No fancy tools required—just a couple of piping bags, tips (or cut bags), and a little patience. Let’s make cookies that look as good as they taste.
Why This Royal Icing Flooding Method Works
I keep the process simple and reliable, so you get consistent results every time.
- Two consistencies, one icing: Mix a base batch, then adjust it into outline consistency and flood consistency. You get sharp edges and a smooth fill without buying different products.
- Clean borders prevent leaks: A slightly thicker outline acts like a fence, so your flood layer stays put and dries into a glassy surface.
- Quick-dry technique: A short fan or dehydrator session (10–15 minutes) sets the surface fast, preventing dents and craters.
- Beginner-friendly flow: Clear steps with timing cues keep things moving, so icing doesn’t crust in the bag or run off the cookie.
- Predictable consistency checks: The “second count” test makes consistency easy to nail without guesswork.
Ingredients
For the Sugar Cookies
- Unsalted butter – softened for smooth dough
- Granulated sugar
- Large egg
- Vanilla extract (and a touch of almond extract if you like)
- All-purpose flour
- Baking powder
- Fine salt
For the Royal Icing
- Powdered sugar – sifted for lump-free icing
- Meringue powder – reliable structure and safe for everyone
- Warm water – helps dissolve quickly
- Vanilla or clear almond extract – keep it clear for bright colors
- Gel food coloring – concentrated color without thinning the icing
Tools
- Piping bags (or squeeze bottles)
- Couplers and tips – #2 or #3 round tips work great
- Scribe tool or toothpick – for popping bubbles and nudging icing
- Sheet pans and parchment – to dry and store decorated cookies
- Small fan or dehydrator – optional, but speeds surface drying
How to Flood Sugar Cookies with Royal Icing
1) Bake sturdy, flat cookies
- Chill the cut dough for 20–30 minutes before baking to hold shape.
- Roll evenly (about 1/4 inch thick) so the icing settles uniformly.
- Let cookies cool completely before decorating.
2) Mix royal icing base
- Whisk powdered sugar and meringue powder to combine.
- Add warm water and beat on low, then medium, until the icing forms soft peaks that hold a tip—about 3–4 minutes.
- Flavor with a little clear extract. Keep it covered with a damp towel to prevent crusting.
3) Split and color
- Divide into bowls for each color.
- Add gel color a little at a time. Stir gently to avoid bubbles.
4) Adjust consistencies
- Outline consistency: Aim for a 12–15 second icing (drag a knife through; the line disappears in 12–15 seconds). Add powdered sugar to thicken or a few drops of water to loosen.
- Flood consistency: Aim for 8–10 seconds for smooth, self-leveling icing.
- Transfer outline and flood icings to separate bags or bottles. Label them to avoid mix-ups.
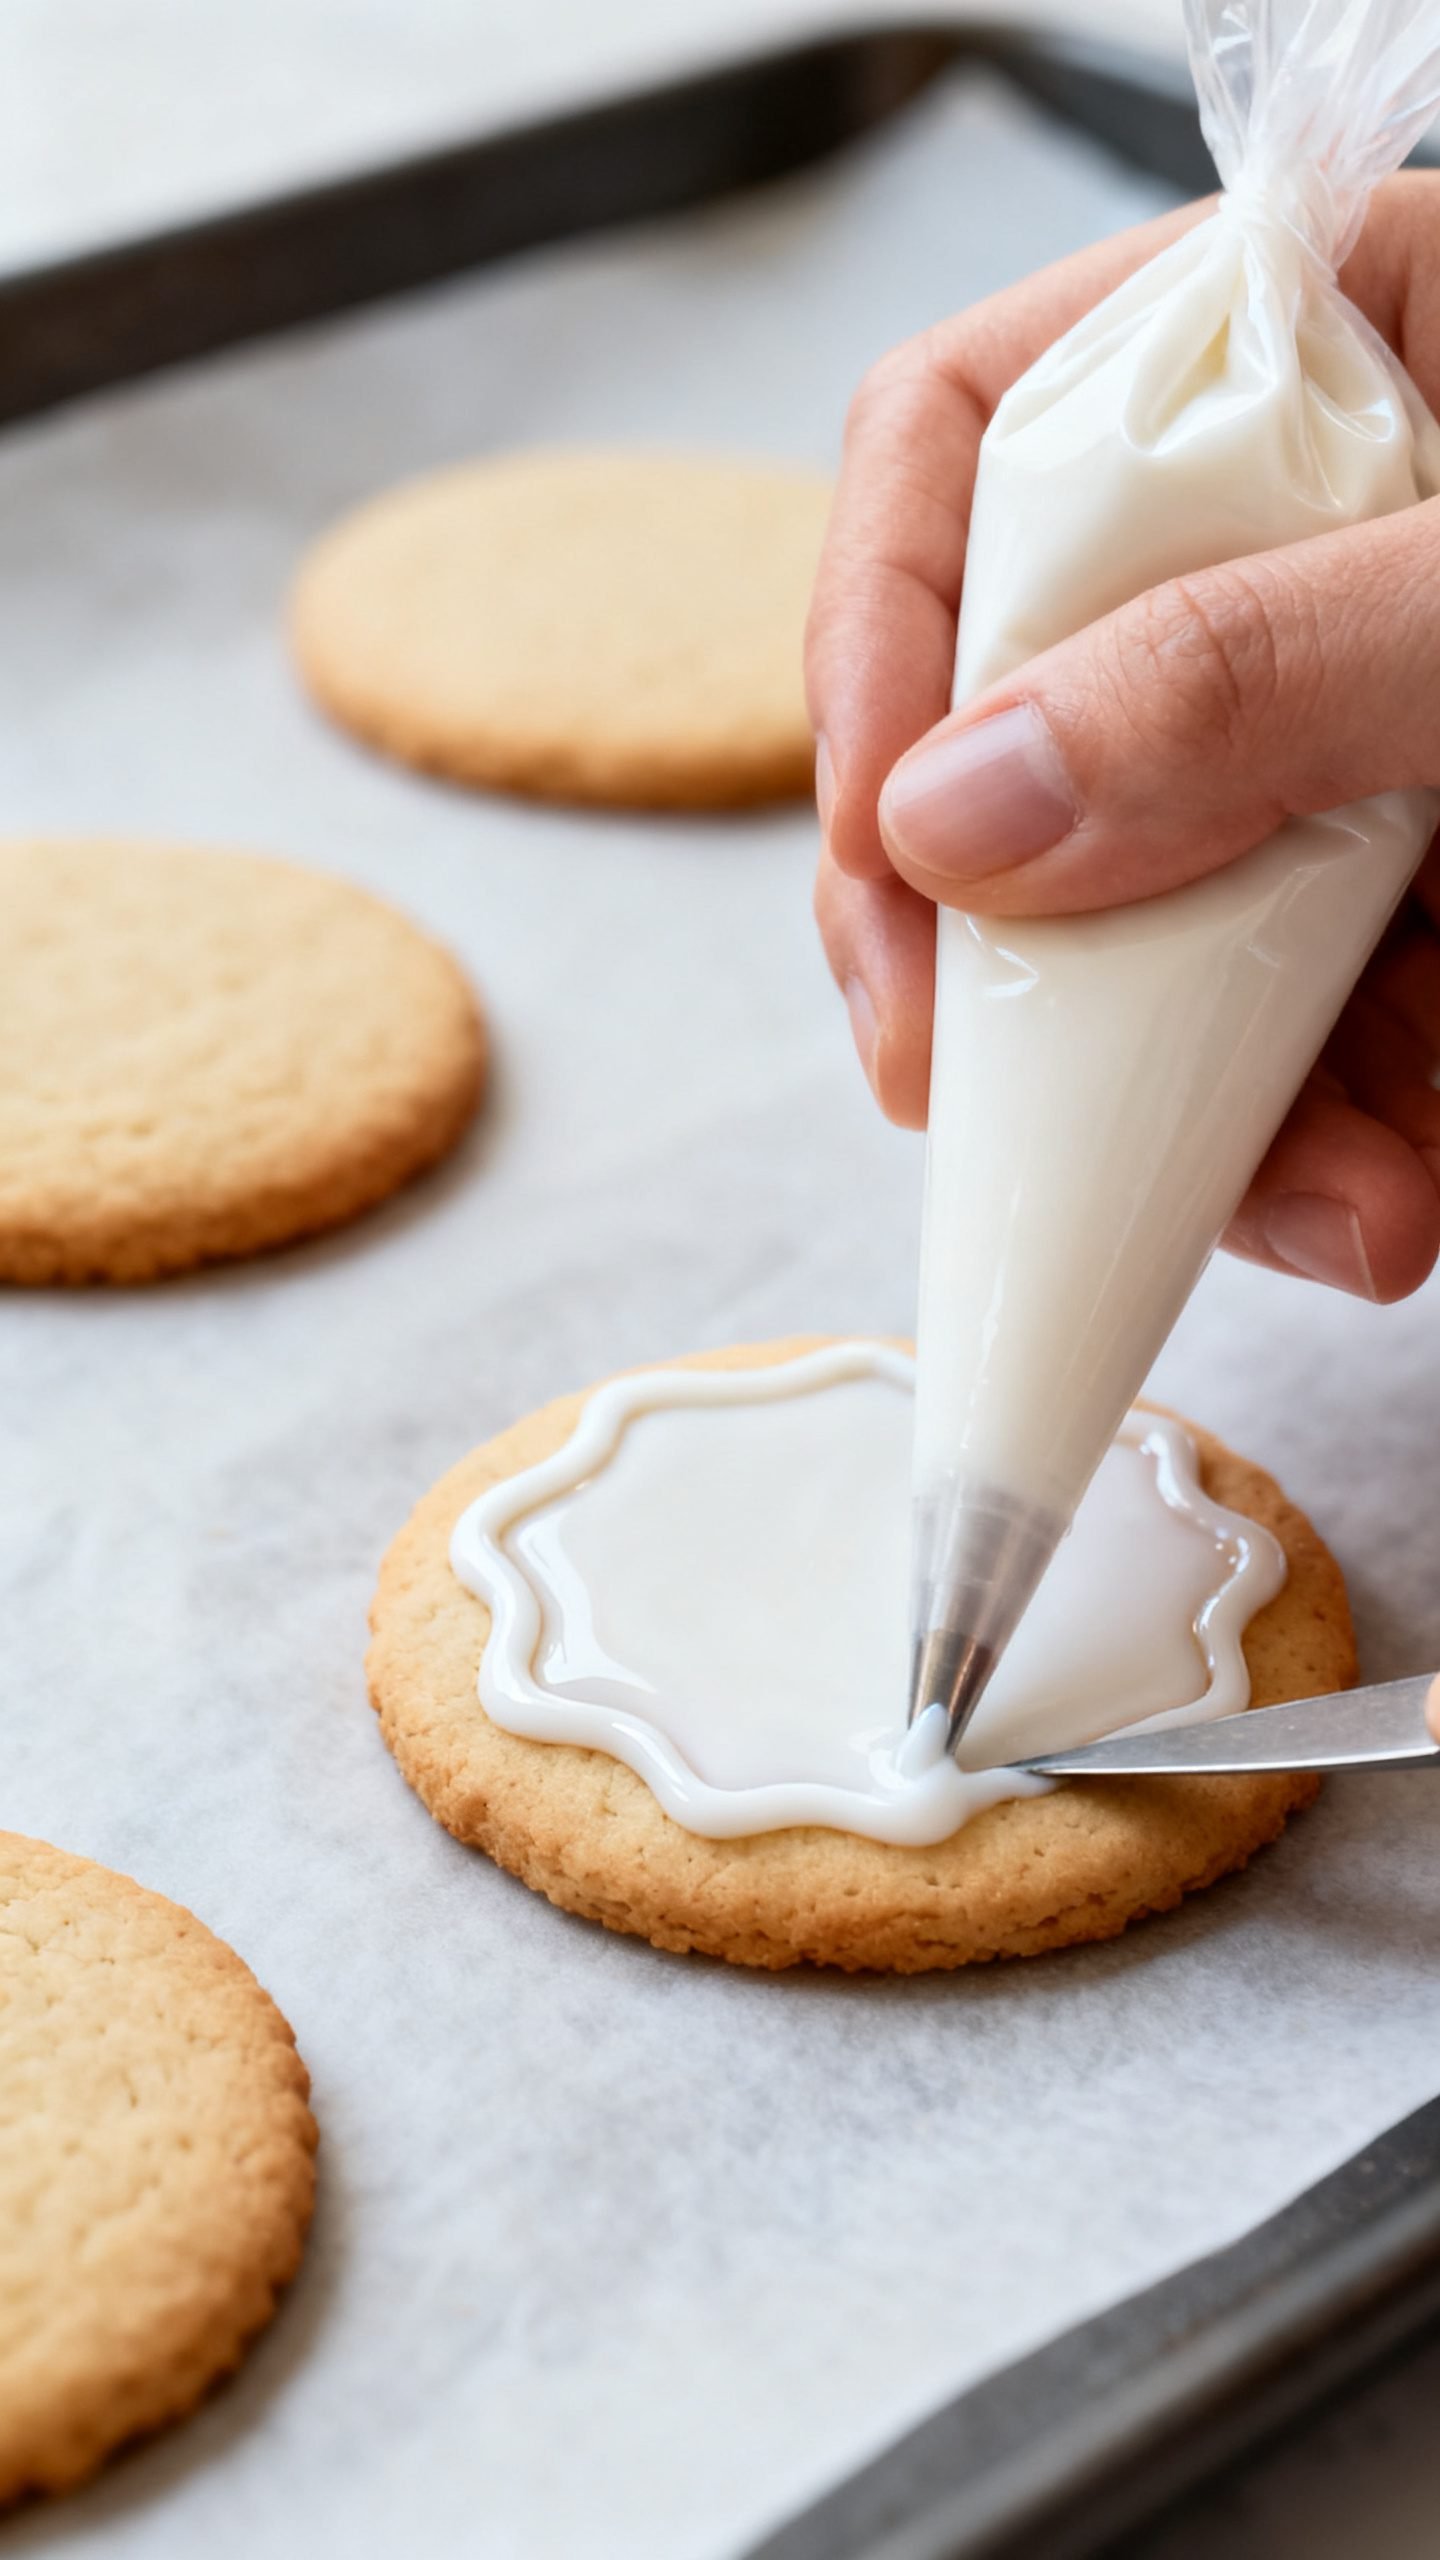
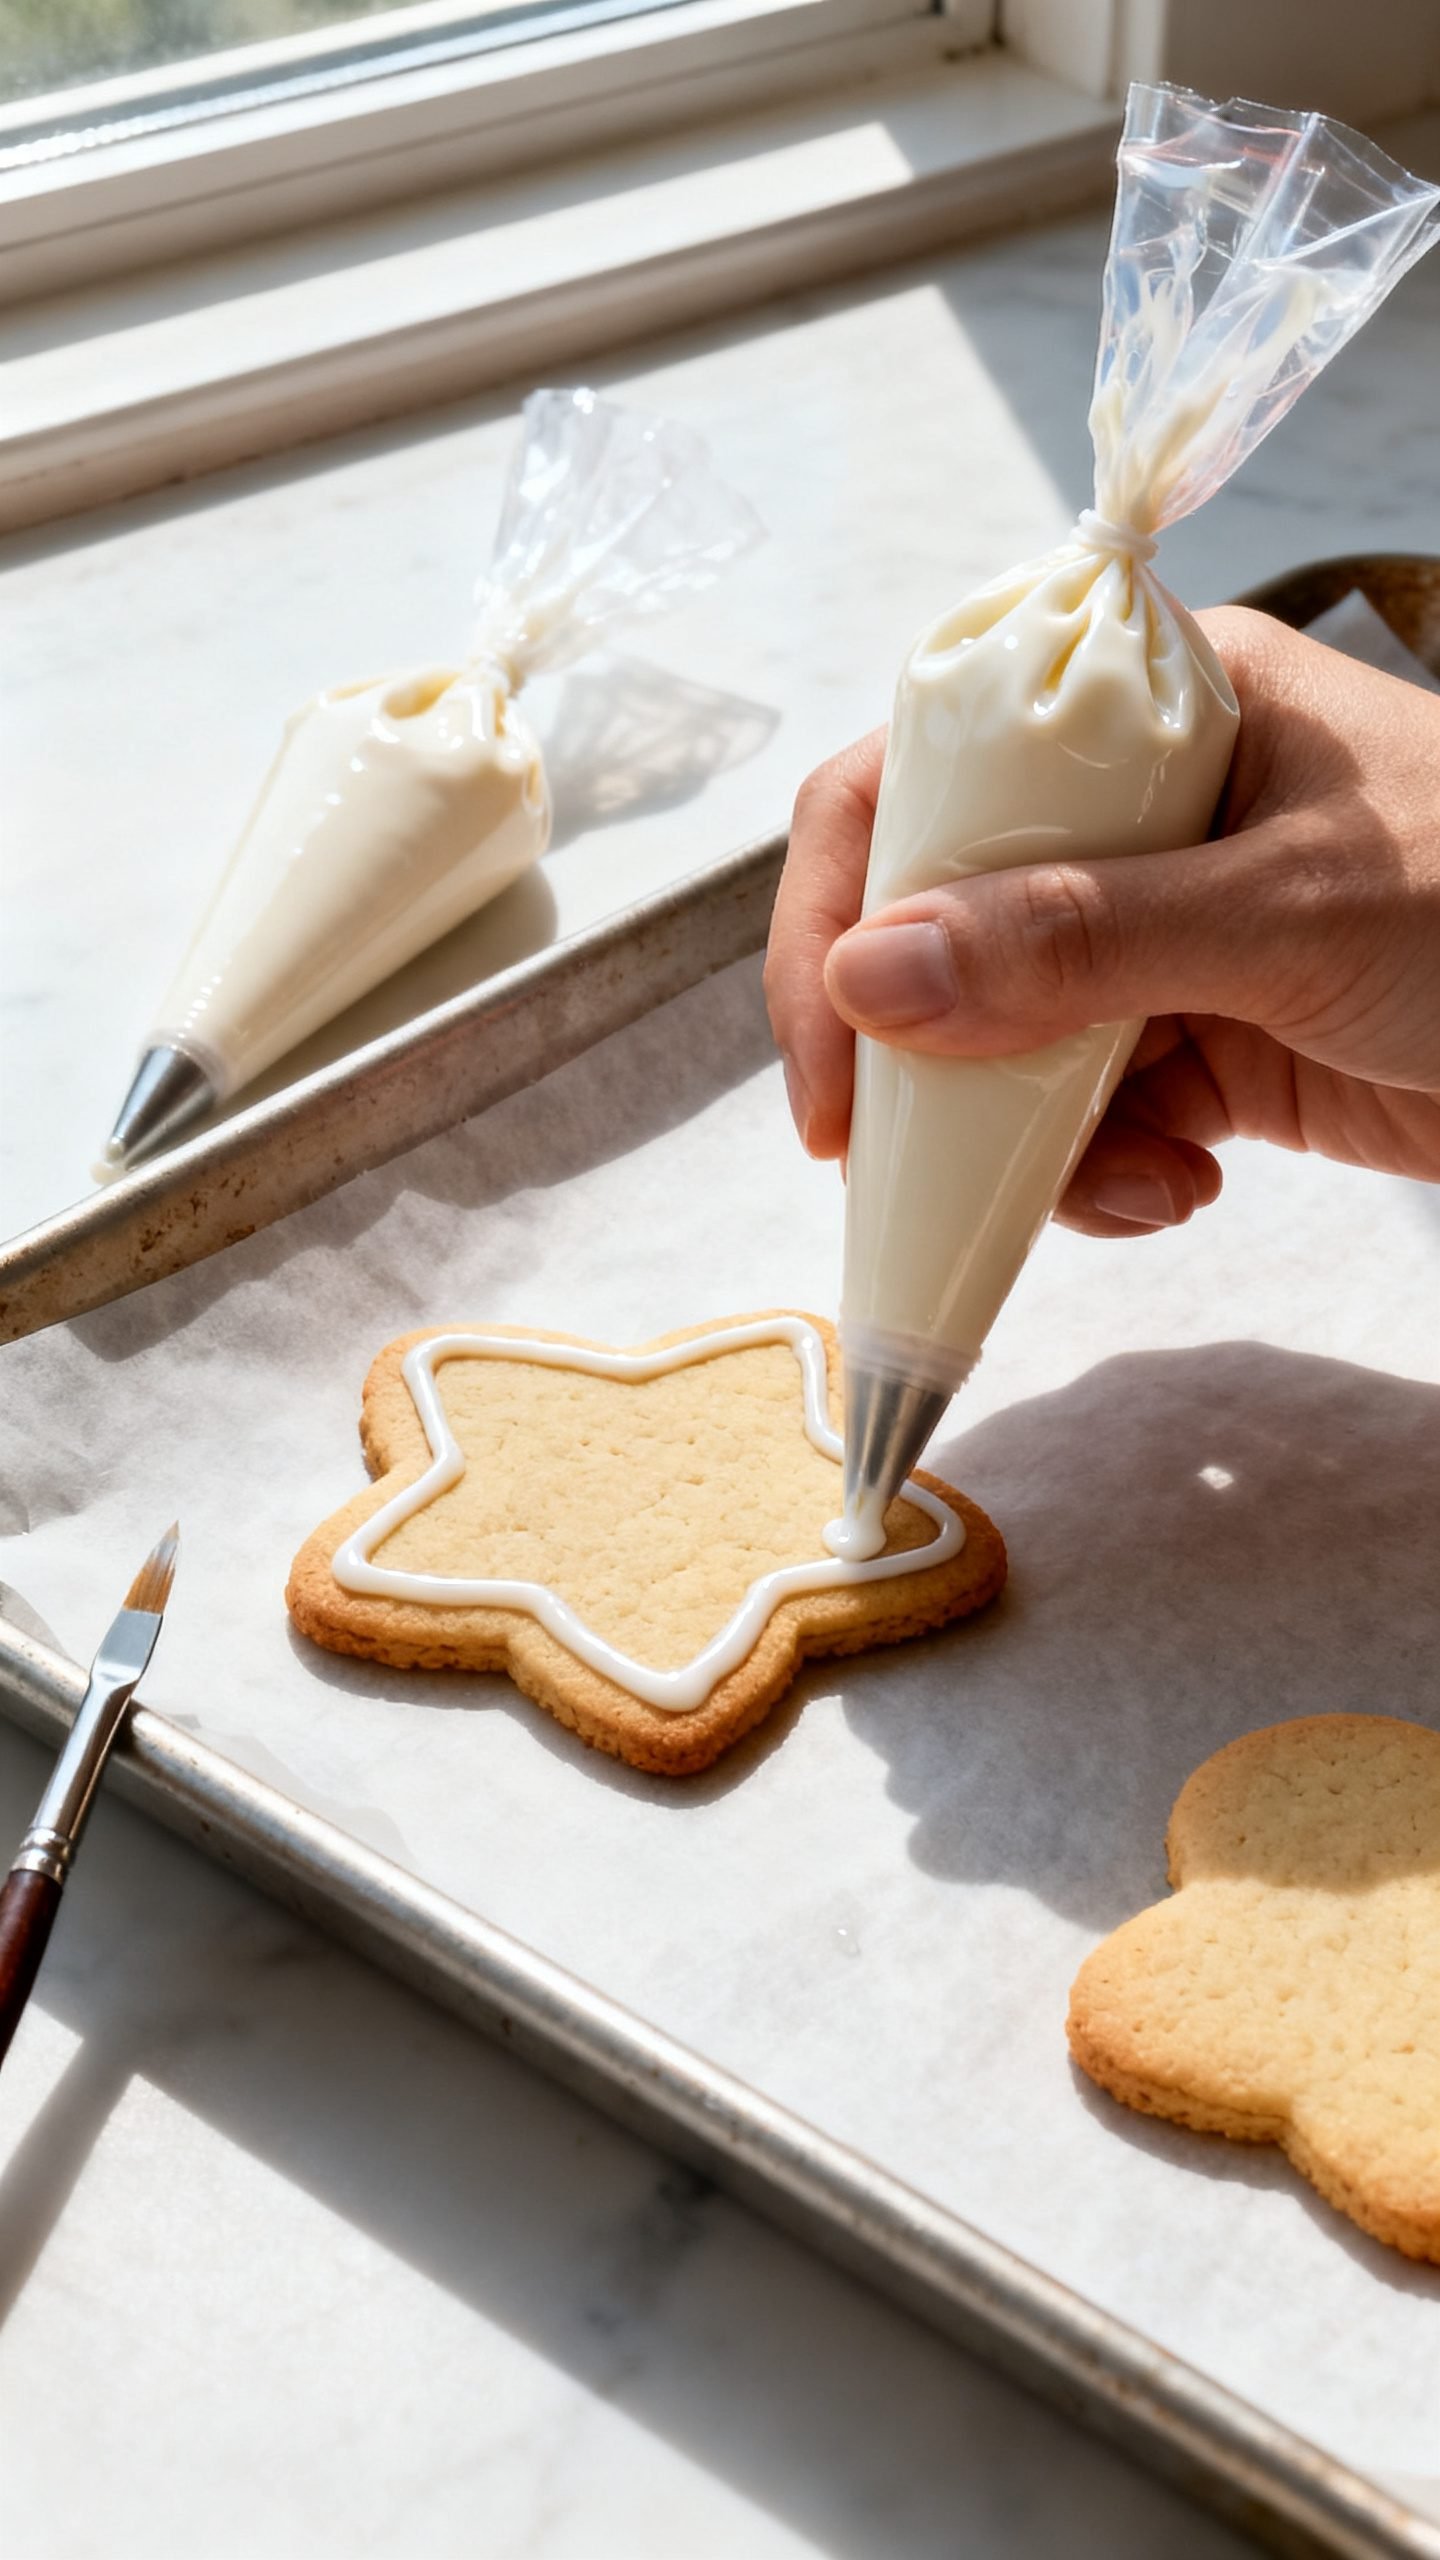
5) Outline the cookie
- Hold the bag at a 45-degree angle, tip slightly above the surface.
- Pipe a steady line around the edge. Let the line fall into place; don’t drag the tip on the cookie.
- Close gaps carefully; gaps cause leaks.
6) Flood the surface
- Work one cookie at a time.
- Pipe flood icing inside the outline, about 1/8 inch from the border at first.
- Use a scribe to nudge icing to the edges and pop bubbles immediately.
- Gently shake the cookie for a couple seconds to smooth the surface.
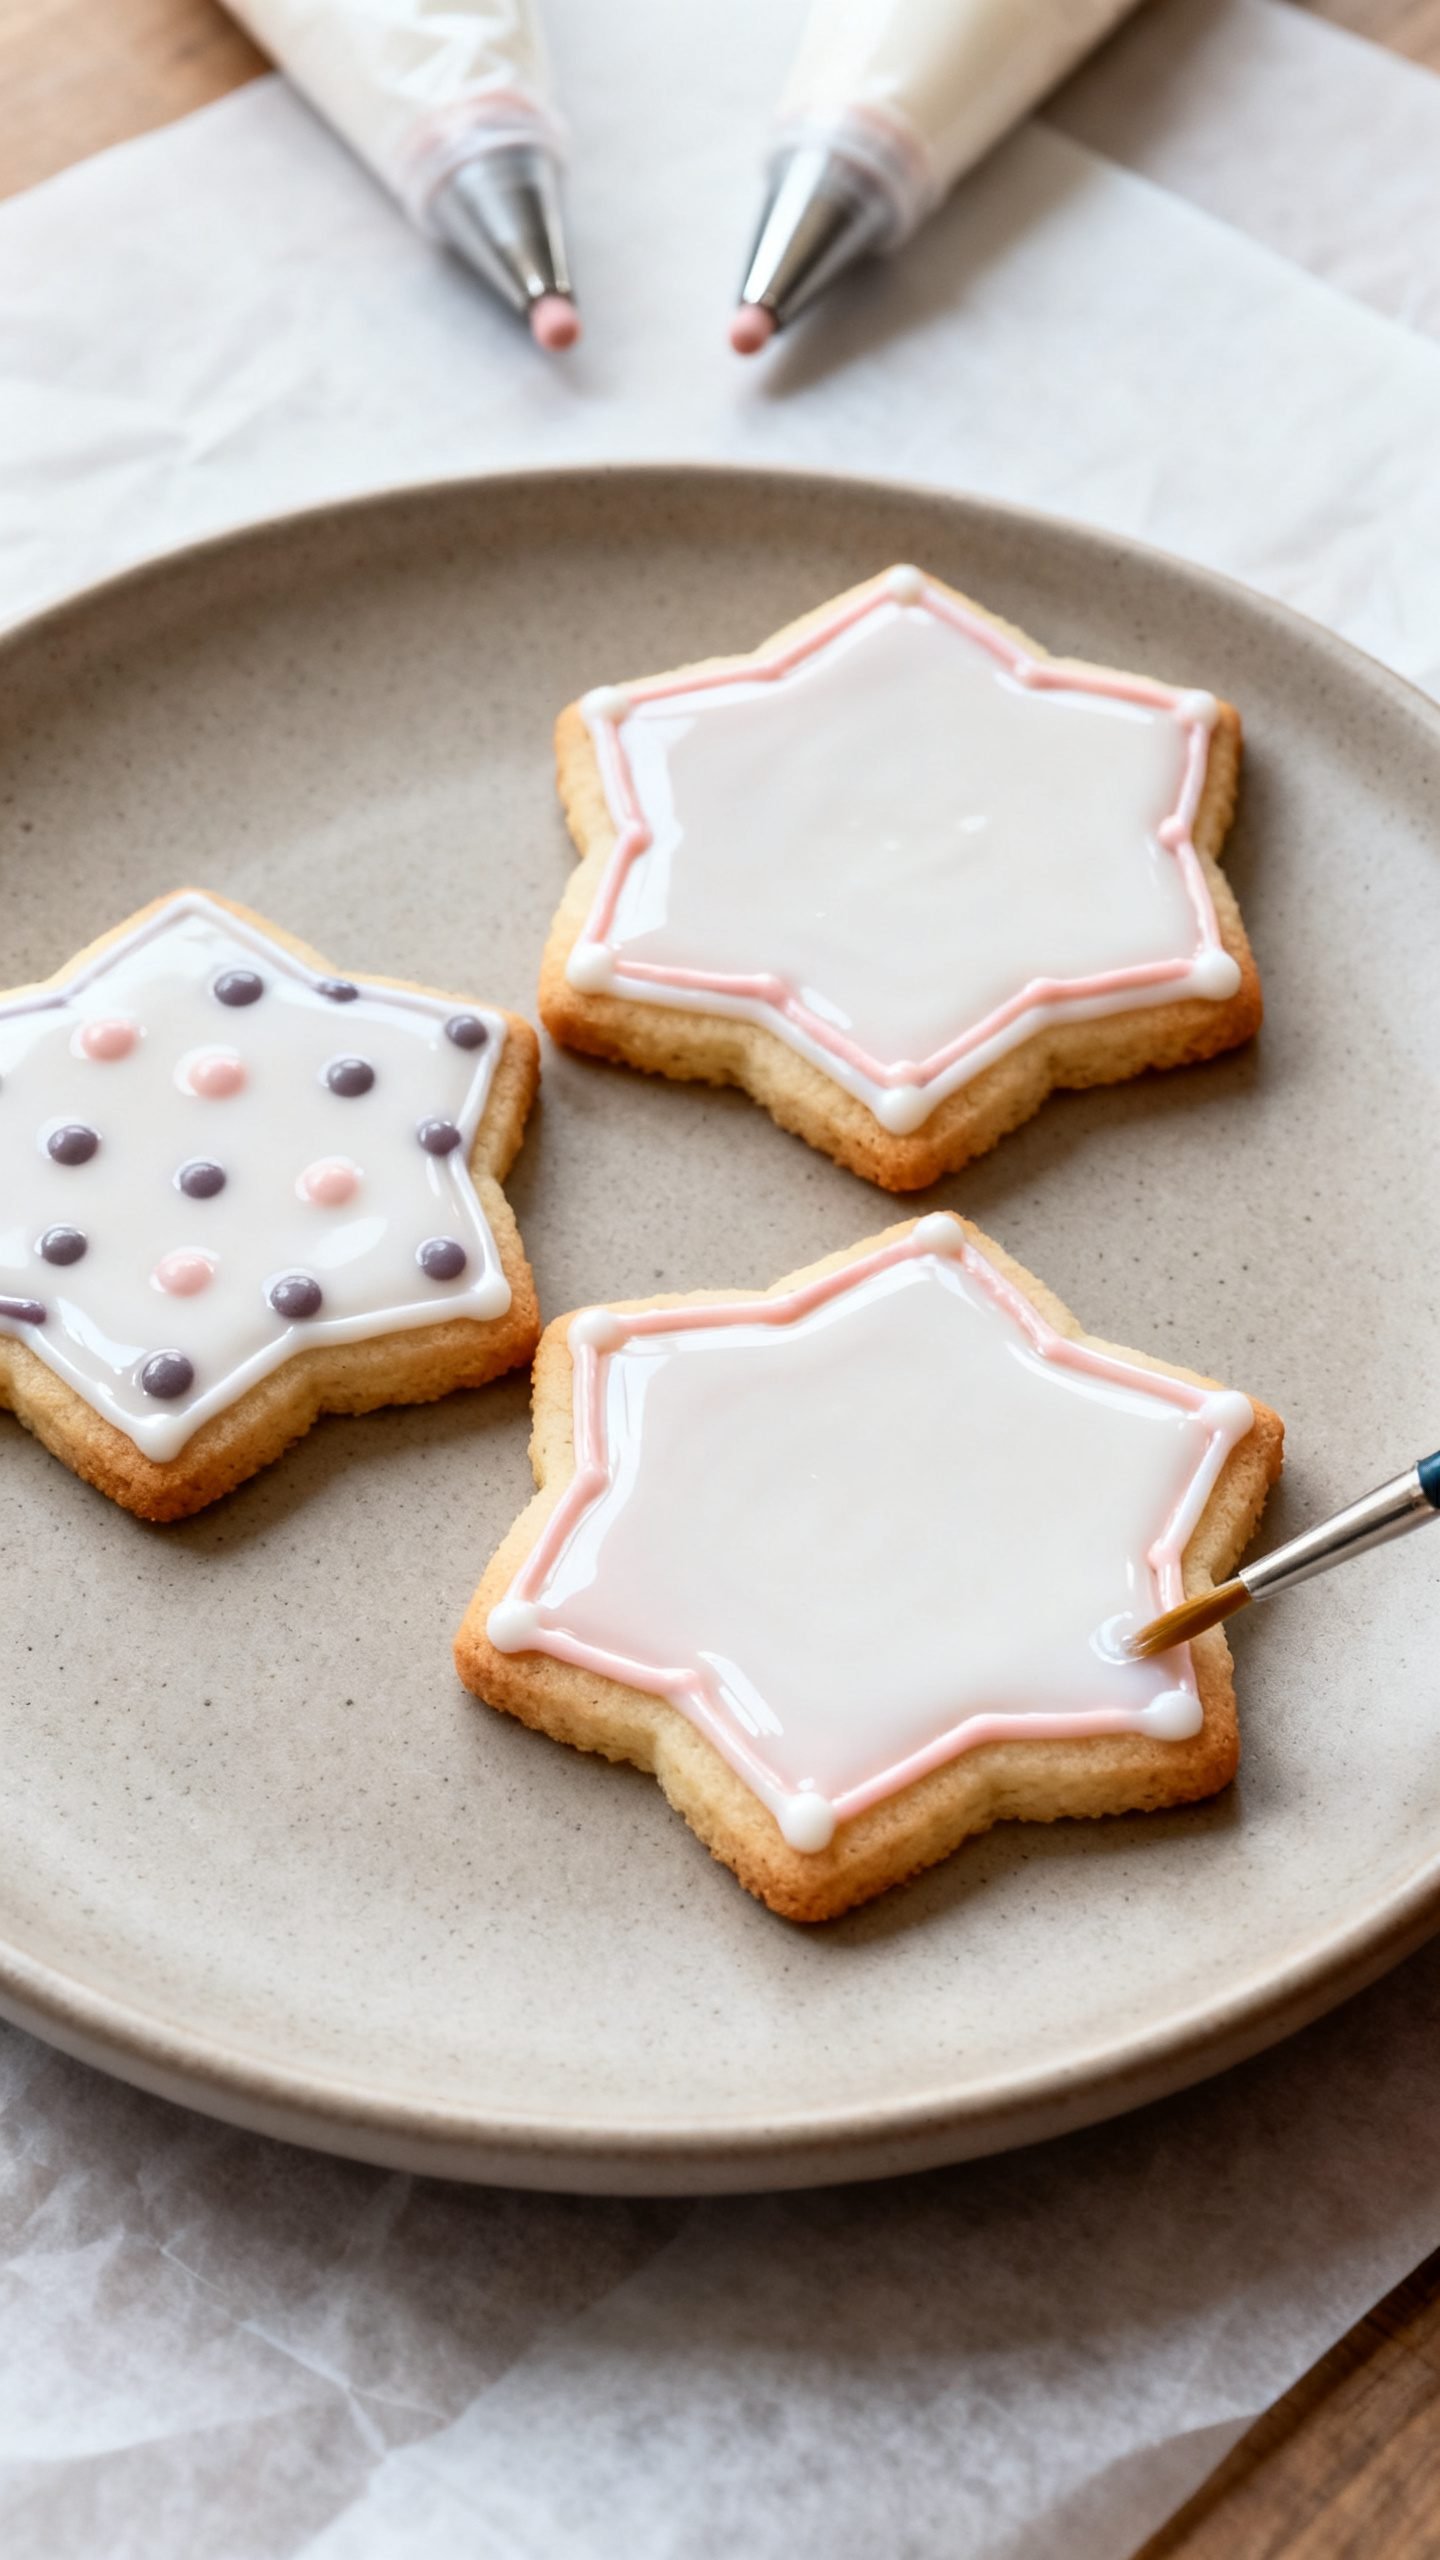
7) Set the layer and add details
- Let the base dry 15–20 minutes under a fan until it forms a light crust.
- Add wet-on-wet designs right away for swirls and hearts, or wait 1–2 hours for raised details (polka dots, borders).
- Allow cookies to dry fully for 8–12 hours at room temperature before stacking.
Pro tips for flawless finishes
- Consistency beats everything: If icing craters in small sections, thicken slightly.
- Keep bags covered: Wrap bag tips with damp paper towels between cookies to prevent crusting.
- Use light pressure: Let the icing flow, and guide it—don’t push it.
- Avoid overmixing color: Colors deepen as they rest. Mix, then wait 10 minutes before adjusting.
How to Store Decorated Sugar Cookies
- Dry completely: Wait until icing cures all the way through—usually overnight.
- Store airtight: Layer cookies between parchment in a sealed container at room temp for up to 1 week.
- Freeze for later: Freeze fully dried cookies in a single layer, then stack with parchment. Thaw in the closed container to prevent condensation.
- Avoid humidity: Moisture dulls shine and can cause colors to bleed.
Benefits of Using Royal Icing to Flood Cookies
- Professional look at home: Smooth, glossy surfaces and crisp edges make simple shapes look bakery-made.
- Custom designs: Wet-on-wet for marbling, or layered details for dimension—the options never end.
- Make-ahead friendly: Cookies stay fresh and stackable once the icing cures.
- Stable and safe: Meringue powder gives structure without raw egg whites.
- Reliable texture: Properly mixed icing dries firm but not rock-hard, so you get clean bites.
What Not to Do
- Don’t skip the outline: Flood icing needs a border to stay put.
- Don’t make icing too thin: Runny icing causes overflows, color bleed, and dull finishes.
- Don’t rush drying: Touching the surface too soon leaves fingerprints and dents.
- Don’t overfill: Leave a tiny gap at the edge; icing spreads as it settles.
- Don’t store before fully dry: Trapped moisture softens details and ruins shine.
Variations You Can Try
- Flavor twists: Swap clear vanilla for lemon, almond, or orange extracts. Use zest in the cookie dough for a bright aroma.
- Finishes and effects: Add luster dust, sanding sugar, or edible glitter once the surface sets slightly.
- Marble designs: Pipe two flood colors and drag a scribe for swirls, hearts, or feathering.
- Textured layers: Let the base dry, then add puffy dots, lines, or florals for dimension.
- Outline-only style: Skip flooding and trace pretty borders for a minimalist look that dries fast.
FAQ
How do I fix icing that’s too thick or too thin?
Add a few drops of water at a time to thin, or a spoonful of powdered sugar to thicken. Re-test with the second-count method.
Why does my icing crater in small sections?
Cratering happens in narrow areas. Thicken the icing slightly, pop bubbles thoroughly, and use a fan for the first 15 minutes to set the surface.
Can I use egg whites instead of meringue powder?
Yes. Use pasteurized egg whites and keep the icing refrigerated if you won’t use it right away. Meringue powder offers the most consistent results.
How long does royal icing take to dry?
Surface set: 15–30 minutes with a fan. Fully dry: 8–12 hours, or overnight.
What’s the best tip size?
Use #2 for outlining and #3 for flooding. For tiny details, go with #1.
How do I prevent color bleed?
Use slightly thicker icing, avoid excessive water, let layers dry between colors, and keep cookies in a cool, low-humidity spot.
Can I make icing ahead?
Yes. Store in an airtight container with plastic wrap pressed on the surface for up to 1 week in the fridge. Stir gently before using.
Conclusion
You can flood cookies like a pro with the right consistency, a clean outline, and a little patience. Start simple, practice the second-count test, and let each layer dry before decorating more. Soon you’ll crank out glossy, beautiful sugar cookies for every occasion—no bakery required.

How to Flood Cookies with Royal Icing | Perfect Sugar Cookie Tutorial
Ingredients
Ingredients
- Unsalted butter, softened
- Granulated sugar
- Large egg
- Vanilla extract
- Almond extract (optional)
- All-purpose flour
- Baking powder
- Fine salt
- Powdered sugar, sifted
- Meringue powder
- Warm water
- Clear vanilla or clear almond extract
- Gel food coloring
Instructions
Instructions
- Chill cut cookie dough for 20–30 minutes, roll to about 1/4 inch thick, bake until set, and let cookies cool completely.
- Whisk powdered sugar and meringue powder, add warm water, and beat until the icing forms soft peaks that hold a tip, about 3–4 minutes; flavor with a little clear extract and keep covered to prevent crusting.
- Divide the icing into bowls, add gel food coloring gradually, and stir gently to minimize bubbles.
- Adjust one portion to outline consistency using the 12–15 second test, and another to flood consistency using the 8–10 second test, thickening with powdered sugar or thinning with drops of water as needed; transfer to separate piping bags or bottles.
- Pipe an outline around the edge of each cookie at a 45-degree angle, letting the icing fall into place and ensuring there are no gaps.
- Flood inside the outline with flood icing, keeping a small gap from the border at first, then use a scribe or toothpick to push icing to the edges, pop bubbles, and gently shake to smooth the surface.
- Let the base dry under a fan for 15–20 minutes until lightly crusted; add wet-on-wet designs immediately or wait 1–2 hours for raised details, then allow cookies to dry fully for 8–12 hours before stacking.