
Classic Italian Dessert Recipe – Tiramisu Made Simple
Tiramisu is one of those desserts that feels fancy but is surprisingly easy to make at home. It’s creamy, coffee-kissed, and perfect for sharing after a relaxed meal. You don’t need an oven, and the ingredients are straightforward.
With the right steps, you’ll get that signature layered look and a silky texture. Let’s make a version that’s true to the original spirit and easy enough for weeknights or special occasions.
What Makes This Special

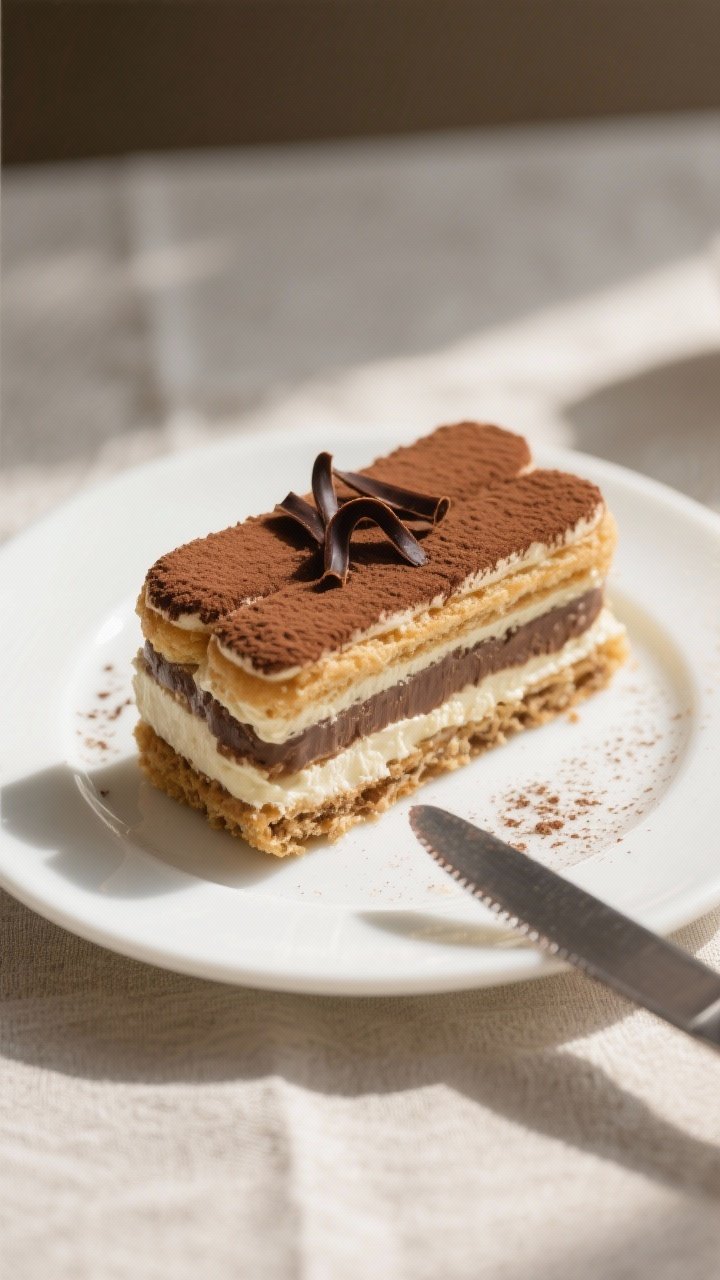
Tiramisu is all about balance: rich mascarpone, bold espresso, and a light cocoa finish. The ladyfingers soften just enough to become cake-like without turning mushy.
This recipe uses a classic zabaglione-style base for depth and a clean finish. It’s also a make-ahead dessert, which means less stress when guests arrive. Best of all, it tastes even better the next day.
Ingredients
- Espresso mixture:
- 1 1/2 cups strong espresso or very strong coffee, cooled
- 2–3 tablespoons coffee liqueur (optional), such as Kahlúa or Marsala
- 1 teaspoon vanilla extract (optional)
- Cream layer:
- 4 large egg yolks
- 1/2 cup granulated sugar, divided
- 8 ounces (225 g) mascarpone, cold
- 1 cup cold heavy cream
- Pinch of fine salt
- Assembly:
- 24–30 ladyfingers (savoiardi)
- Unsweetened cocoa powder, for dusting
- Dark chocolate shavings (optional)
How to Make It

- Brew and cool the coffee. Make strong espresso or coffee and let it cool to room temperature.
Stir in the liqueur and vanilla, if using. Pour into a shallow dish for easy dipping.
- Set up a bain-marie. Bring an inch of water to a gentle simmer in a pot. Place a heatproof bowl on top so the bottom doesn’t touch the water.
- Whisk the yolks. Add egg yolks, a pinch of salt, and half the sugar to the bowl.
Whisk constantly over the steam for 5–7 minutes until the mixture is pale, thick, and increased in volume. Remove from heat and let it cool for a few minutes.
- Beat the mascarpone. In a separate bowl, whisk the mascarpone briefly until smooth. Don’t overbeat—just loosen it up.
- Combine the two. Gently fold the mascarpone into the yolk mixture in two additions until smooth and creamy.
- Whip the cream. In a clean bowl, whip the heavy cream with the remaining sugar to soft-medium peaks.
It should hold shape but still look silky.
- Fold it all together. Fold the whipped cream into the mascarpone mixture in two or three additions. Use gentle strokes to keep the mixture airy.
- Dip the ladyfingers. Quickly dip each ladyfinger into the coffee—about 1 second per side. They should be soaked but not soggy.
- Build the first layer. Arrange a tight layer of dipped ladyfingers in a 9×9-inch dish (or similar).
Trim pieces if needed to fit.
- Add the cream. Spread half the cream mixture over the ladyfingers. Smooth the top with a spatula.
- Repeat. Add a second layer of dipped ladyfingers, then the remaining cream. Smooth the top again.
- Chill. Cover and refrigerate for at least 6 hours, ideally overnight.
This helps the flavors meld and the layers set.
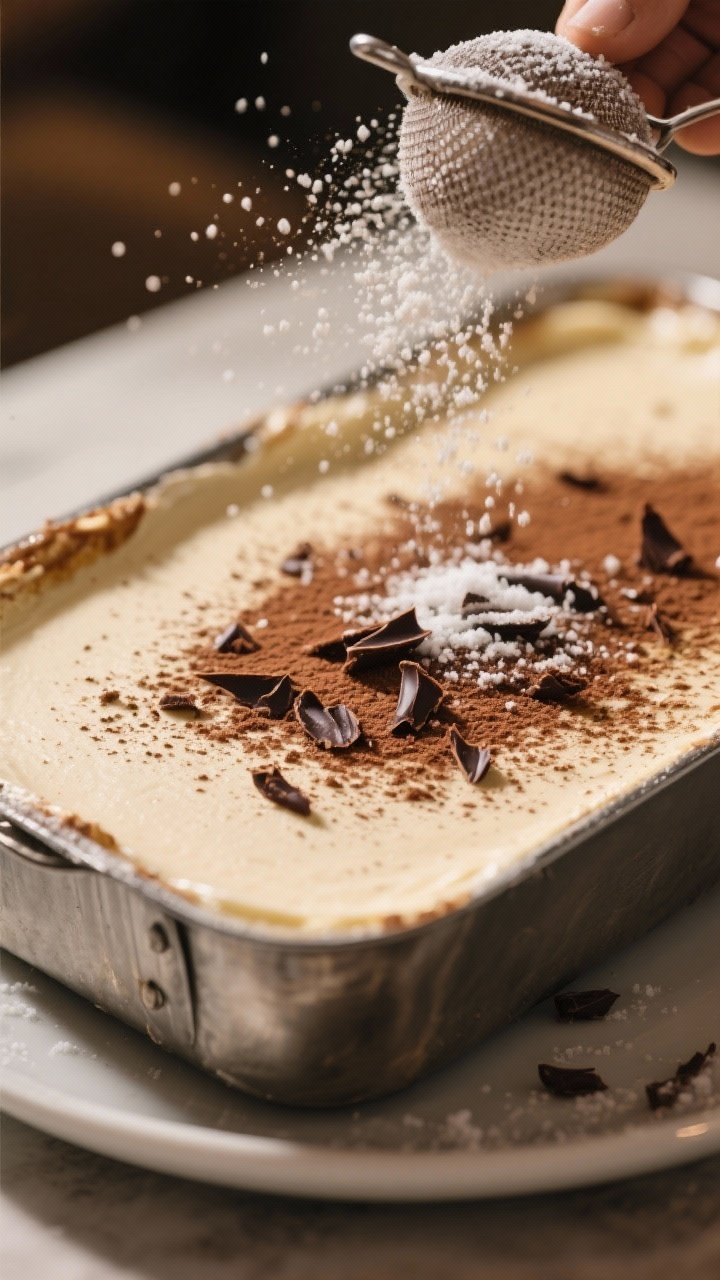
- Finish and serve. Just before serving, sift a generous layer of unsweetened cocoa powder over the top. Add chocolate shavings if you like. Slice and serve cold.
Keeping It Fresh
– Refrigeration: Keep tiramisu covered in the fridge for up to 3 days.
The flavor usually peaks on day 2. – No freezing for best texture: Freezing can make the cream grainy and the ladyfingers icy once thawed. If you must, freeze tightly wrapped for up to 1 month and thaw in the fridge overnight. – Slice smart: Use a sharp knife wiped clean between cuts to keep layers neat. – Serve cold: Tiramisu holds its shape better when chilled. Take it out 5–10 minutes before serving for the best texture.
Health Benefits
– Protein and calcium: Mascarpone and cream contribute some protein and calcium. – Portion control: It’s rich, so a small slice satisfies a sweet craving, helping you enjoy dessert without overdoing it. – Caffeine awareness: Espresso adds a mild energy lift; you can choose decaf to reduce caffeine. – Balanced indulgence: Pair with a lighter meal and fresh berries to add fiber and antioxidants.
Common Mistakes to Avoid
– Over-soaking the ladyfingers: A quick dip is enough.
Too long and they turn mushy. – Skipping the chill time: The dessert needs several hours to set. Rushing leads to runny slices. – Over-whipping cream: Grainy or curdled cream ruins the texture. Stop at soft-medium peaks. – Beating mascarpone too much: It can break and turn runny.
Gently loosen it, then fold. – Using warm coffee: Warm liquid over-soaks the cookies. Always cool it first. – Forgetting the dusting at the end: Cocoa powder added right before serving looks fresher and tastes better.
Alternatives
– Alcohol-free: Skip the liqueur and add a little extra vanilla or a splash of almond extract. – Decaf-friendly: Use decaf espresso for a late-night dessert. – Egg-free version: Replace the yolk base with an all-whipped-cream approach: fold mascarpone into sweetened whipped cream. It’s lighter but still delicious. – Flavor twists: Add a layer of finely chopped dark chocolate, or swap cocoa for grated chocolate on top.
A touch of orange zest in the cream is lovely. – balanced sweetness by reducing sugar to 1/3 cup if your coffee is sweet or your ladyfingers are very sugary. – Individual servings: Assemble in small glasses or jars for easy plating.
FAQ
Can I make tiramisu without raw eggs?
Yes. Use the egg-free variation with mascarpone folded into sweetened whipped cream, or pasteurize the yolks by whisking them with sugar over a gentle bain-marie until thick and hot to the touch, as in this recipe.
What if I can’t find mascarpone?
You can make a quick substitute by blending softened cream cheese with a little heavy cream until smooth. The flavor will be slightly tangier but still tasty.
How long should tiramisu chill?
At least 6 hours, and ideally overnight.
This lets the cookies soften evenly and the cream firm up for clean slices.
Which coffee works best?
Freshly brewed espresso is ideal. If using drip coffee, make it very strong. Always cool it before dipping the ladyfingers.
Can I make it ahead for a party?
Absolutely.
Assemble it the day before, cover tightly, and dust with cocoa just before serving for the best look and flavor.
Why did my tiramisu turn watery?
Common causes are over-soaked ladyfingers, over-beaten mascarpone, or not chilling long enough. Keep dips quick, fold gently, and give it time to set.
Final Thoughts
Tiramisu proves that a few good ingredients, treated simply, can feel luxurious. Once you learn the rhythm—dip, layer, fold, chill—it becomes a reliable go-to for any gathering.
Keep the coffee strong, the mascarpone smooth, and the chill time generous. With those basics, you’ll turn out a classic Italian dessert that’s both effortless and unforgettable.
Classic Italian Dessert Recipe - Tiramisu Made Simple
Ingredients
- Espresso mixture: 1 1/2 cups strong espresso or very strong coffee, cooled
- 2–3 tablespoons coffee liqueur (optional), such as Kahlúa or Marsala
- 1 teaspoon vanilla extract (optional)
- Cream layer: 4 large egg yolks
- ½ cup granulated sugar, divided
- 8 ounces (225 g) mascarpone, cold
- 1 cup cold heavy cream
- Pinch of fine salt
- Assembly: 24–30 ladyfingers (savoiardi)
- Unsweetened cocoa powder, for dusting
- Dark chocolate shavings (optional)
Instructions
- Brew and cool the coffee. Make strong espresso or coffee and let it cool to room temperature.Stir in the liqueur and vanilla, if using. Pour into a shallow dish for easy dipping.
- Set up a bain-marie. Bring an inch of water to a gentle simmer in a pot. Place a heatproof bowl on top so the bottom doesn’t touch the water.
- Whisk the yolks. Add egg yolks, a pinch of salt, and half the sugar to the bowl.Whisk constantly over the steam for 5–7 minutes until the mixture is pale, thick, and increased in volume. Remove from heat and let it cool for a few minutes.
- Beat the mascarpone. In a separate bowl, whisk the mascarpone briefly until smooth. Don’t overbeat—just loosen it up.
- Combine the two. Gently fold the mascarpone into the yolk mixture in two additions until smooth and creamy.
- Whip the cream. In a clean bowl, whip the heavy cream with the remaining sugar to soft-medium peaks.It should hold shape but still look silky.
- Fold it all together. Fold the whipped cream into the mascarpone mixture in two or three additions. Use gentle strokes to keep the mixture airy.
- Dip the ladyfingers. Quickly dip each ladyfinger into the coffee—about 1 second per side. They should be soaked but not soggy.
- Build the first layer. Arrange a tight layer of dipped ladyfingers in a 9x9-inch dish (or similar).Trim pieces if needed to fit.
- Add the cream. Spread half the cream mixture over the ladyfingers. Smooth the top with a spatula.
- Repeat. Add a second layer of dipped ladyfingers, then the remaining cream. Smooth the top again.
- Chill. Cover and refrigerate for at least 6 hours, ideally overnight.This helps the flavors meld and the layers set.
- Finish and serve. Just before serving, sift a generous layer of unsweetened cocoa powder over the top. Add chocolate shavings if you like. Slice and serve cold.


