Homemade Hoagie Roll Recipe | Soft Bakery Style Sandwich Rolls
If you love a hearty sandwich, you need a reliable, soft hoagie roll that holds everything together without falling apart. These homemade hoagie rolls bake up fluffy inside with a thin, lightly chewy crust—perfect for Italian subs, meatball sandwiches, cheesesteaks, or your favorite deli combo.
I’ll walk you through the process step by step so you get bakery-style results at home. No complicated techniques, just simple ingredients and a few smart tips. You’ll shape long rolls with a smooth surface, get that classic split-top look, and bake them golden for the ideal bite.
Why This Soft Hoagie Roll Recipe Works
- Right flour blend for structure: Bread flour delivers chew and height while a touch of sugar keeps the crumb tender and flavorful.
- Milk and water combo: You get softness from milk and good rise from water, which balances tenderness and oven spring.
- Enriched but not heavy: A little butter gives richness without making the rolls dense.
- Steam and scoring: A quick steam trick and a shallow slit help the rolls expand and create that signature hoagie shape.
- Make-ahead friendly: The dough chills well, so you can shape and bake fresh rolls the next day.
Ingredients
For the Dough
- Bread flour: 4 cups (500 g), spooned and leveled
- Warm water: 1 cup (240 ml), about 105–110°F
- Warm milk: 1/2 cup (120 ml), about 105–110°F
- Instant yeast: 2 1/4 teaspoons (1 packet)
- Granulated sugar: 2 tablespoons
- Kosher salt: 2 teaspoons
- Unsalted butter: 3 tablespoons, very soft
- Olive oil: 1 tablespoon for greasing the bowl
For Shaping and Baking
- Cornmeal or parchment: For lining the baking sheet
- Egg wash: 1 egg beaten with 1 tablespoon water (optional, for shine)
- Water for steam: 1 cup, added to a hot pan in the oven
How to Make Soft, Bakery-Style Hoagie Rolls
1) Mix and Knead the Dough
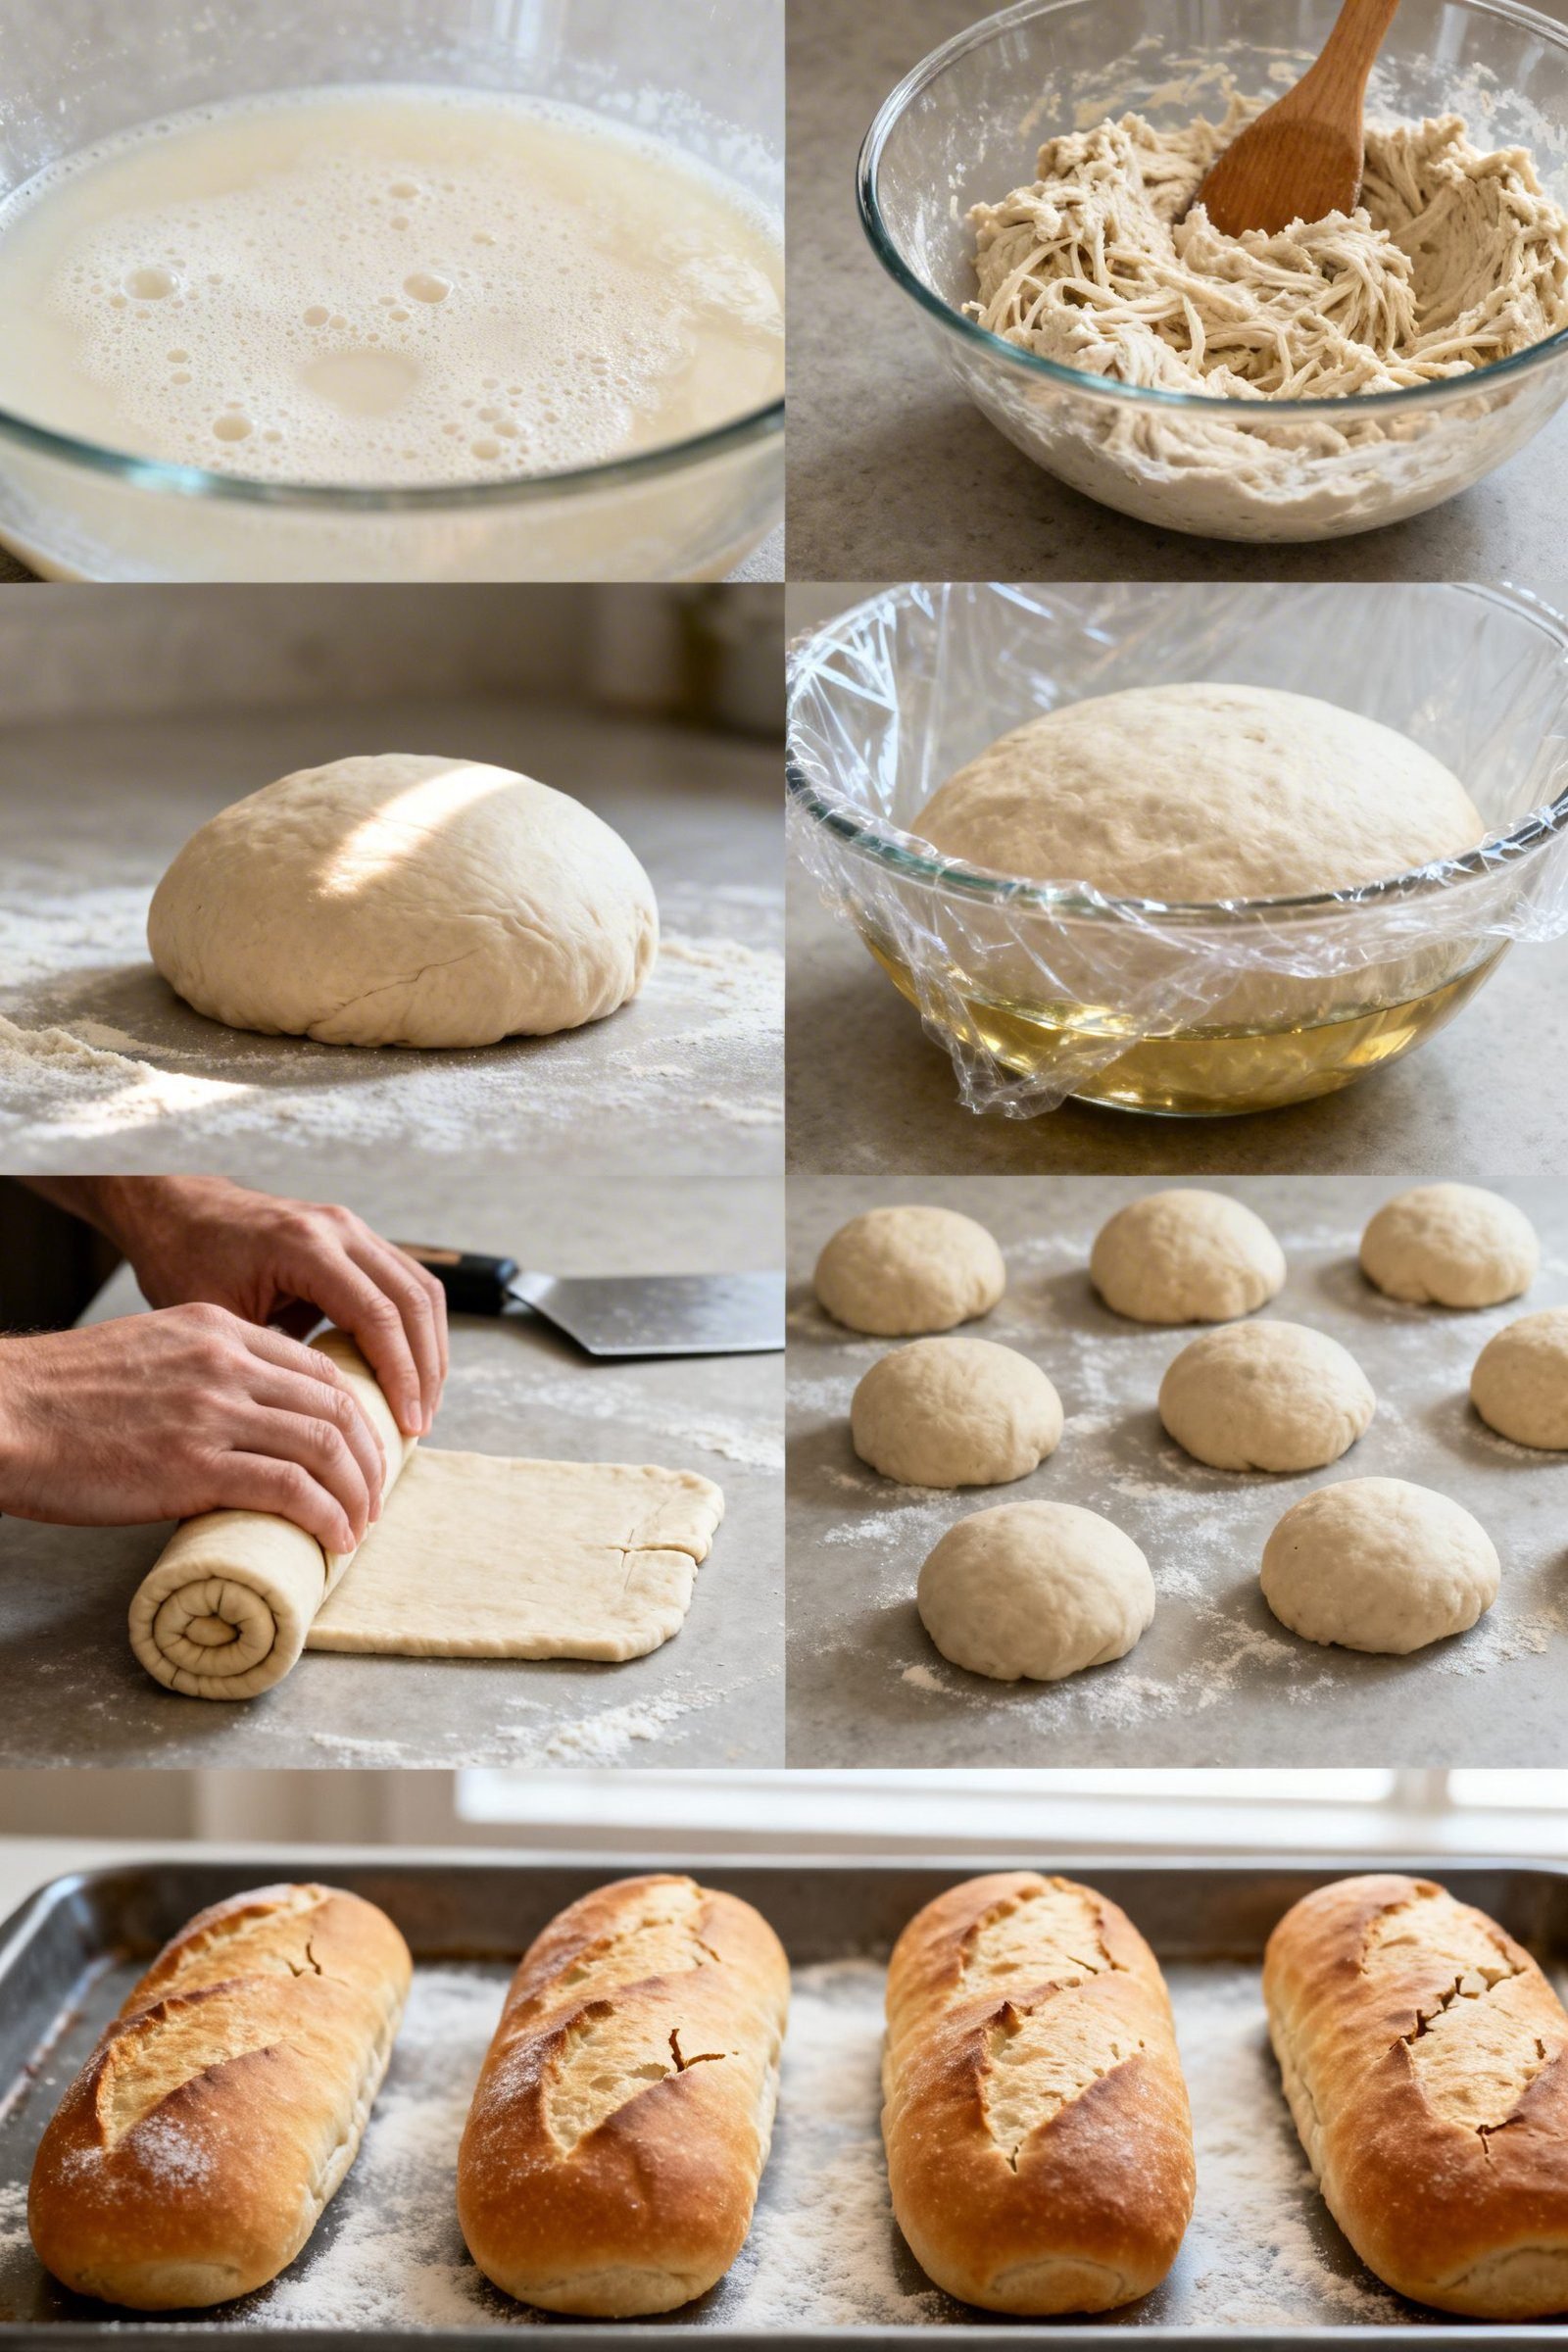
- In a large bowl, whisk warm water, warm milk, sugar, and yeast. Let it stand 5 minutes until foamy.
- Add bread flour and salt. Stir with a sturdy spoon until a shaggy dough forms.
- Add the softened butter and work it into the dough. Knead by hand 8–10 minutes (or 6–7 minutes on medium with a stand mixer) until smooth, elastic, and slightly tacky but not sticky.
- Lightly oil a clean bowl. Place the dough inside, turning once to coat. Cover and let rise in a warm spot until doubled, about 60–90 minutes.
2) Divide and Pre-Shape
- Turn the dough onto a lightly floured surface. Gently deflate it.
- Divide into 6 equal pieces for large sub rolls or 8 for smaller rolls. Aim for even weight for consistent baking.
- Pre-shape each piece into a loose ball. Cover with a towel and rest 10 minutes to relax the gluten.
3) Shape the Hoagie Rolls
- Working with one piece at a time, flatten into a rectangle about 5×7 inches.
- Fold the long edge toward the center and press to seal. Repeat with the opposite edge, creating a tight cylinder.
- Roll the cylinder under your palms to 7–9 inches long (depending on your pan and sandwich plans). Taper the ends slightly for a classic hoagie look.
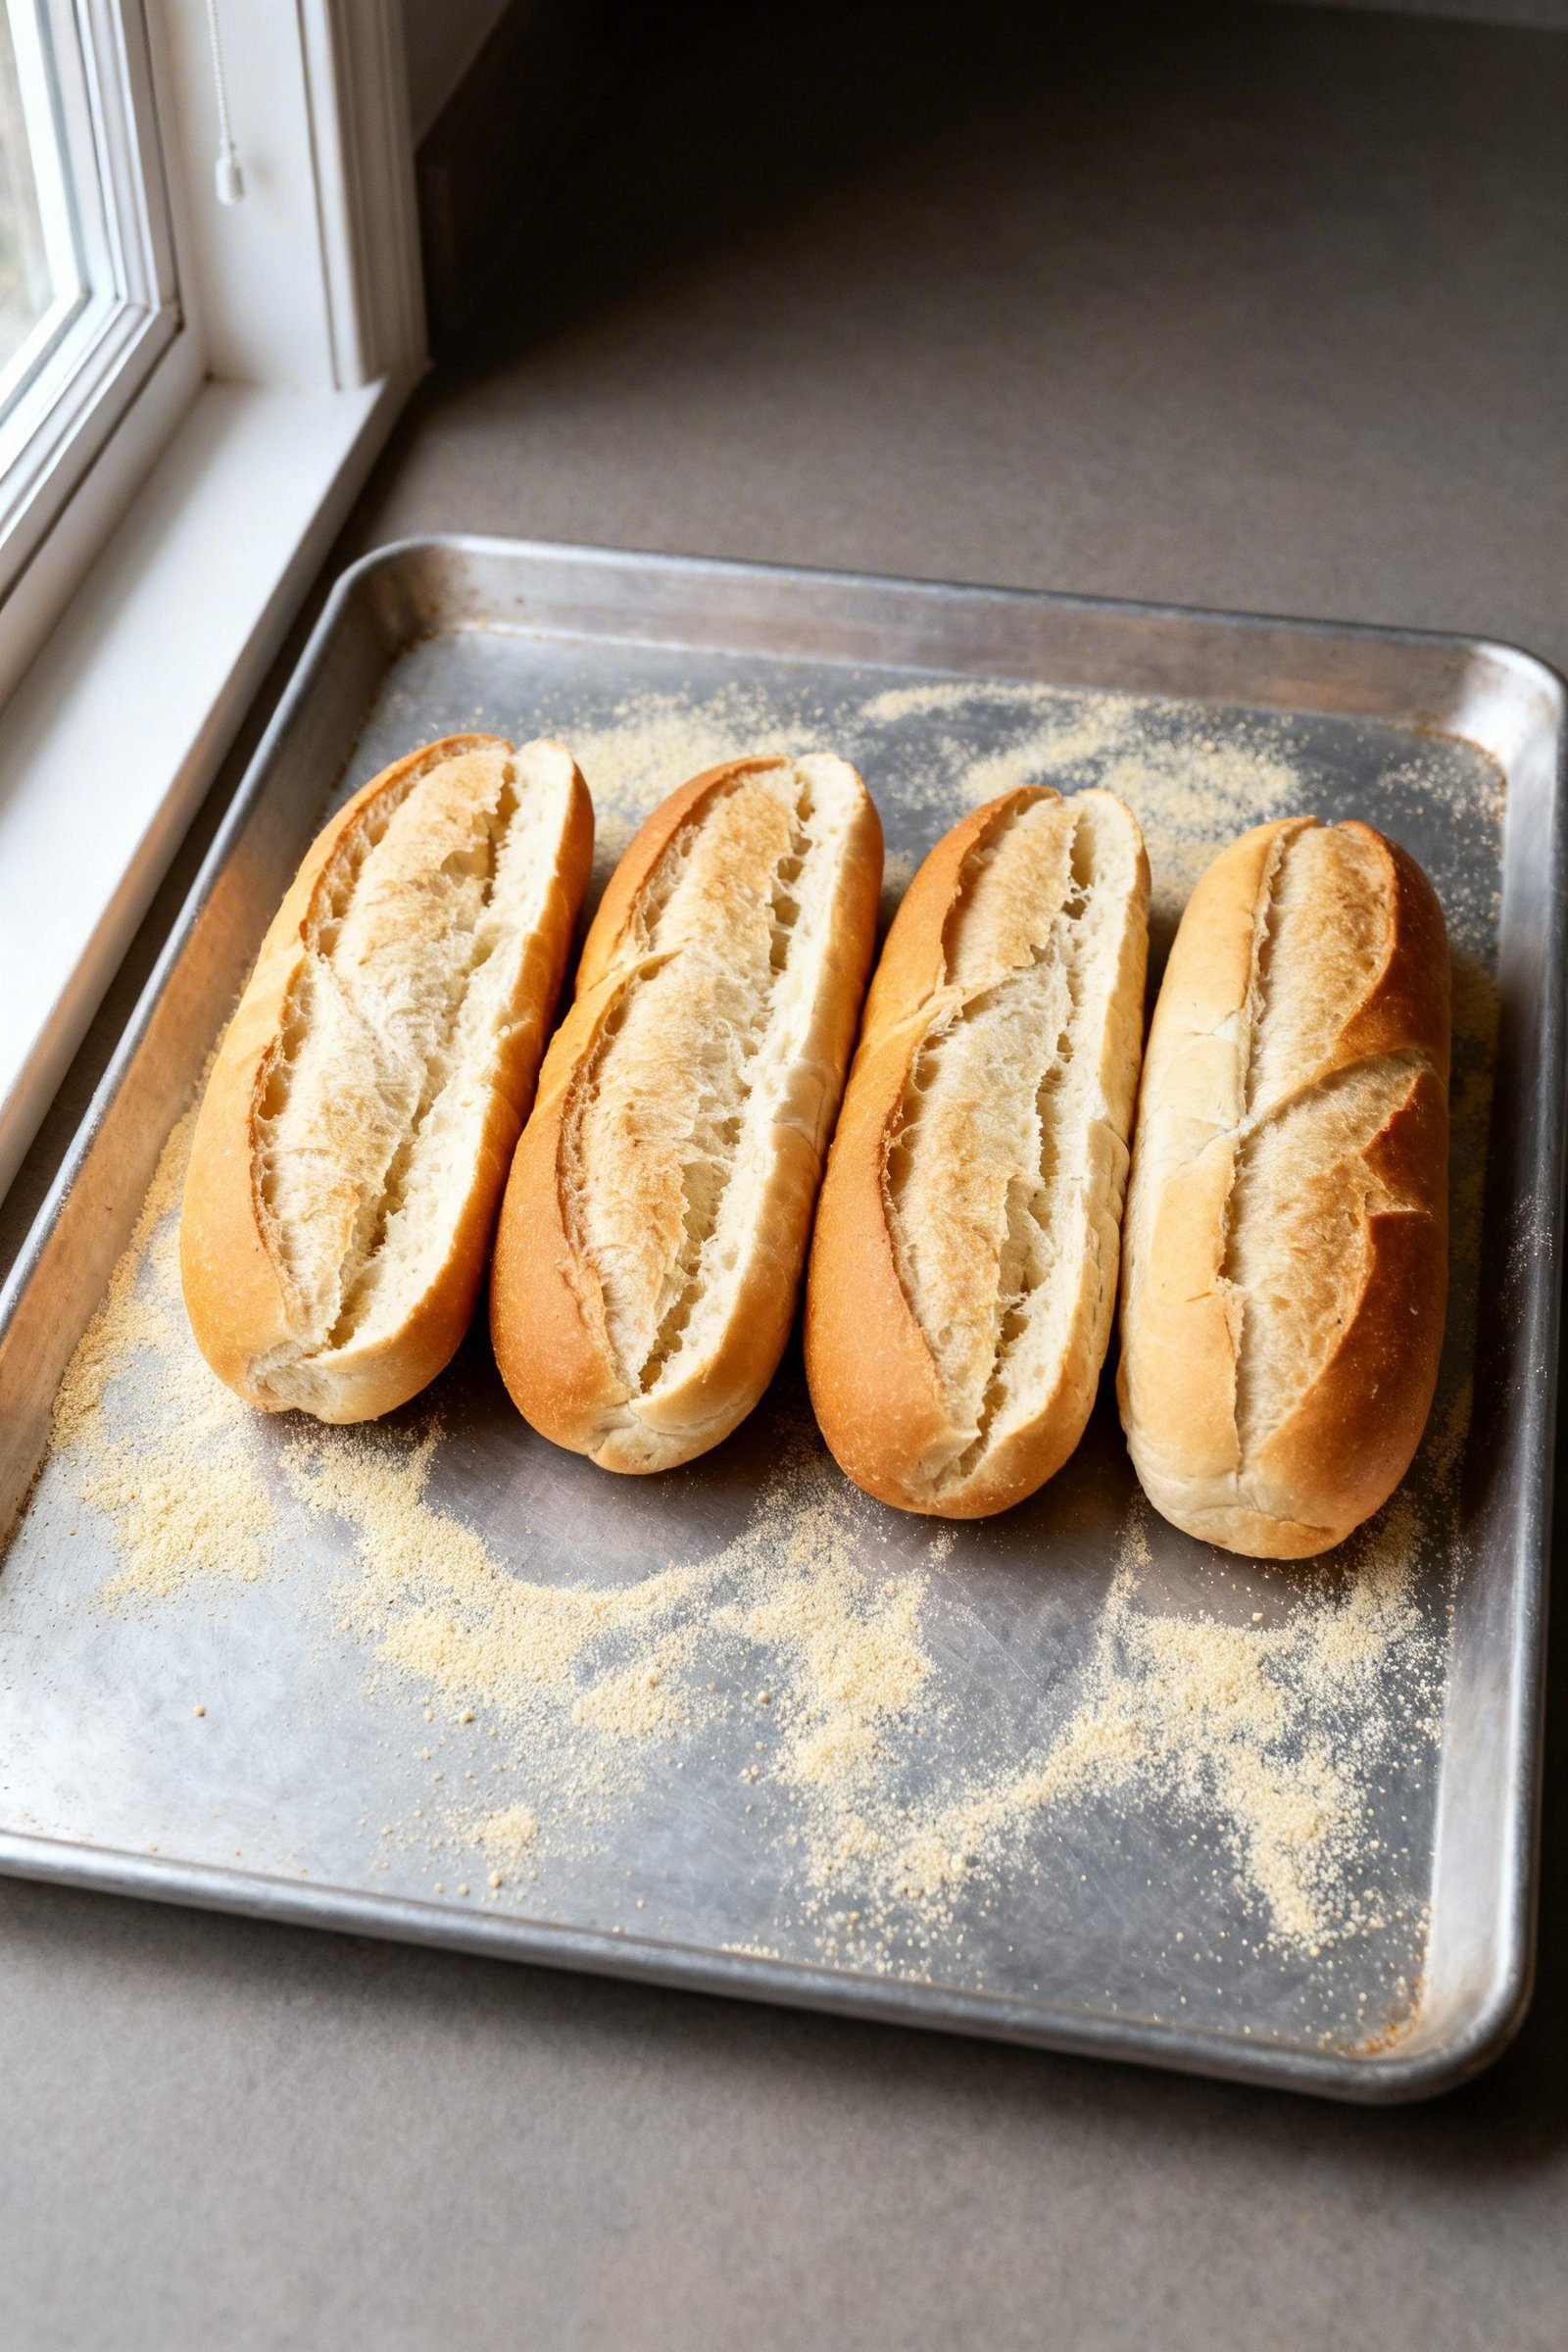
- Place on a parchment-lined or cornmeal-dusted sheet pan, seam-side down. Space them at least 2 inches apart.
4) Proof and Prep for the Oven
- Cover the rolls lightly with greased plastic wrap. Let rise until puffy and nearly doubled, 35–55 minutes. They should spring back slowly when gently pressed.
- Meanwhile, preheat the oven to 400°F (200°C). Place an empty metal pan on the bottom rack to preheat for steam.
- Brush rolls with egg wash for a glossy finish (optional). Using a sharp knife or lame, score one shallow slit down the center of each roll.
5) Bake with Steam
- Carefully pour 1 cup hot water into the preheated pan to create steam. Work quickly and close the oven door.
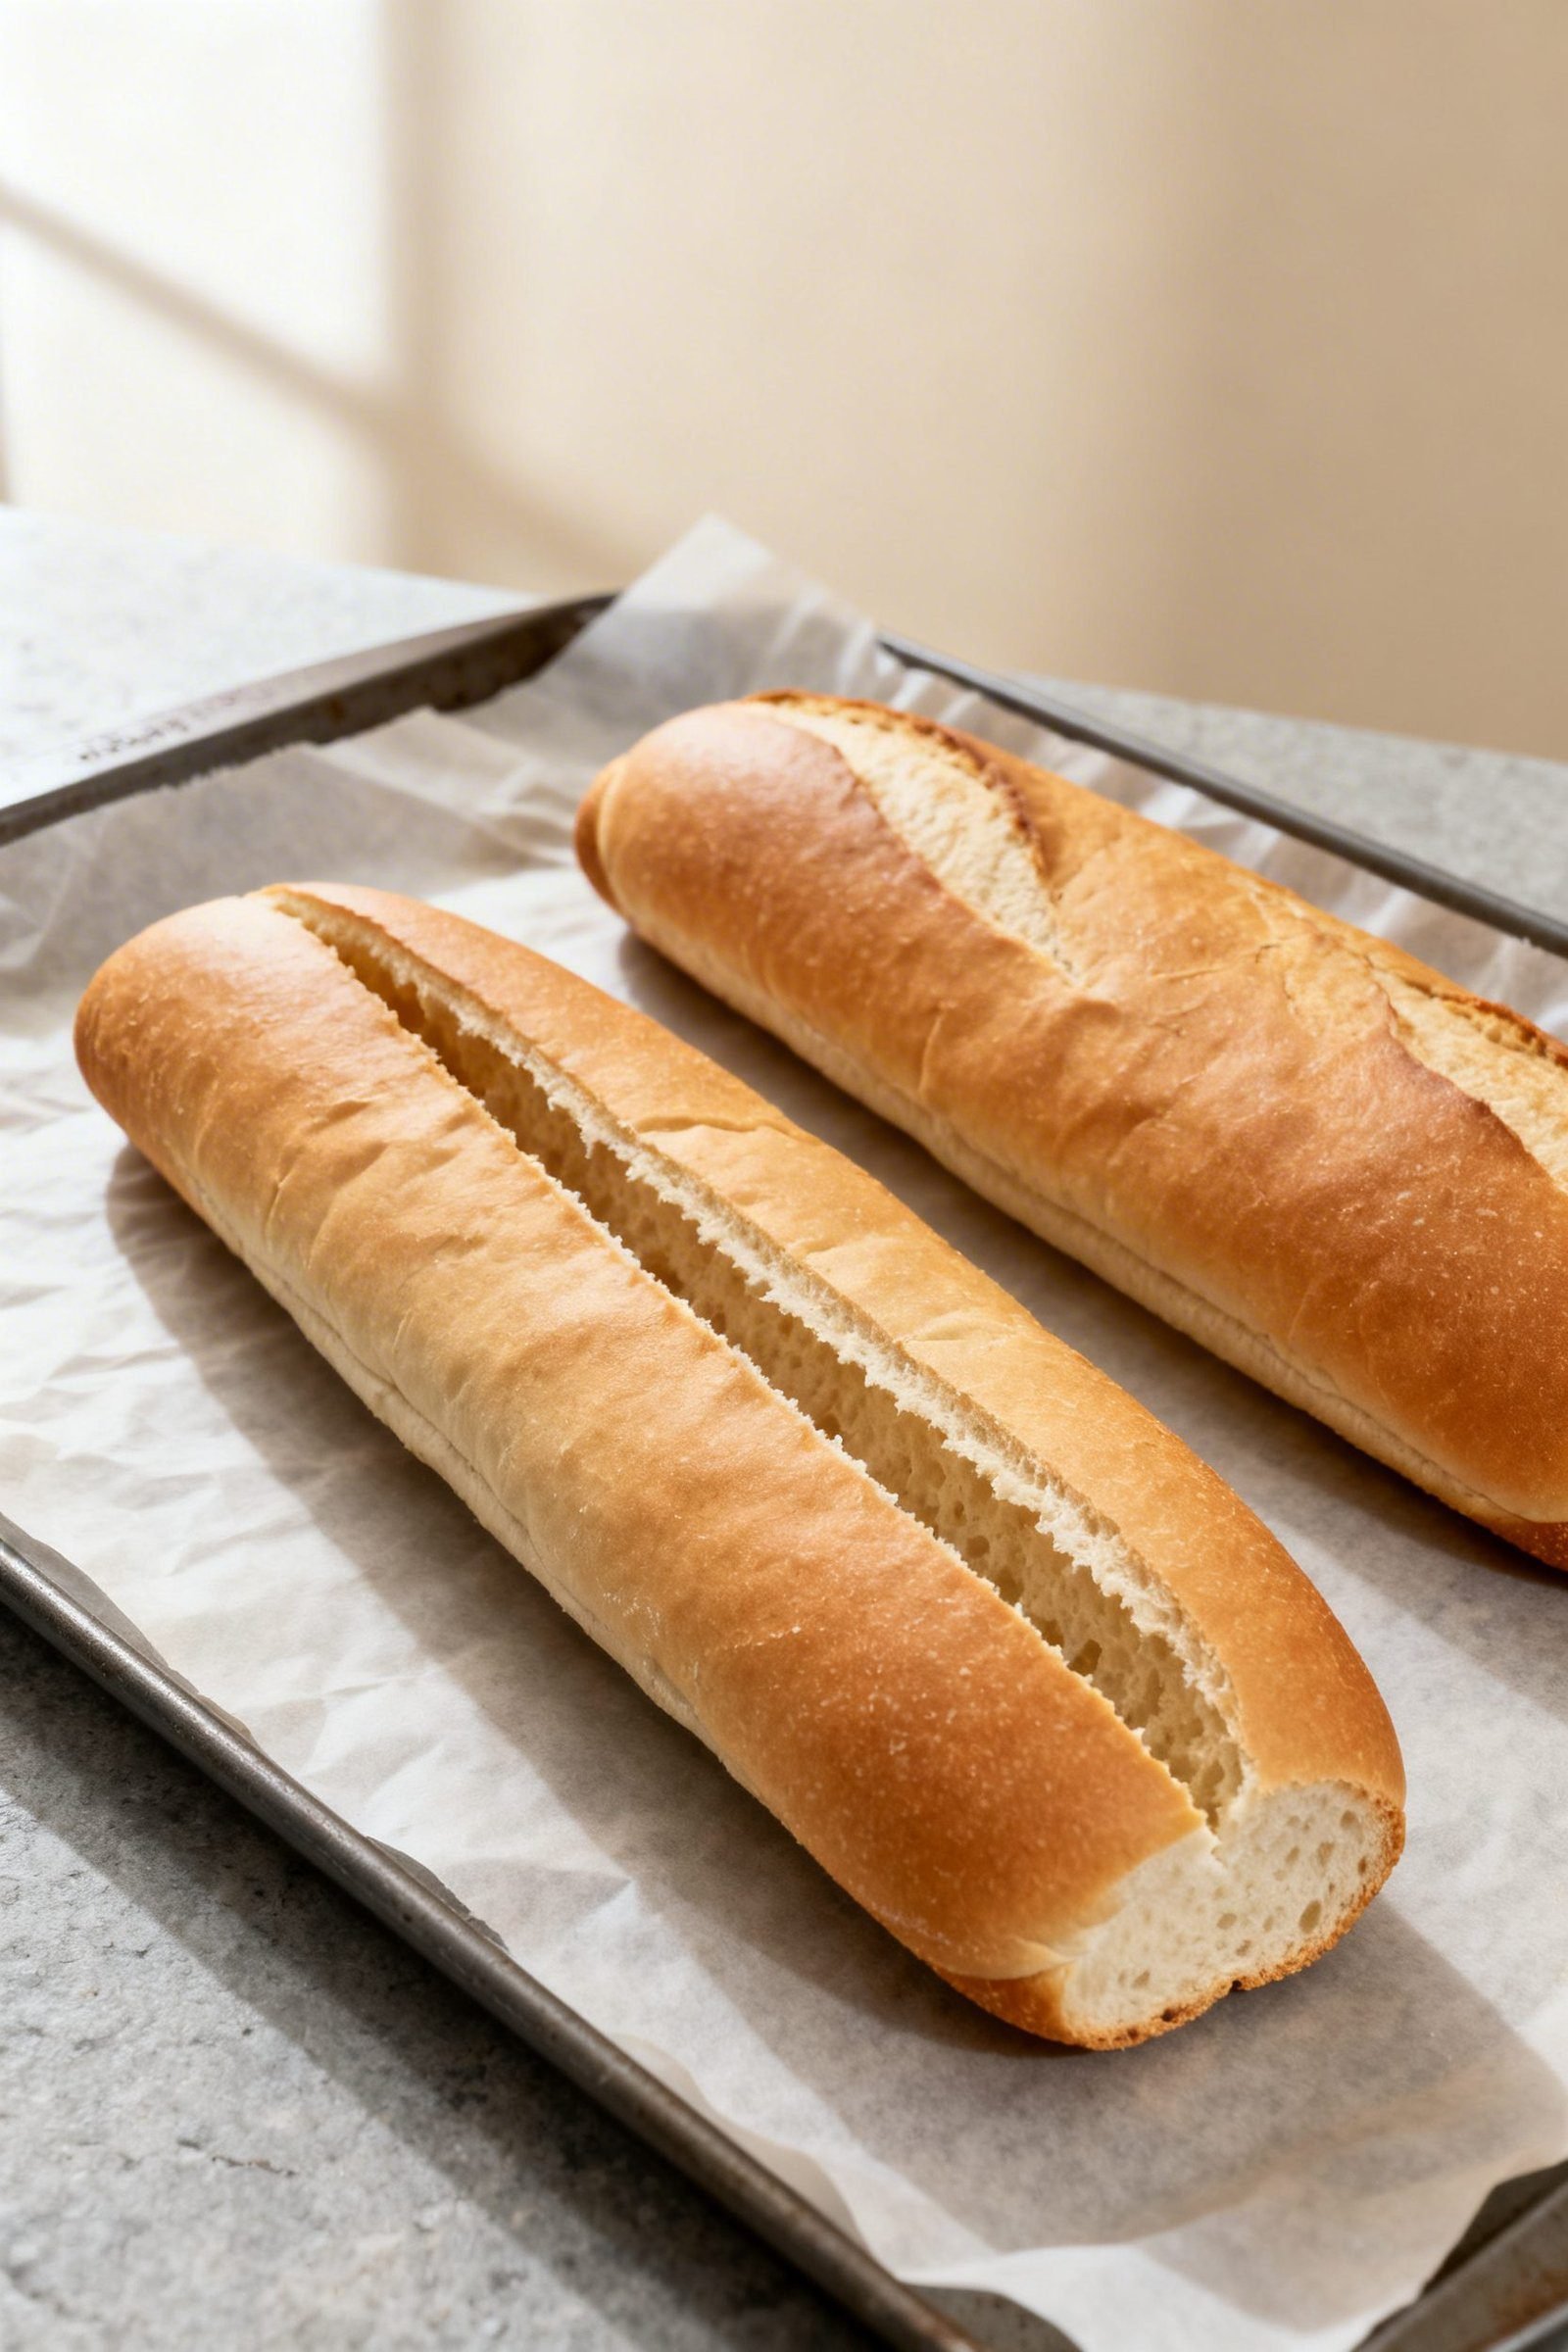
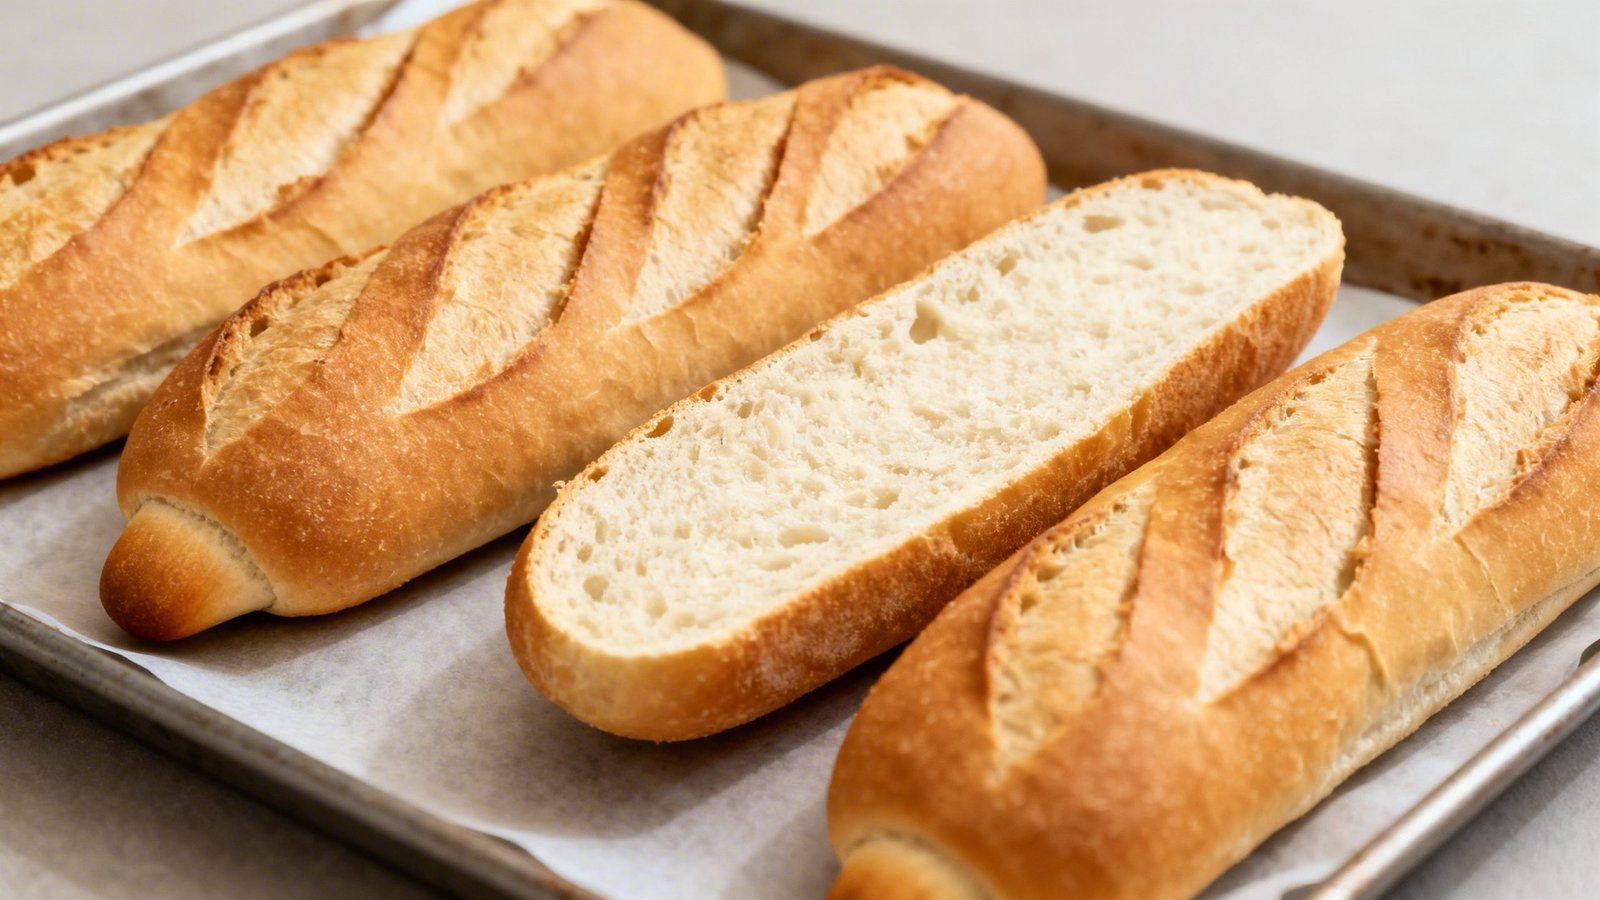
- Bake the rolls on the middle rack for 16–20 minutes, until deeply golden and the centers reach about 195–200°F.
- Cool on a wire rack at least 20 minutes before slicing. The crumb sets as it cools, which keeps the texture soft and bouncy.
How to Store Fresh Hoagie Rolls
- Room temp: Store completely cooled rolls in an airtight bag for up to 3 days. Add a paper towel to absorb excess moisture.
- Freeze: Wrap each roll tightly, then place in a freezer bag. Freeze up to 3 months. Thaw at room temp in the bag to keep them soft.
- Refresh: Warm rolls in a 325°F oven for 5–7 minutes to revive softness and aroma.
- Pre-slice smart: If you plan to freeze, slice almost through before freezing so the rolls open easily after thawing.
Benefits of Baking Your Own Hoagie Rolls
- Superior texture: A tender interior that still holds saucy fillings without sogging out.
- Clean ingredients: You control the salt, sugar, and fats—no additives needed.
- Custom size: Shape 6 big subs for hearty sandwiches or 8 smaller rolls for lunches.
- Better flavor: Fresh-baked aroma and a hint of buttery richness you never get from store-bought.
- Budget-friendly: Simple pantry staples turn into bakery-quality bread at a fraction of the cost.
What to Avoid for Best Results
- Don’t rush the rise: Under-proofed rolls split oddly and bake dense. Wait for that puffy, slow spring-back test.
- Don’t drown the dough in flour: Slight tackiness means good hydration. Too much flour makes tough rolls.
- Don’t skip the score: The slit guides expansion and prevents blowouts.
- Don’t overbake: Aim for golden brown with a soft crackle. Prolonged baking dries the crumb.
- Don’t shape too loosely: A tight roll creates structure and a neat bakery look.
Easy Variations to Try
- Sesame or poppy seed: Brush with egg wash and sprinkle seeds before baking.
- Italian herb: Add 1–2 teaspoons dried Italian seasoning and a pinch of garlic powder to the dough.
- Whole wheat blend: Swap 1 cup bread flour for whole wheat flour; add 1 extra tablespoon water if needed.
- Onion-topped: Press dehydrated minced onion onto egg-washed rolls for deli-style flavor.
- Garlic butter finish: Brush warm rolls with melted butter mixed with garlic and parsley.
FAQ
Can I use active dry yeast?
Yes. Use the same amount. Bloom it in the warm water, milk, and sugar for 10 minutes until foamy before mixing in flour and salt.
Why did my rolls spread too much?
Likely under-kneading or over-proofing. Knead until the dough feels elastic and passes a gentle windowpane test. Proof only until puffy and slightly springy.
How do I get a chewier crust?
Bake at 425°F for the first 8 minutes with steam, then lower to 400°F to finish. Skip the egg wash and mist the rolls with water just before baking.
Can I make the dough ahead?
Yes. After the first rise, gently deflate, cover, and refrigerate up to 24 hours. Shape cold, proof slightly longer, and bake.
What if I don’t have bread flour?
Use all-purpose flour and add 1 tablespoon vital wheat gluten if you have it. If not, expect slightly softer structure but still great rolls.
How do I get that classic split-top look?
Score one shallow, confident line down the center with a sharp blade at a slight angle. Bake with steam for best expansion.
Conclusion
With a few pantry staples and a little shaping practice, you can bake soft, sturdy hoagie rolls that upgrade every sandwich you make. The dough comes together easily, proofs reliably, and bakes with gorgeous color and lift. Once you taste them warm from the oven, you’ll skip the store-bought pack every time. Line up your fillings, split a roll, and build the sub of your dreams—fresh, fragrant, and truly bakery style.
Homemade Hoagie Roll Recipe | Soft Bakery Style Sandwich Rolls
Soft, sturdy hoagie rolls with a fluffy interior and lightly chewy crust, perfect for hearty sandwiches.
Ingredients
- Bread flour: 4 cups (500 g), spooned and leveled
- Warm water: 1 cup (240 ml), about 105–110°F
- Warm milk: ½ cup (120 ml), about 105–110°F
- Instant yeast: 2 ¼ teaspoons (1 packet)
- Granulated sugar: 2 tablespoons
- Kosher salt: 2 teaspoons
- Unsalted butter: 3 tablespoons, very soft
- Olive oil: 1 tablespoon for greasing the bowl
- Cornmeal or parchment: for lining the baking sheet
- Egg wash: 1 egg beaten with 1 tablespoon water (optional, for shine)
- Water for steam: 1 cup, added to a hot pan in the oven
Instructions
- Whisk warm water, warm milk, sugar, and yeast in a large bowl; let stand 5 minutes until foamy.
- Add bread flour and salt; stir until a shaggy dough forms.
- Add softened butter and knead 8–10 minutes by hand (or 6–7 minutes on medium in a stand mixer) until smooth, elastic, and slightly tacky.
- Lightly oil a clean bowl, place dough inside turning to coat, cover, and let rise until doubled, about 60–90 minutes.
- Turn dough onto a lightly floured surface, gently deflate, and divide into 6 pieces for large rolls or 8 for smaller.
- Pre-shape each piece into a loose ball; cover and rest 10 minutes.
- Flatten one piece into a 5×7-inch rectangle, fold long edges toward center and seal, forming a tight cylinder.
- Roll to 7–9 inches long, tapering ends slightly; place seam-side down on a parchment-lined or cornmeal-dusted sheet pan. Repeat with remaining pieces, spacing 2 inches apart.
- Cover rolls lightly with greased plastic wrap and proof until puffy and nearly doubled, 35–55 minutes; they should spring back slowly when gently pressed.
- Preheat oven to 400°F (200°C) with an empty metal pan on the bottom rack for steam.
- Brush rolls with egg wash if using and score one shallow slit down the center of each roll.
- Carefully pour 1 cup hot water into the preheated pan to create steam; close oven door quickly.
- Bake on the middle rack for 16–20 minutes, until deeply golden and centers reach 195–200°F.
- Cool on a wire rack at least 20 minutes before slicing.