
Soft Milk Mochi Recipe | Easy Chewy Homemade Japanese Mochi Dessert
Craving something chewy, silky, and slightly sweet? This soft milk mochi hits the spot every time. It’s a Japanese-inspired stovetop dessert that uses glutinous rice flour, milk, and sugar to create a bouncy, tender bite. Roll it in toasted kinako, coat it in coconut, or dust it with cornstarch and fill it with fruit—the texture steals the show.
You don’t need special equipment or tricky techniques. If you can stir a pot and whisk a slurry, you can make this. I’ll walk you through the process, share pro tips to avoid stickiness, and give you storage options so your milk mochi stays pillowy for days.
Why This Soft Milk Mochi Recipe Works
- Simple pantry ingredients: Glutinous rice flour (mochiko), milk, sugar, butter, and cornstarch for dusting. That’s it.
- Ultra-creamy texture: Milk and a touch of butter keep the mochi soft, tender, and pleasantly chewy without toughness.
- Foolproof stovetop method: A gentle cook and steady stirring transform the batter into glossy, stretchy mochi in minutes.
- Customizable flavor: Vanilla, matcha, cocoa, or even coffee easily blend into the base.
- Make-ahead friendly: The mochi sets in the fridge and slices cleanly, perfect for prepping ahead of guests.
Ingredients
- Glutinous rice flour (mochiko): 1 cup (not regular rice flour). This creates the classic chewy texture.
- Granulated sugar: 1/3–1/2 cup, to taste. I like 1/3 cup for a lightly sweet finish.
- Whole milk: 1 1/4 cups, warmed. You can use 2% if you prefer a lighter bite.
- Unsalted butter: 1 tablespoon, for softness and shine.
- Cornstarch or potato starch: for dusting, so nothing sticks.
- Vanilla extract: 1 teaspoon for a cozy, dessert-like aroma.
- Optional flavor boosts: 1–2 teaspoons matcha powder, 1 tablespoon cocoa powder, or a pinch of salt to balance sweetness.
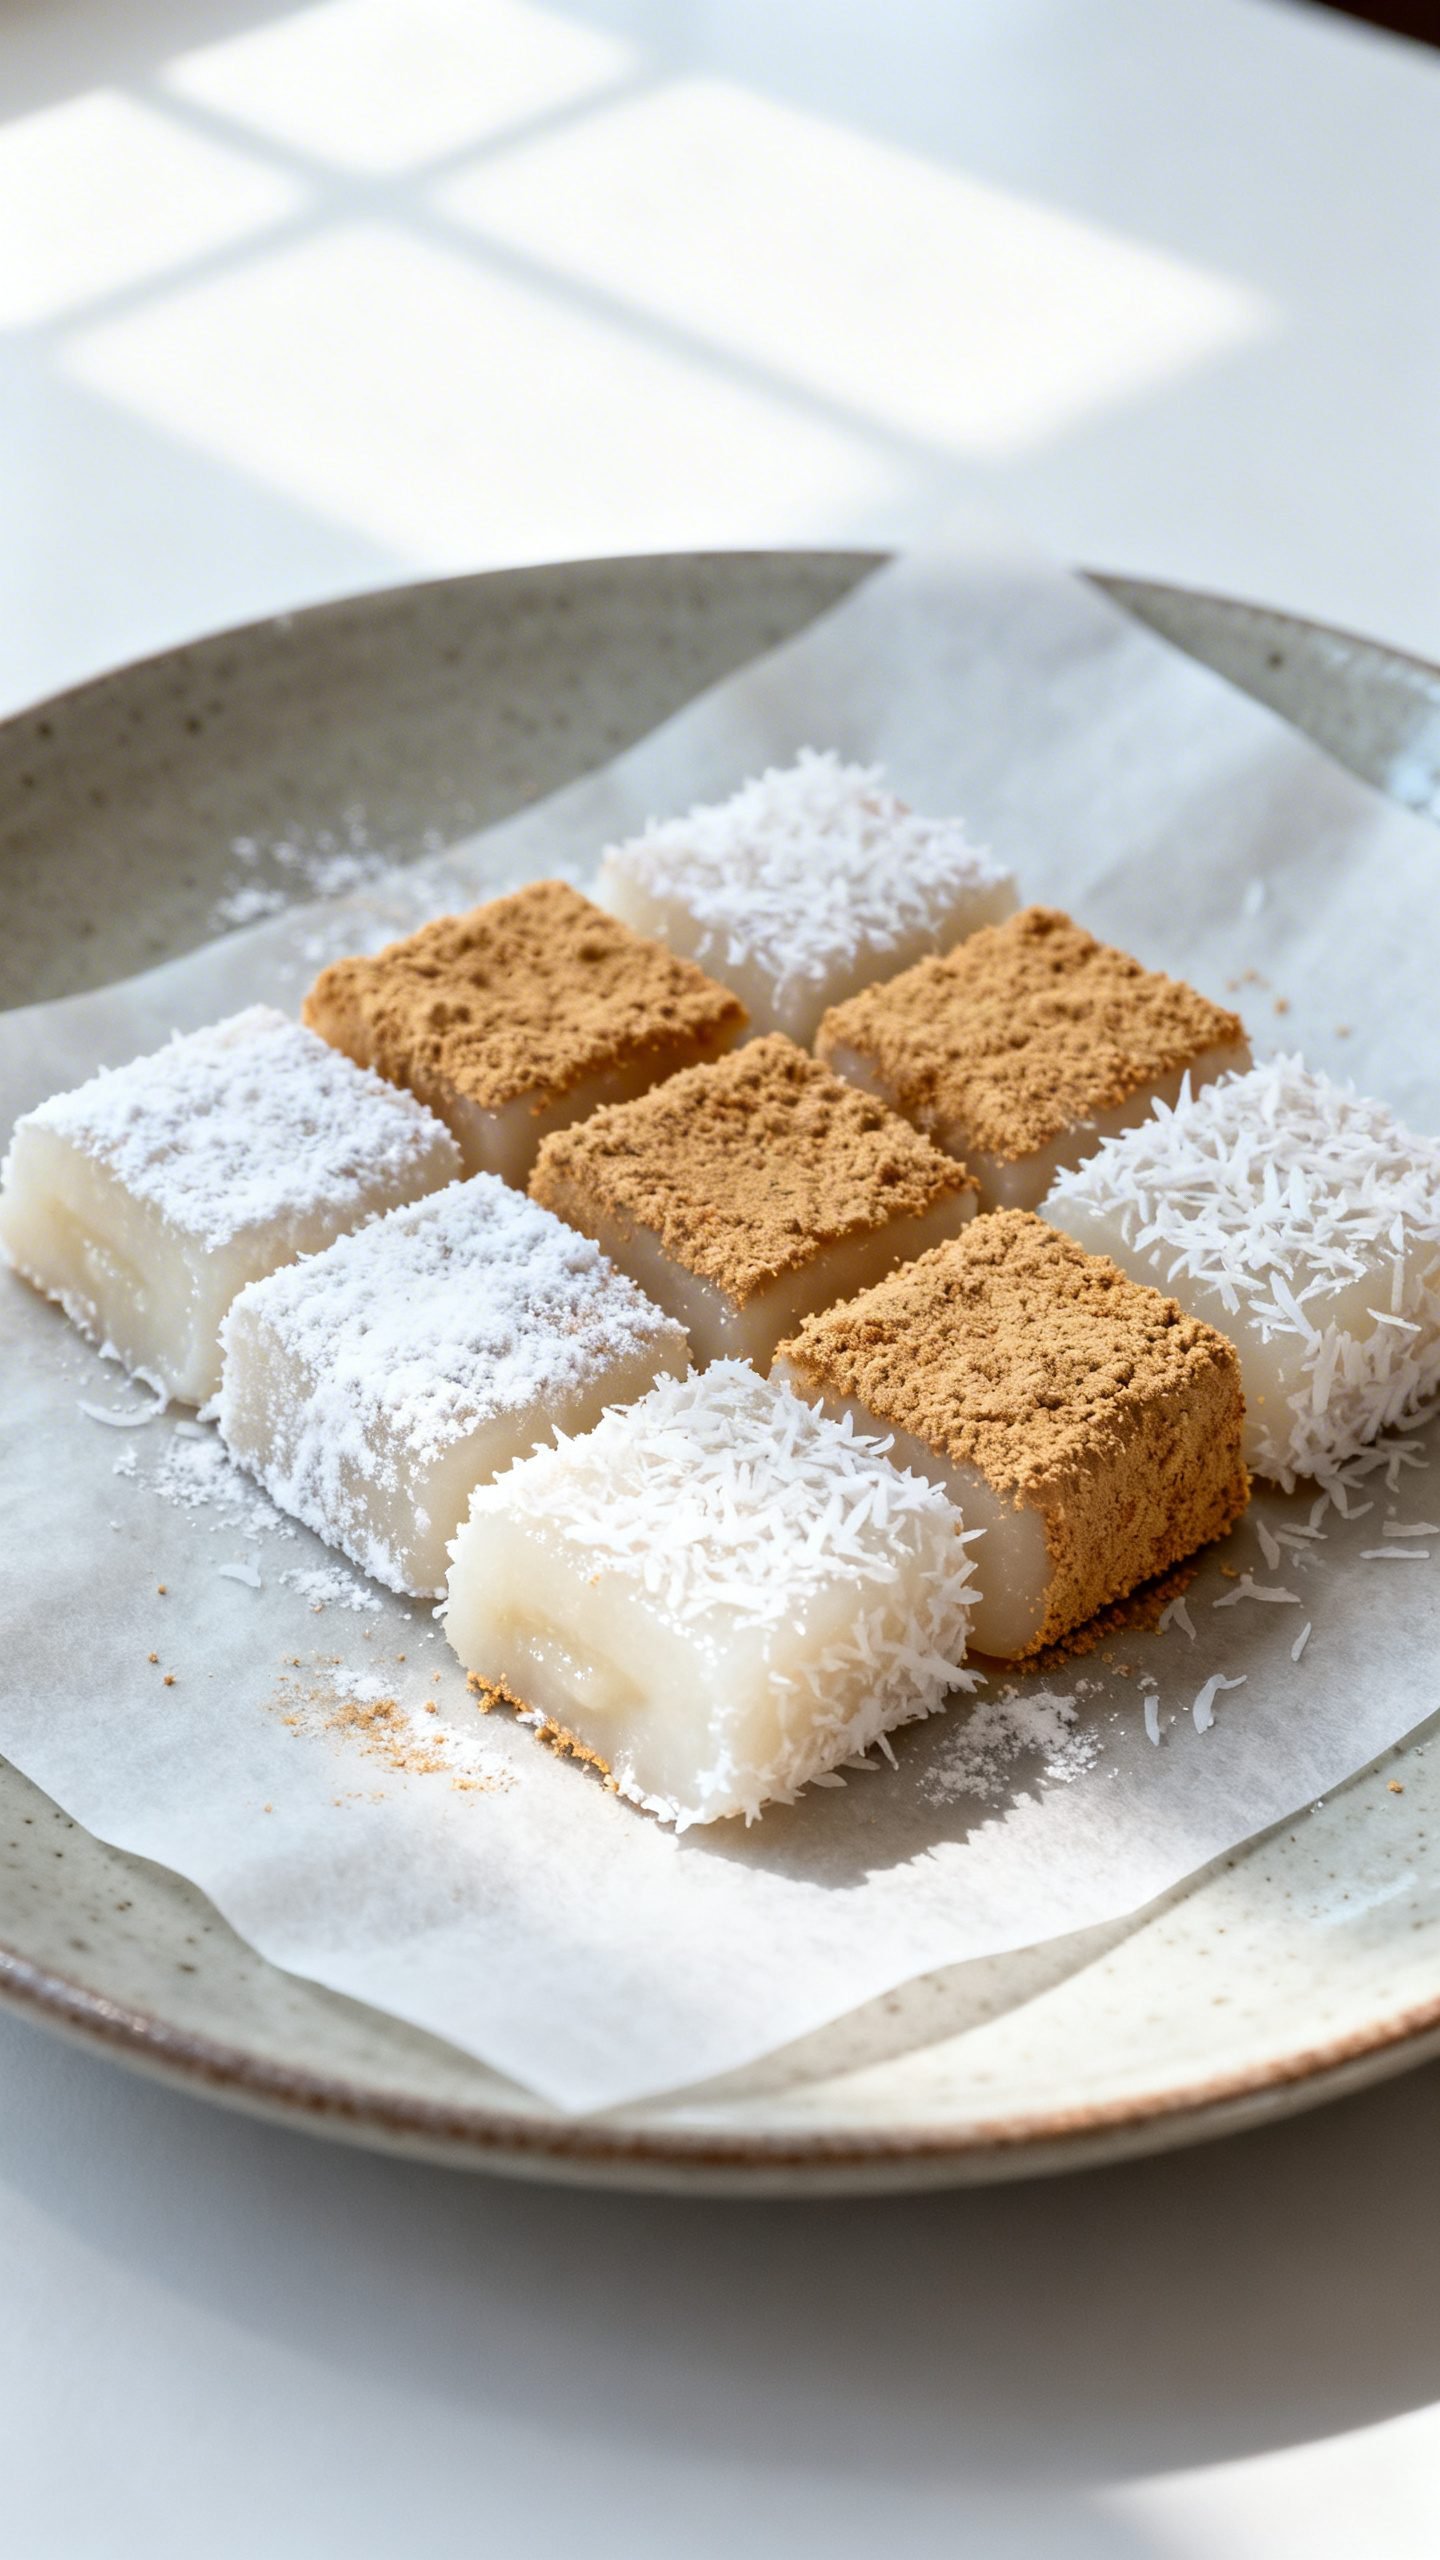
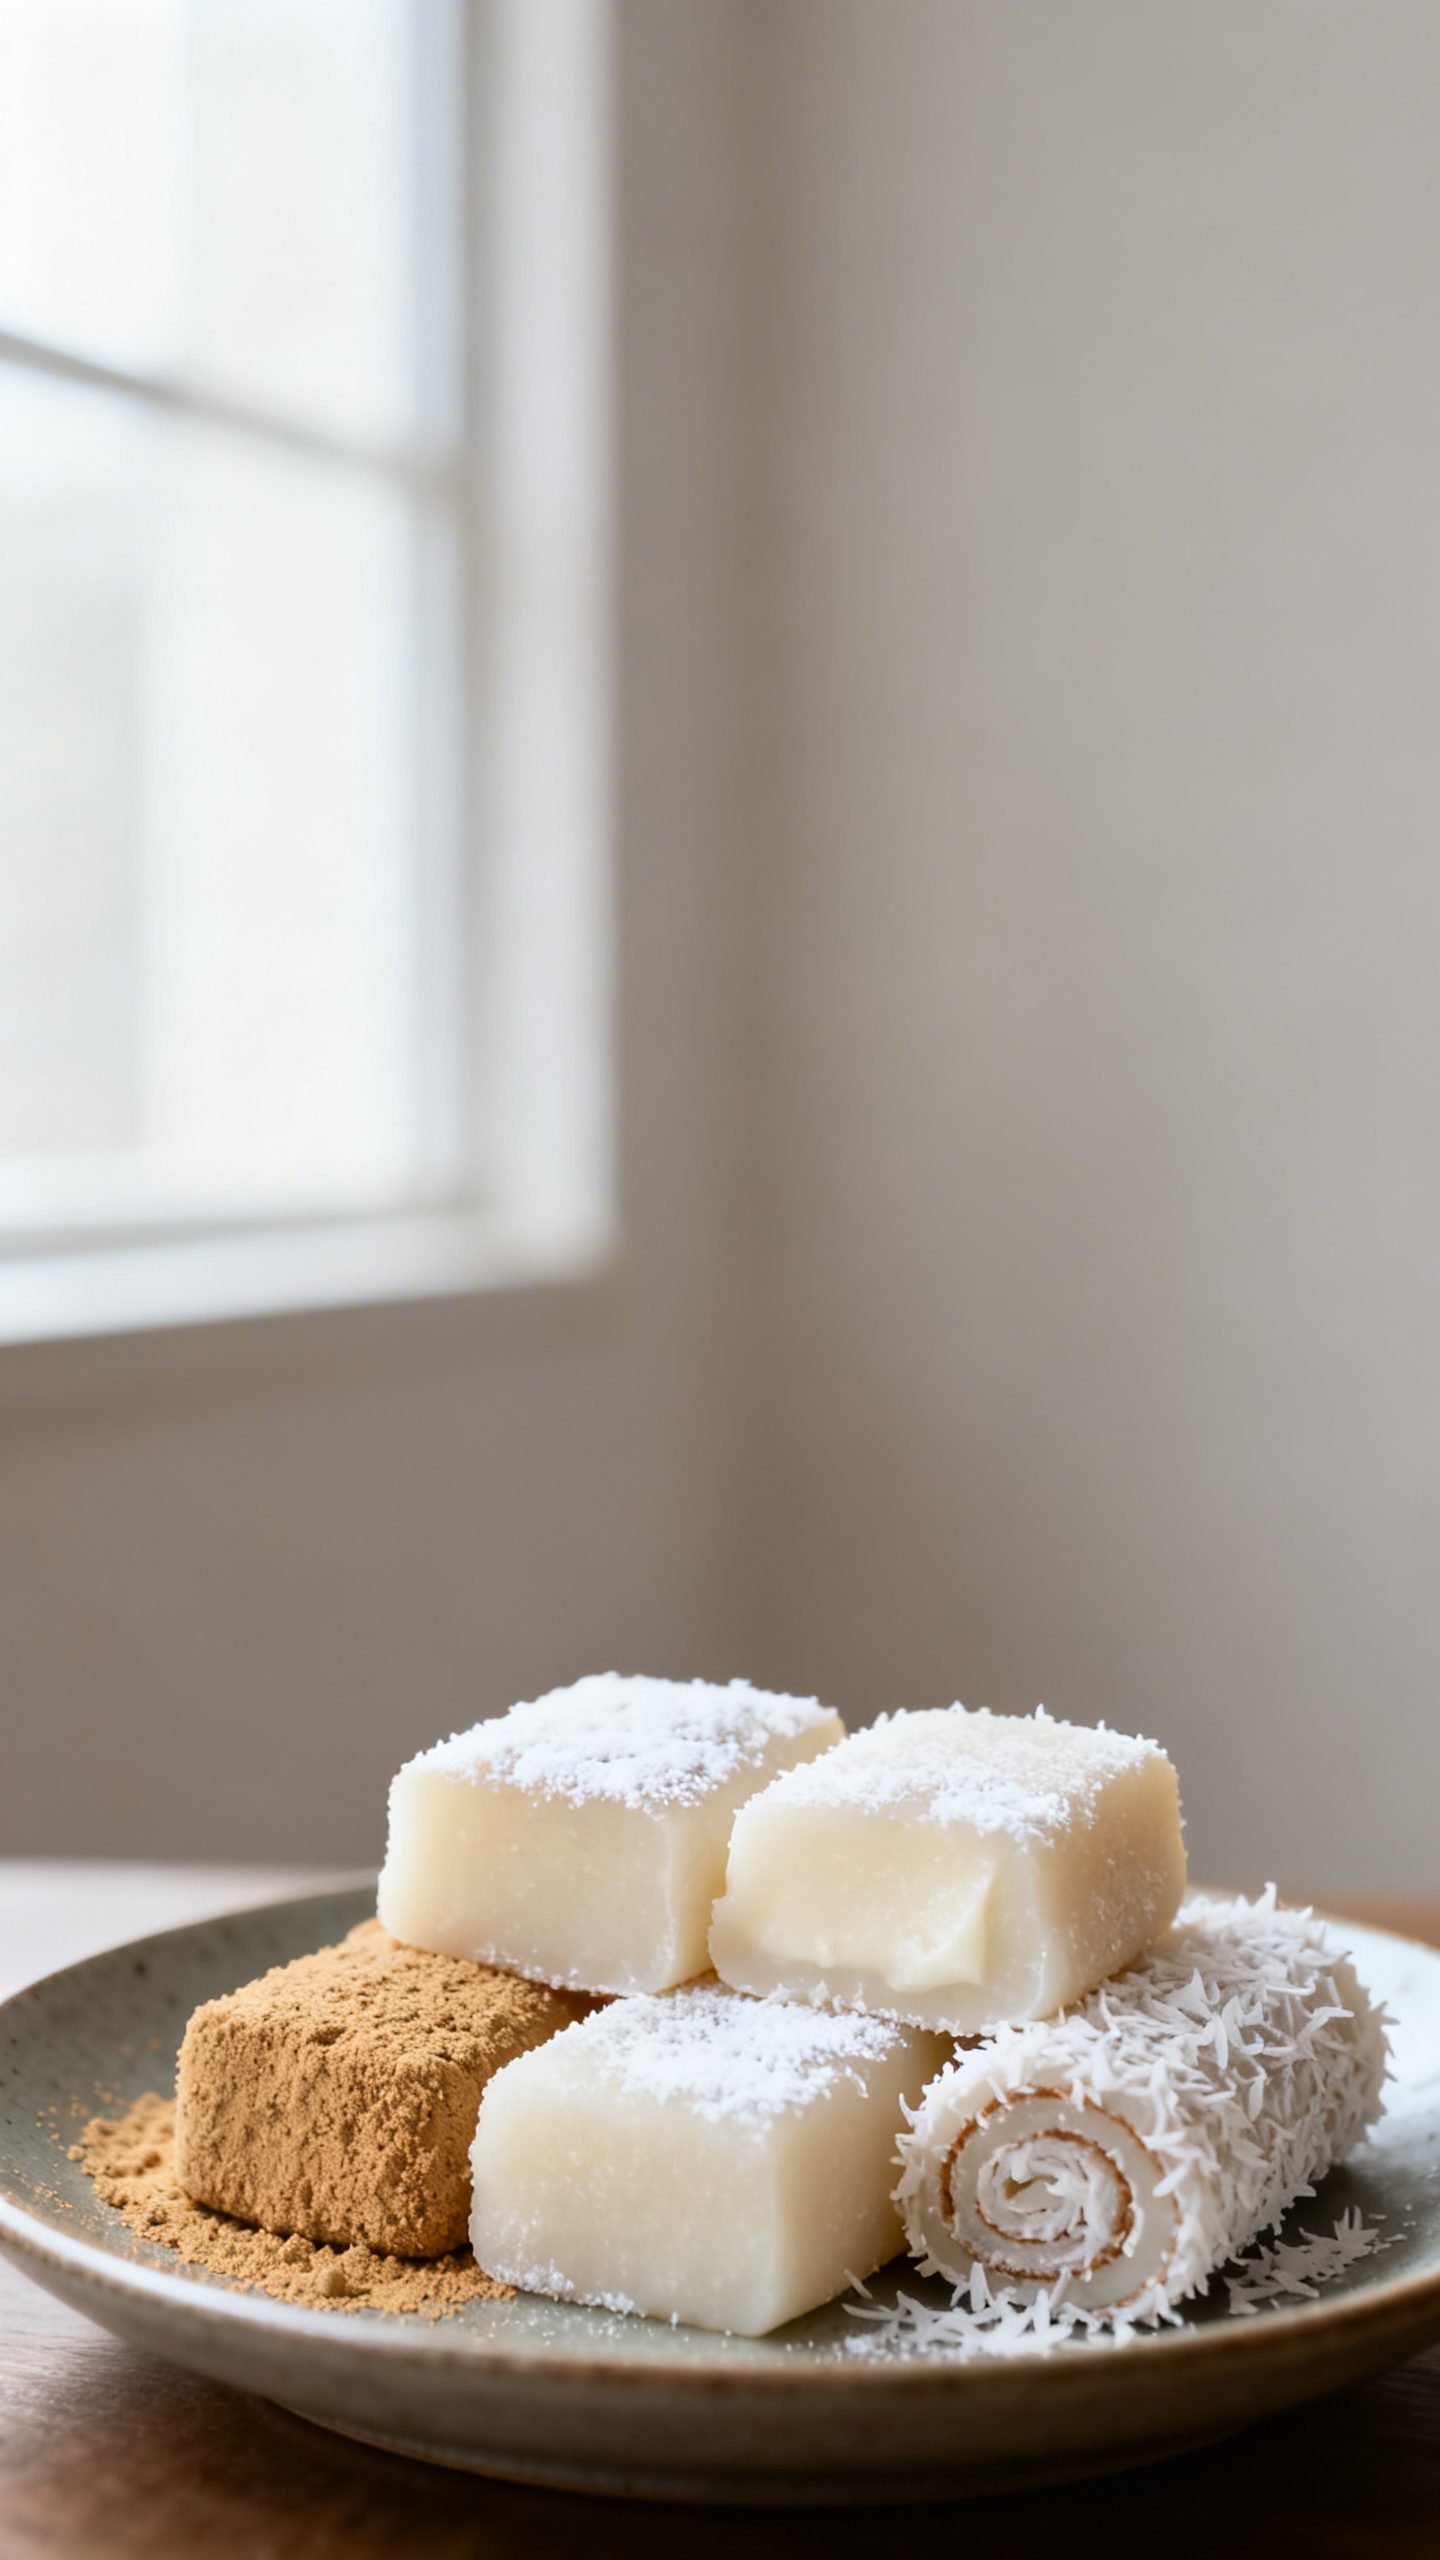
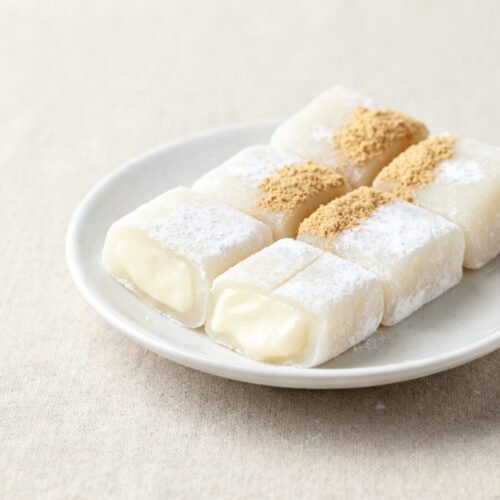
- Optional coatings: Kinako (roasted soybean flour + sugar), shredded coconut, powdered sugar, or a cocoa-cornstarch mix.
How to Make Soft Milk Mochi at Home
1) Prep your pan and tools
- Line a small square pan (6–7 inches) with parchment. Lightly dust with cornstarch to prevent sticking.
- Set out a sturdy spatula or wooden spoon and a whisk. Keep extra starch nearby for dusting.
2) Whisk the batter
- In a saucepan off the heat, whisk mochiko and sugar together until no lumps remain.
- Slowly pour in the warm milk while whisking. Add vanilla and butter.
- Whisk until the batter looks smooth and fluid, like thin pancake batter.
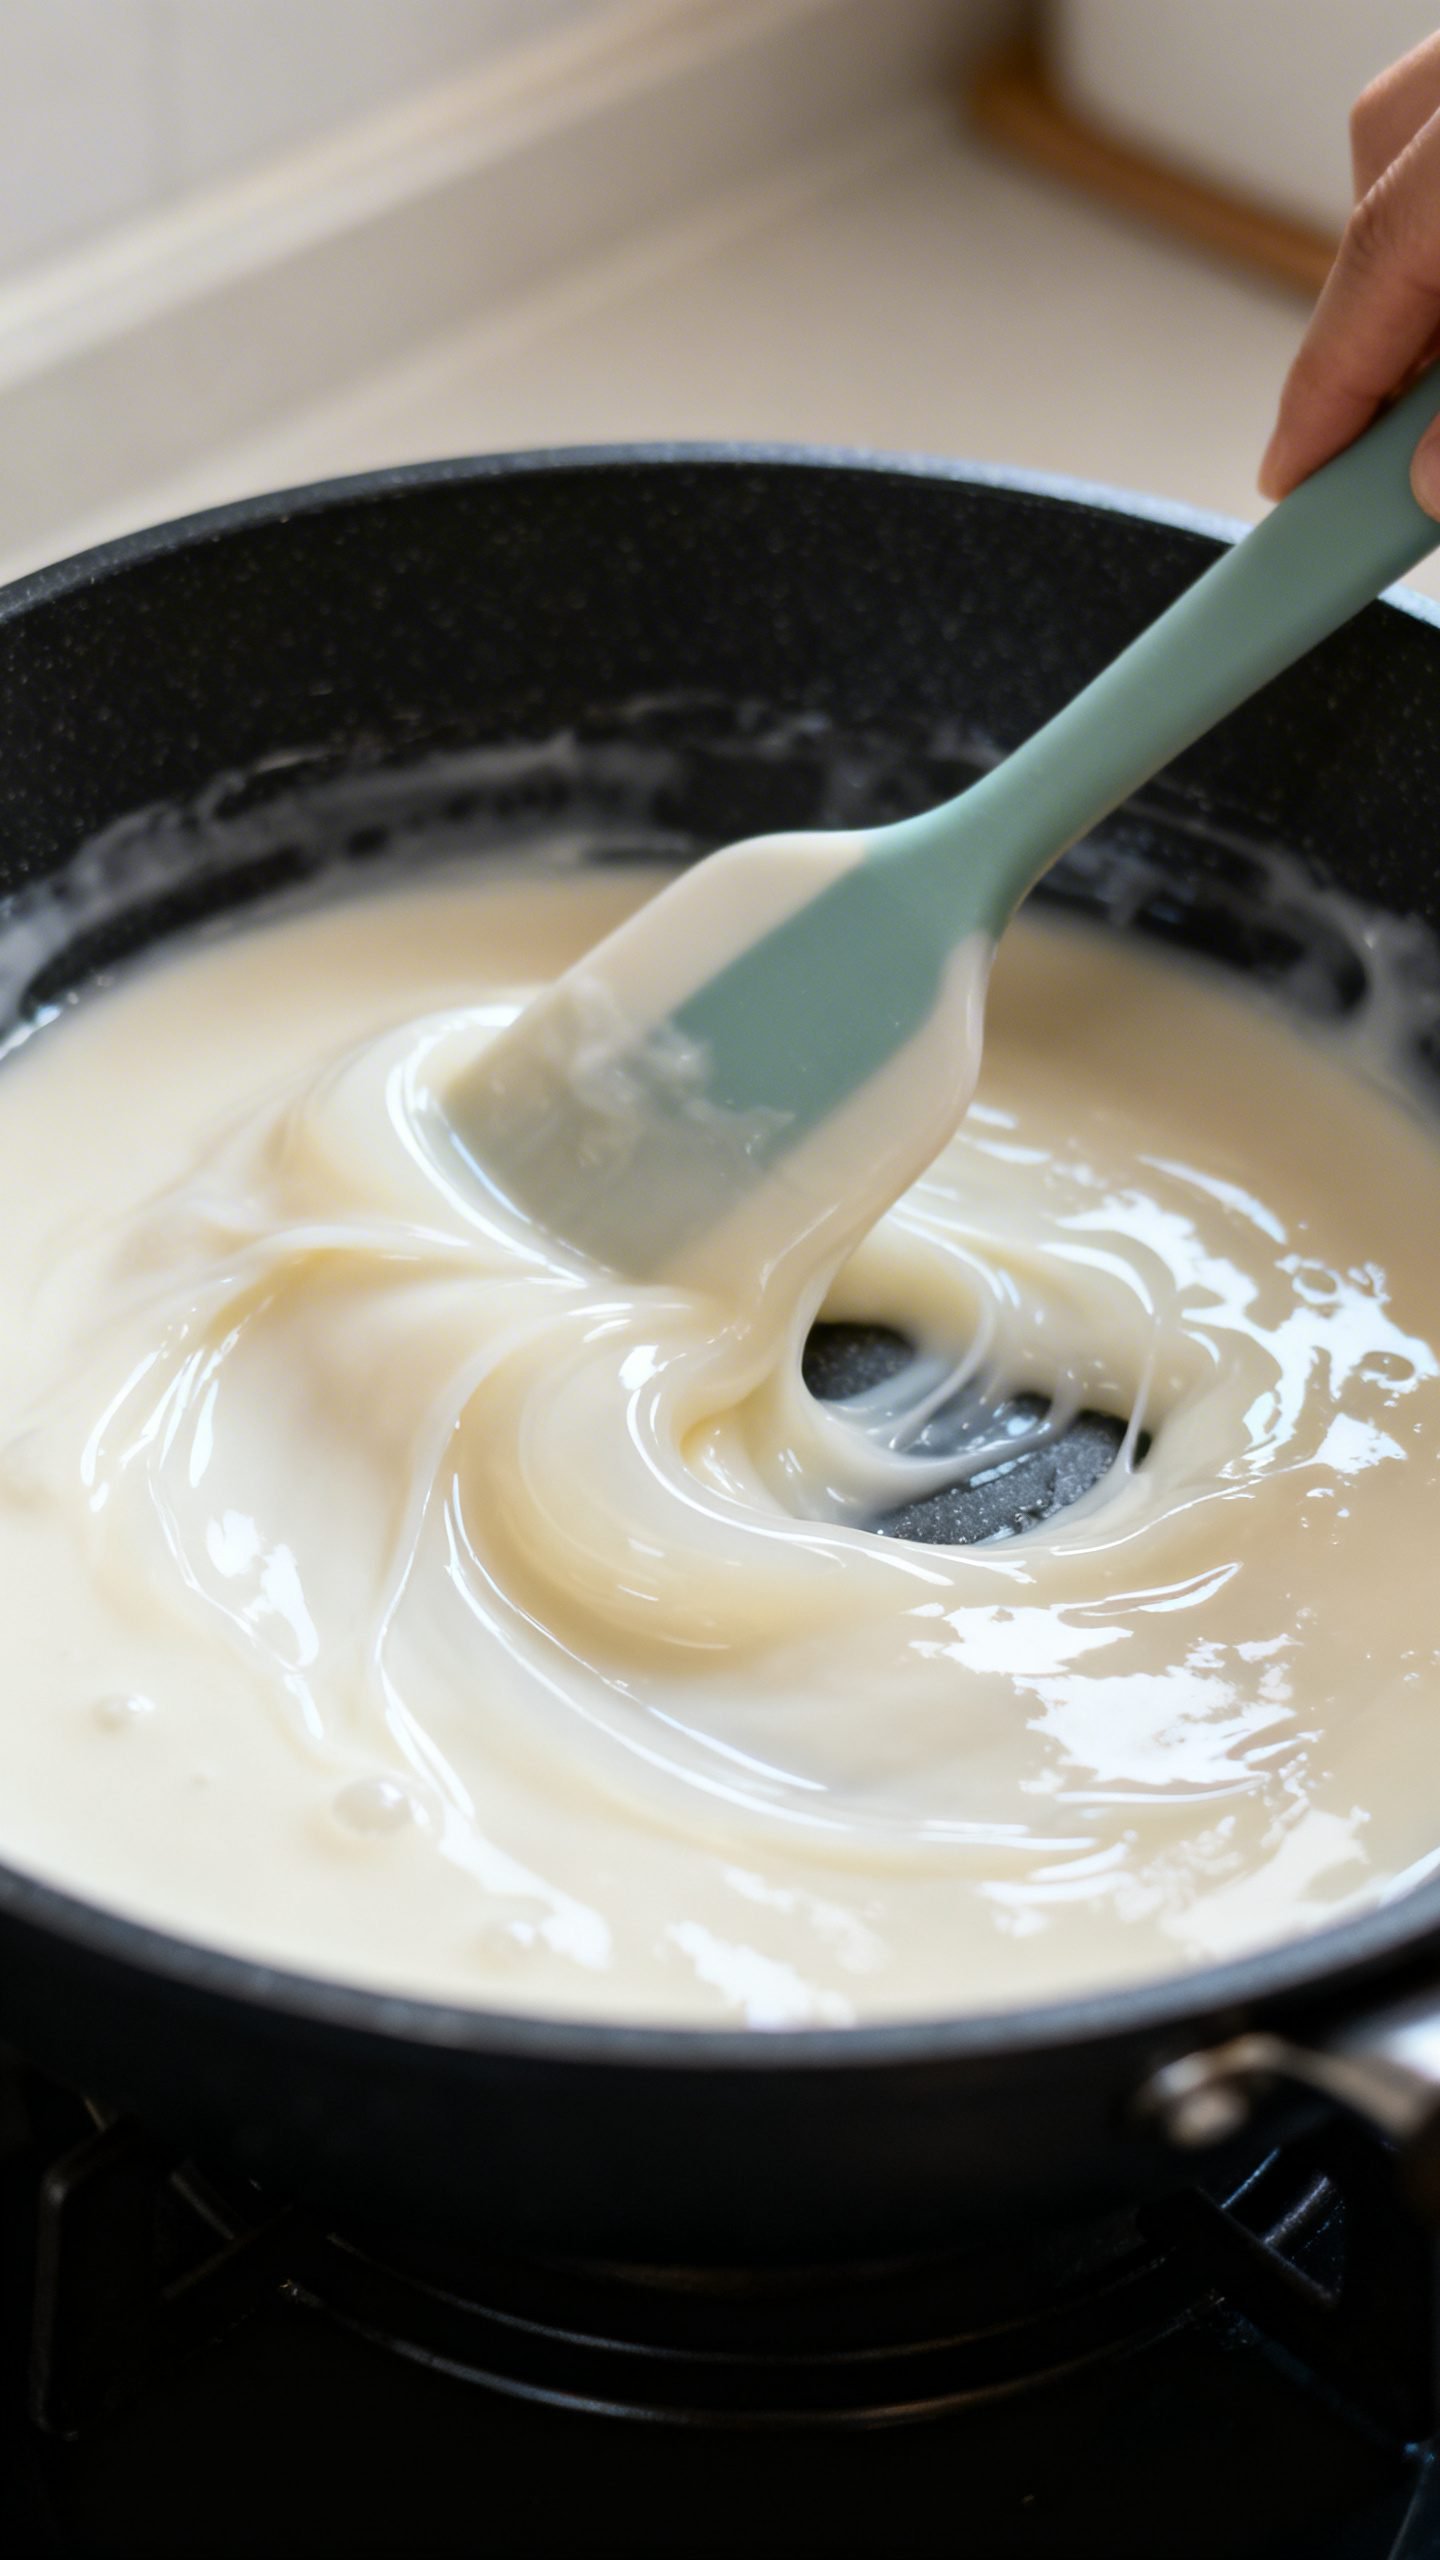
3) Cook to glossy and stretchy
- Place the pan over medium-low heat. Stir constantly with a spatula, scraping the bottom and sides.
- After 3–5 minutes, the mixture thickens. Keep stirring until it turns translucent, shiny, and stretchy, with no chalky streaks.
- This step matters. If it looks opaque or grainy, cook another minute while stirring.
4) Transfer and smooth
- Scrape the hot mochi into the prepared pan.
- Dust the top lightly with cornstarch and use a spatula (dusted) to press and smooth an even layer about 3/4 inch thick.
- Let it cool to room temperature, then cover and refrigerate for 1–2 hours until set and easy to slice.
5) Cut and coat
- Dust a board with cornstarch. Flip the slab of mochi out and peel off the parchment.
- Dust a knife with starch and cut into 1–1.5 inch squares or rectangles.
- Coat each piece in cornstarch, kinako-sugar, or coconut so they don’t stick together.
Helpful tips
- Control the heat: Too hot and it clumps; too low and it takes forever. Medium-low keeps the texture silky.
- Stir, stir, stir: Continuous stirring prevents scorching and ensures even gelatinization.
- Flavor add-ins: Sift matcha or cocoa into the flour to avoid lumps. Add coffee or tea concentrates with the milk.
- Sweetness check: Taste a tiny dab during cooking and adjust with a sprinkle of sugar if needed.
How to Store Soft Milk Mochi
- Room temperature (same day): Keep covered for up to 6 hours if your kitchen runs cool and dry.
- Refrigerator (best for 2–3 days): Place pieces in an airtight container with parchment between layers. Dust lightly with starch before stacking.
- Freezer (for longer storage): Freeze pieces on a tray until firm, then bag with as much air removed as possible. Thaw at room temperature 20–30 minutes.
- Texture check: Refrigeration can firm the mochi. Soften by leaving it out for 10–15 minutes before serving.
Benefits of Making Milk Mochi at Home
- Custom sweetness and flavor: Dial sweetness up or down and swap in matcha, vanilla, or cocoa.
- Better texture control: Freshly made mochi stays soft and bouncy without drying out.
- Budget-friendly: A single bag of mochiko makes multiple batches for the cost of one store-bought tray.
- Gluten-free by nature: Glutinous rice flour contains no gluten, so it suits many diets.
- Fun and fast: From stovetop to snack in under an hour of hands-on time.
What Not to Do
- Don’t use regular rice flour: It lacks the sticky starches needed for chew. Only use glutinous rice flour (mochiko or shiratamako).
- Don’t crank the heat: High heat scorches the bottom and creates rubbery clumps.
- Don’t stop stirring: Inconsistent stirring leads to lumps and uneven texture.
- Don’t skip the starch dusting: Undusted mochi sticks to everything—knife, board, fingers.
- Don’t slice while hot: Warm mochi stretches and tears. Let it set for clean cuts.
Variations You Can Try
- Matcha Milk Mochi: Sift 1–2 teaspoons matcha into the flour. Coat in sweetened kinako for a nutty finish.
- Cocoa or Chocolate: Add 1 tablespoon cocoa powder to the batter. Serve with a dusting of cocoa-cornstarch and shaved chocolate.
- Black Sesame: Stir in 1–2 tablespoons finely ground black sesame and a pinch of salt. Coat with sesame-sugar.
- Coconut Mochi: Swap half the milk for coconut milk. Roll pieces in lightly toasted shredded coconut.
- Strawberry Milk: Mix 1–2 tablespoons freeze-dried strawberry powder into the flour. Finish with powdered sugar.
- Filled Mochi Bites: Flatten cut pieces slightly and sandwich a small strawberry or a dab of sweet red bean paste in the center.
FAQ
What’s the difference between mochiko and shiratamako?
Mochiko is a fine, smooth glutinous rice flour great for batters and stovetop mochi. Shiratamako has coarser granules that hydrate differently and often yield a slightly springier texture. Use either, but mochiko mixes more easily.
Can I make this dairy-free?
Yes. Use full-fat coconut milk or oat milk and swap the butter for neutral oil or vegan butter. The texture stays soft, but coconut milk adds a mild coconut note.
Why did my mochi turn tough?
You likely overcooked it or used too high heat. Cook gently until just translucent and glossy, then stop. Measure flour carefully and avoid extra-long cooking.
How do I prevent sticking while cutting?
Dust your board, knife, and hands with cornstarch. Re-dust as needed. Work quickly and keep the mochi cool for cleaner cuts.
Can I color the mochi?
Absolutely. Add a few drops of gel food coloring or natural powders like matcha, beet, or butterfly pea to the batter before cooking.
Is milk mochi the same as daifuku?
Not exactly. Milk mochi is a simple, sliceable, sweet mochi. Daifuku is stuffed mochi typically filled with anko or fruit. You can adapt this base to make filled pieces, though.
Conclusion
This soft milk mochi delivers that perfect chewy bounce with an ultra-smooth, milky finish—and you can make it with just a handful of ingredients. Keep the heat gentle, stir consistently, and dust well. Then slice, coat, and enjoy. Once you nail the base, flavor variations come easy and the batch disappears fast. Make a pan today and treat yourself to the chewiest, coziest homemade dessert.
Soft Milk Mochi Recipe | Easy Chewy Homemade Japanese Mochi Dessert
Ingredients
Ingredients
- 1 cup glutinous rice flour (mochiko; not regular rice flour)
- 1/3–1/2 cup granulated sugar, to taste
- 1 1/4 cups whole milk, warmed (or 2% for lighter)
- 1 tablespoon unsalted butter
- 1 teaspoon vanilla extract
- Cornstarch or potato starch, for dusting
- Optional: 1–2 teaspoons matcha powder
- Optional: 1 tablespoon cocoa powder
- Optional: pinch of salt
- Optional coatings: kinako mixed with sugar, shredded coconut, powdered sugar, or cocoa-cornstarch mix
Instructions
Instructions
- Line a 6–7 inch square pan with parchment and lightly dust it with cornstarch; set out a whisk and sturdy spatula.
- Off heat, whisk mochiko and sugar in a saucepan until no lumps remain.
- Slowly pour in the warm milk while whisking, then add vanilla and butter and whisk until smooth and fluid.
- Place over medium-low heat and stir continuously, scraping bottom and sides, until thickened, translucent, glossy, and stretchy with no chalky streaks, about 3–5 minutes more as needed.
- Scrape the hot mochi into the prepared pan, dust the top lightly with cornstarch, and press into an even 3/4-inch layer.
- Let cool to room temperature, then cover and refrigerate 1–2 hours until set.
- Dust a board and knife with cornstarch, release the mochi from the pan, and cut into 1 to 1.5 inch squares or rectangles.
- Coat each piece in cornstarch, kinako-sugar, or coconut to prevent sticking and serve.


